HOW TO PROPAGATE DAFFODILS AND NARCISSUS

white daffodils in flower
How to propagate daffodils and narcissus


When it comes to propagating daffodils there are only two effective techniques that the gardener can employ - natural division by offset bulbs or bud initiation by scoring. Although daffodil seed viability is good, seed collection is not an effective way of propagating specific cultivars. Not only can it take between 5-7 years for a seedling to bloom, with so many modern hybrids around you cannot guarantee either the shape or the colour your seedlings flower due to the high risk of further hybridization.

The easiest method is to let nature do its thing as daffodil bulbs will naturally reproduce by division as part of their yearly growing cycle. They are classed as tunicate bulbs as they are made up of a sequence of specialized fleshy and very broad scale leaves. As they grow the outer leaves become dry and membranous which help to protect the bulb against drying out. During the growing season apical buds will develop from the parent plants basal plate, which in time will produce the new flowering bulbs. However it will take at least another year before they are ready for separation and flowering.

The best time to remove these new bulbs is in late summer after the flower stalks have fully dried off. Carefully lift the bulbs and detach them from the parent bulb. They can then be planted into a fertile, free draining soil at approximately twice their own depth. Try to choose a site that has an open and sunny location away from excessive damp and strong winds.

With regards to propagating bulbs by scoring you can expect to produce far more bulbs using this technique than by using the natural division method. The process involves making two cuts at right angles through the bulbs basal plate. Using a sharp knife, make each cut to a depth of about 5 mm then allow the scored bulb to stand in a warm environment - at approximately 21 degrees Celsius - for 24 hours. This allows the cuts to open which can then be treated with a dusting of fungicide to prevent rots from developing. Set the bulb upside down on either a raised wire mesh or a tray of dry sand. Place back into a temperature of 21 degrees Celsius as this will encourage callusing which also helps to prevent infection from rots. Keep the bulb as dry as possible without it actually drying out. If resting on sand, you may wish to dampen it occasionally.

Within three months new bulbs would have developed on the cut surfaces. You can now plant the parent bulb on into a pot, but again it will need to be placed upside with the new bulbs just below the surface of the compost. In March the pot can be taken outside for hardening off. The new bulbs will then start to grow properly producing roots and leaves while the parent bulb slowly disintegrates as carbohydrates and nutrients are transferred on to its progeny. Bulbs that are produced this way usually only need to be grown on for a further two years before they are mature enough to start flowering. This method takes just as long as natural division but you can end up with three to four times the number of bulbs.
Main image credit - First Light under https://creativecommons.org/licenses/by-sa/3.0/deed.en

For related articles click onto the following links:

HOW TO PROPAGATE TULIPS

How to propagate tulips

Arguably the most colorful of all spring flowering plants, tulip bulbs are also amongst some of the easiest plants to propagate as they do all the hard work themselves. There are generally two ways that you can increase stocks of these stunning plants and that is either by seed collection or by removing the smaller offset bulbs which form at the base of the parent bulb. The advantage of using offset bulbs is that because they are genetically identical, meaning that they will grow true to the parent plant. Unfortunately collecting seed from modern cultivated bulbs will normally result in further hybridisation making plants grown from their seed genetically different to the parent. This is because they are easily pollinated by other closely related cultivars. So for this reason the best way to propagate tulips is by using these natural offsets. Of course with wild species bulbs such as Tulipa tarda and Tulipa sprengeri, seed grown plants will still grow true to the parent plant.

During the tulips annual growth cycle apical buds will develop at the base of the parent bulb. In most cases just one of these buds becomes dominant and will grow on to become next year's flowering bulb.

Unfortunately with tulips, once the parent plant has finished flowering its bulb will begins to die back, transferring it valuable store of carbohydrates and nutrients to it progeny. Eventually the parent bulb will disintegrated, however it will leave behind a replacement, full-sized flowering bulb along with a cluster of smaller bulbs.

In the autumn, carefully lift this tulip ‘family’ and gently detach all the bulbs. Next, plant all the bulbs into a prepared nursery bed of fertile, free draining soil at approximately twice their own depth. Try to choose a site that has an open and sunny location away from excessive damp and strong winds.

Although the new parent bulb will flower next year the smaller bulbs won’t be mature enough to produce flowers until at least the following year. Once they reach flowering size they can be lifted come the following autumn and planted into their final position.
Main image credit - Jina Lee licensed under the Creative Commons Attribution-Share Alike 3.0 Unported license.

For related article click onto the following links:
DO BLACK TULIPS REALLY EXIST?

HOW TO PROPAGATE SNOWDROPS

large clump of snowdrops planted in a lawn
How to propagate snowdrops


Considered by many to be the harbinger of spring, the humble but perfectly formed snowdrop is a glorious little spring flowering plant which gladdens the heart - or at least it does mine. While not a true native of the United Kingdom, its natural habitat does carry across Europe from Spain and France and eastwards to the Ukraine. However it has become so successfully naturalised in England's green and pleasant land that you can be forgiven for thinking that it has always been one of ours.

Although often seen in small clumps, under favourable conditions snowdrops can form impressive carpets of white. While this display maybe be stunning, unless you have extremely favourable condition the only way to achieve something similar is to have access to large amounts of stock or propagate the plants yourself which luckily enough can be surprisingly easy.

How to propagate snowdrops

There are a number of popular ways by which snowdrops can be propagated, notably by offset bulbs, either by careful division of clumps in full growth or removed when all top growth has died back and the plants are dormant. Commercial growers are known to use a technique known as 'twin-scaling', where after a certain amount of preparation the bulb is then sliced cleanly from top to bottom several times to create a number of segments. At this stage the segments are planted into pots or trays of compost and allowed to grow until they are large enough to survive in individual pots or the open ground. Despite this rather aggressive technique snowdrops have been known to flower in their first year!

That being said, the most popular and clearly the simplest way to propagate is when the plant is in full growth, known as being 'in the green'. All you have to do is carefully lift a clump of snowdrops, separate them out into smaller clumps and either pot them on or replant them into their final position.

Similarly, you can propagate snowdrops by removing the individual offset bulbs either when there are still showing green growth or immediately after the leaves have died back. For both techniques, lift the parent plant when the soil is still moist using either a strong hand trowel or border fork. Carefully, so as to avoid root damage, tease the clump apart removing bulbs either as individuals or as smaller clumps. Using a trowel, plant your new material into a good fertile soil in either full sun or partial shade. The site should be well drained, but not so much that it dries out in summer.

Make sure that the bulbs are placed at the same depth as before so that the soil line remains unchanged. This will be indicated on the bulb as a line where the stem colour changes from green to white. Snowdrops do best in a moisture retentive, humus rich soil, similar to that found in our woodlands so it’s a good idea to add a good quantity of well decomposed leaf mould to the soil first. To finish off, give you new plants a good watering in to help the roots bind with the surrounding soil. That way they will establish far quicker than just being left.

Main image credit - Red simon  licensed under the Creative Commons Attribution 3.0 Unported license

In text credit - Bank hall bretherton  https://creativecommons.org/licenses/by/3.0/deed.en

For related articles click onto the following link:
HOW TO GROW BULBS
HOW TO GROW THE LODDON LILY  - Leucojum aestivum
HOW TO GROW SNOWDROPS FROM SEED
HOW TO GROW THE SPRING SNOWFLAKE - Leucojum vernum
HOW TO PLANT AND GROW SNOWDROPS
THE SNOWDROP 'GRUMPY'

THE IMPORTANCE OF LOG PILES TO NATIVE WILDLIFE

rotting logs on woodland floor
The importance of log piles to native wildlife
The thought of have piles of rotting logs in the garden isn't a particularly appealing one, but for the wildlife gardener a small bank of logs can be an invaluable source of insect life, a safe harbour for small mammals, reptiles and amphibians, and a sanctuary for over-wintering and hibernating wildlife.

Once the wood starts to decay it becomes a veritable engine room of life, perfectly evolved for supporting, specialised fungal, insect species and the larger predators that feed off them such as our native bats, reptiles and insect eating birds. In Britain, some 900 species of invertebrates live in or on dead wood alone, with different species of trees supporting a unique range of insects at each stage of its decay.

Thousands of years ago when Britain was covered by ancient woodlands and forests, the life cycle of trees dying, rotting, fertilizing the soil released new life back into the forest. This is a fundamental environmental life cycle that modern woodland and agricultural practices have massively reduced. With the rise of mankind wood from the forests played a crucial role in our society supplying fuel and building materials. Unfortunately this directly caused the destruction of woodland areas, particularly if the land was turned over to farming. More recently, modern forestry practice had begun to remove fallen dead wood in an attempt to keep our managed woodlands clean. This is done with a view to control the natural ‘pests and fungal diseases’ present in the forests, as well as to keep the place tidy.

There is a typical pattern of decay with dead wood which is largely the result of its colonization by other organisms such as wood-boring beetles, fungi, and bark beetles. These in turn attract predators and parasites including spiders, false scorpions, and specialist wasps which open up the wood to allowing more fungi to enter. Hoverflies, millipedes and mites are associated with the mid-stage of decay, and in the later stages the wood may even be used by small mammals.

Within the wildlife garden it’s the temporary visitors to the log piles that are perhaps the most important to us. With suburban gardens isolated from the majority of natural woodland and forest we are unable to attract many of the species that would ordinarily take on the role of breaking down our old wood. However these woody sanctuaries are vital for the various developmental stages of many garden insect larvae as well as creating a safe environment away from predators which would otherwise feed on our native reptiles and amphibians and mammals. You could be performing a valuable service in protecting species such as our common lizard, the common frog, the common toad, slow worms, grass snakes and hedgehogs - many of which are in decline. On freshly harvested wood, fresh wounds and seepages (sap plus rainwater) also be providing valuable feeding sites for hover-flies, hornets and butterflies.

Having a log pile in the garden isn't going to be to everyone’s taste ,but by having a open mind to using different species of indigenous wood within the garden - not covered by a thick coating of wood preserver – is still one step closer to halting the decline in our native wildlife.

For related articles click onto the following links:
RSPB Log piles
WHAT IS A DRY MULCH?
A DRY MULCH?p://gardenofeaden.blogspot.co.uk/2014/12/what-is-dry-mulch.html

HOW TO MAKE A NATURAL AND ORGANIC INSECTICIDE SPRAY FOR APHIDS

green aphid on a leaf stem
How to make a natural and organic insecticide spray for aphids
This is an easy and natural recipe for making an effective and organic aphid killer. It involves the use of plants from the Saponaria family, notably Saponaria ocymoides and Saponaria officinalis Both of these plants should be easily available from your local retail plant stockists. Saponaria ocymoides is usually classed as an invasive rock plant so not only will it produce plenty of material for you, it will also recover quickly supplying more material for future use.

To create your natural aphid insecticide you simply add approximately 200 grams of leaves and/or roots to 250 millilitres of water, then add it to a blender making sure that the lid is on tightly. Once pulverised into a fine soapy solution, pour the resulting mixture through a culinary sieve, collecting the fluid into a suitable container. Now pour this 'clean' solution into a hand held spray bottle as the mix is ready to use. Your next step is to spray your aphids.

The secret as to why this recipe works is due to the high levels of naturally occurring phosphates that are found in plants from the Saponaria family. It's also these phosphates that create the soapiness of Saponaria and on a chemical level they are able to break down the water molecular attraction that causes surface tension. Aphids have a naturally hydrophilic (water repelling) skin which they use to help protect themselves from the rain, but this soapy solution allows the water to 'smother the aphids body. Like all insects, aphids breathe through specialised pores called ' Spiracles' that are found along its thorax and abdomen. If the insect becomes smothered by 'soapy' water it will quickly perish by asphyxiation through drowning.

This is what would be known as a 'contact' insecticide as it only kills what the spray makes contact with. Unfortunately, because all insecticides must be licensed by the UK Government, using this Saponaria/water mix is unlawful.

The soapy properties of crushed Saponaria officinalis leaves or roots of S. officinalis have have been used by man throughout the centuries In fact modern museum conservators still use Saponaria soap today for cleaning ancient and fragile fabrics that are not capable of withstanding the harshness of modern soaps. For those who may wish to try it, it also makes a fine shampoo.
Main image - Medieval Rich at the English language Wikipedia licensed under the Creative Commons Attribution-Sharealike 3.0 Unported license.

For related articles click onto the following links:
HOW TO MAKE A NATURAL AND ORGANIC INSECTICIDE SPRAY FOR APHIDS
MAKE YOUR OWN ORGANIC PYRETHRUM INSECTICIDE
Organic Gardening
ORGANIC CONTROL OF CATERPILLARS
Sacrificial Planting
THE IMPORTANCE OF LOG PILES TO NATIVE WILDLIFE
WHAT ARE THE NATURAL PREDATORS OF PLANT LICE?
WHICH PLANTS ATTRACT APHID PREDATORS TO THE GARDEN
.

HOW TO PLANT AND GROW SNOWDROPS

How to plant and grow snowdrops


When winter starts to break and the promise of blue spring skies is just around the corner, you’ll find that there’s nothing more perfect than a glimpse of your first English snowdrop. With pure white flowers hanging gently above the melting snow, its promise that the worst of winter is now over is enough to melt the coldest of hearts.

As English as they may seem, their native habitat is restricted to the areas of Asia Minor and mid to southern Europe. However they are so enchanting that even during the bloody battles of the Crimean War (1853-1856), soldiers dug them up to keep in their backpacks so that when they returned home they could plant them in their gardens.

drift of white flowering snowdrops in woodland
How to plant and grow snowdrops
For a plant to have such an impact during the horrors of war it’s no wonder that they have become, and still remain, one of the nation’s favourite plants. Although some species are now threatened in their native habitats, snowdrops naturalise readily in our climate and will remain quite happy undisturbed for many years.

Along with many of our spring flowering bulbs, snowdrops are available to buy as loose bulbs during early autumn, However, it's best to get them in the ground early as they can quickly dry out and die.

Each bulb should be planted 3-4 inches deep into a good fertile soil in either full sun or partial shade. The site should be well drained but not so much that it dries out in the heat of summer. They do best in a moisture retentive, humus rich soil, similar to our woodlands so it’s a good idea to add well decomposed leaf mould to the soil first. This is particularly important when trying to establish dry bulbs.

For best results you should buy your plants in the spring otherwise known as ‘in the green’. This means that the bulb has been either protected or grown on in soil, or that the bulbs have been wrapped to preserve their moisture. Either way there should be in full leaf. If they are not, don’t buy them!

Once you get your snowdrops there are a number of ways that you can choose to display them. They tend to look their best planted in meandering drifts through borders, or under deciduous shrubs in a woodland setting. Quite often, you will see them planted informally in lawns, or naturalised in grass under a favourite tree. They will even do well planted up in containers, displayed as specimen plants on a patio.

There are over 100 species in the wild, and if that doesn't make them difficult to identify they will also hybridise between species. It’s a little easier for the English gardener though, as there are generally no more than half a dozen varieties grown commercially in the UK. The commonest types and varieties of snowdrop are as follows.

Common Snowdrop – Galanthus nivalis: This is the most common species available and is seen by many as the ‘traditional’ snowdrop. It grows to a height of around 4-6 inches and flowers from January to March. Given the right weather it can flower long into April.

The Double Snowdrop - Galanthus nivalis 'Flore Pleno': This is a double-flowered variety of the common snowdrop. It is very similar but with a much bigger flower by comparison. It requires exactly the same conditions and is also ideal for naturalisation.

The Crimean Snowdrop – Galanthus plicatus: This is a much taller variety growing up to 1 ft in height. It has distinctive pleated leaves, and flowers from January until March.

The Giant Snowdrop – Galanthus elwesii: Originating from Turkey it is not as tall as the Crimean snowdrop despite the name. It reaches to approximately 10 inches in height producing large flowers between January and February. It also has a lovely honey fragrance.

Although it’s tempting to use your snowdrops as cut flowers, be aware of this popular myth. Bringing snowdrops into your home for cut flowers before Valentine's Day can bring you bad luck. If you choose to do so anyway then tradition dictates that you will miss out on any chances of getting married for the rest of the year.
Main image credit - Red simon  licensed under the Creative Commons Attribution 3.0 Unported license

In text image credit - Bank Hall Bretherton https://creativecommons.org/licenses/by/3.0/deed.en

For related articles clicks onto the following links:
Gardeners World Snowdrops
HOW TO GROW THE LODDON LILY  - Leucojum aestivum
HOW TO GROW SNOWDROPS FROM SEED
HOW TO GROW THE SPRING SNOWFLAKE - Leucojum vernum
HOW TO PROPAGATE SNOWDROPS
THE SNOWDROP 'GRUMPY'

HOW TO PLANT AND GROW HYACINTHS

How to plant and grow hyacinths

After suffering with yet another wet English winter, the sight of a newly emerging hyacinth flower is enough to warm the hardest of hearts. Their richly fragrant scent combined with striking Mediterranean colours not only puts other spring flowering bulbs to shame, but it makes it one of the true wonders of spring.

These stunning bulbs are believed to have been first brought into cultivation by the ancient Greeks. In fact the word hyacinth originates from the word ‘Hyakinthos’. In ancient Greek mythology, this was the name of a handsome young Spartan prince who was loved by the gods Apollo and Zephyrus.

field of mixed coloured flowering hyacinths
How to plant and grow hyacinths
Highly valued for it scent it became an instant hit during the ‘Tulip mania’ period of 17th century Europe. Desired by rich merchants and aristocrats alike, owning unusual and spectacular flowered bulb became the fashionable way of showing off their wealth and status. Understandably, during this time they became exorbitantly expensive and eventually becoming available to only the wealthiest of flower collectors. Over the next century over 2000 cultivars were developed from which our modern varieties are descended although they now command a far more reasonable price.

Enter your local bulb retailer during the autumn months and you will find a selection of loose and pre-packed hyacinth bulbs, but be careful what you choose as they will be available in two distinct conditions. Those that have been ‘prepared’ and are suitable for indoor flowering and those which have not been prepared and therefore better suited for planting outdoors as spring flowering bulbs.

Prepared hyacinth bulbs are special because they have undergone a sequence of cold temperature treatments used to encourage flower initiation. If they are planted indoors by the end of October then they should be flowering in time for Christmas.

blue flowering hyacinths growing in the ground
How to plant and grow hyacinths
Native to the dry regions of the Middle East, drainage is one of the most important considerations when planting these bulbs so make sure that there is plenty of grit at the bottom of your pot or planter before you add your compost. Place your bulb with the flattened end facing downwards then backfill with either standard bulb compost or something free-draining like John Innes seed compost. Even then, it can still help to add a little more grit, perlite or vermiculite to ensure suitable drainage, reducing the threat of fungal rots.

If you are planting into traditional bowls you will need to space you bulbs approximately 1 inch apart, but remember to wear gloves if you have sensitive skin as you may find the dry sap residue irritating to your skin. In extreme cases, even the slightest contact can cause your skin to turn red, blotch and very itchy.

As a rule, different hyacinth bulb colours will flower at different times and so it generally best to keep the same varieties to each container. Plant them with the nose of the bulb sitting above the soil level by about an inch, then top off the compost with a layer of gravel of decorative grit to act as a drying mulch. Move your finished container to either a cool shed or leave outside with a weighted bucket over the top in order to exclude light and damage from pests like squirrels. After a couple of months, fat buds will begin to appear and at this point they would need to be brought back inside to a cool bright room, near a windowsill. They should reach full bloom in just three weeks time!

For untreated hyacinth bulbs it's best to plant them outside, in a sunny site and preferably into a free-draining soil. You may wish to mix in a good bulb fertilizer first, but if your soil is acidic, you can add a little lime. Plant them between 5 and 6 inches in depth and approximately 5 inches apart. Avoid areas that are too damp as these bulbs can be susceptible to rotting. You will find that Hyacinth bulbs are self propagating producing smaller bulbs at the bottom of your parent plants. These can be removed and replanted every year to maintain your displays. Once the flower has finished, you can remove the stems, but you may wish to leave the foliage, allowing the bulb to absorb the nutrients providing a stronger display next years.

Main image credit - Elena Schifirnet licensed under the Creative Commons Attribution-Share Alike 3.0 Unported license.
In text image credit - John O'Neill Hyacinths - floriade canberra CC BY-SA 3.0
In text image - By The wub - Own work, CC BY-SA 3.0, https://commons.wikimedia.org/w/index.php?curid=20184777

For related articles click onto the following links:

PLANTS AND FRUIT TREES OF THE GARDEN OF EDEN

old painting depicting the garden of eden
Plants and fruit trees of the garden of Eden


The are only a few clues in the Old Testament that tell us about the plants that grew in the Garden of Eden. Even the iconic apple, the fruit most associated with the garden, goes without a mention. Although the Garden of Eden no longer exists as 'God's kingdom on earth' there is plenty of evidence to point out where it used to be - an area somewhere around the Persian Gulf. Given our modern historical and geological knowledge of this region its possible to piece together a list of plants that would have been flourishing here during its fertile period as Eden. You may be surprised at how many you are already familiar with.
.
Comparing what we know about the Persian Gulf, combined with clues written in bible texts, it is possible to get an overall view of the types of plants that were native to this area. Of course this region was full of busy and important trading routes so many non-indigenous plant species have been introduced and naturalised from from the seeds and fruit brought in by ancient Persian traders. Let's start at the beginning of the Bible were we have our initial description of those very first plants.

old painting depicting adam and eve in the garden of eden
Plants and fruit trees of the garden of Eden
Genesis 2:8- 17. And the LORD God planted a garden eastward in Eden; and there he put the man whom he had formed. And out of the ground made the LORD God grow every tree that is pleasant to the sight, and good for food; the tree of life was also in the midst of the garden, and the tree of knowledge of good and evil...

…. And the LORD God commanded the man, saying, Of every tree of the garden you may freely eat: But of the tree of the knowledge of good and evil, you shall not eat of it: for in the day that you eat thereof you shall surely die.
.
Genesis 3:2-2. And the woman said unto the serpent, We may eat of the fruit of the trees of the garden.

The important thing here is the word 'trees' as this shows that there were more species here than just the fig, the Tree of Life, and the Tree of Knowledge. If you take the text as literal then of course all trees and plants that exist today would have been in the Garden of Eden - except for, of course, any man made hybrids and cultivars. For those of you who believe that Biblical text is open to interpretation through metaphor then we can look elsewhere. Let's begin with the fig.

Figs - Ficus carica. This is the easiest one to identify as it is mentioned in Genesis 3:7

‘…And the eyes of them both were opened and they knew that they were naked; and they sewed fig leaves together, and made themselves aprons…’

old painting of the garden of eden
Plants and fruit trees of the garden of Eden
Apple - Malus sieversii. We also know from the Old Testament that there was a tree of knowledge, but only tradition has made this out to be an apple tree. Although the bible says that every tree was in Eden, were there really any apples? The answer is - ' yes, quite possibly', but maybe not what we would recognise in our Kentish orchards, it would look more similar to a greenish crab apple. Its wild ancestor originated from Central Asia where it can still be found today and so it is highly likely that some ancient cultivated variety made it there several thousand years ago. They were certainly around in biblical times and mentioned many times in their texts. One of the best examples is from Song of Solomon.
.
'...Like an apple tree among the trees of the forest is my lover among the young men. I delight to sit in his shade, and his fruit is sweet to my taste...'

Quince - Cydonia oblonga. The quince is the only existing member of the genus Cydonia and its cultivation is believed to pre -date that of apple culture. Although it is indigenous to the Persian region its strange that there isn't a single reference to it in the bible. However it's believed that many references found in the Bible regarding apples are a miss-translation and were in fact meant to be about the quince.

Black mulberry – Morus nigra. This plant is certainly native to southwestern Asia, but because it has been under cultivation for such a long time it's true native range is unknown. Nevertheless, it was then as it is still today regarded as a viable crop and also worthy of a mention in Luke 17:6.
.
'...He replied, "If you have faith as small as a mustard seed, you can say to this mulberry tree, 'Be uprooted and planted in the sea,' and it will obey you...'

The pomegranate - Punica granatum. This gorgeous fruiting tree is native to the region from Iran to the Himalayas in northern India where it has been cultivated and naturalized over the whole Mediterranean region. The pomegranate is mentioned several times in the bible most notably in the Song of Solomon 13.

'...Thy plants are an orchard of pomegranates, with pleasant fruits; camphire, with spikenard...'

Doum Fruit – Hyphaene thebaica. This is a sweet orange/red fruit also known as gingerbread fruit which is a harvested from the doum palm, it was also an extremely popular fruit in Egyptian times. In fact - as recently as 2007 - eight baskets filled with doum fruits preserved for more than 3,000 years were discovered by Egyptian archaeologists in Tutankhamen’s tomb. We know that its native habitat reaches as far north as Israel so the existence of doum plants in God's great Garden is a strong possibility. Unfortunately this plant is also not mention in the bible, but again this could be due to translation errors.

Pistachios - Pistacia vera. Native to Iran and adjacent areas, pistachios have been carbon-dated to 6760 BC. This nut of antiquity is one of two mentioned in the Old Testament. In fact its believed that pistachio trees were featured in the fabled Hanging Gardens of Babylon. These gardens were built in around 700 BC by King Nebuchadnezzar as a way to cheer up his wife, Amytis, who found the flat Babylonian landscape dreary. These nuts are also mentioned in Genesis 43:11.

'...Then their father Israel said to them, "If it must be, then do this: Put some of the best products of the land in your bags and take them down to the man as a gift—a little balm and a little honey, some spices and myrrh, some pistachio nuts and almonds...'

Sayer or Sair dates - Phoenix Dactylifera. Dates have been a source of food for civilisation throughout the course of history and are native to the Persian Gulf. They also get a mention in Samuel 6:19

'...Then he gave a loaf of bread, a cake of dates and a cake of raisins to each person in the whole crowd of Israelites, both men and women...'

Grapevines – Vitis vinifera.The appearance of the grapevine on earth has been dated to between 130 to 200 million years ago. With mankind’s relationship to this plant dating back to the Neolithic period surely this above all plants must have been in the garden of Eden. At least it gets a mention in Deuteronomy 8:8

'...a land with wheat and barley, vines and fig trees, pomegranates, olive oil and honey...'

Almond - Prunus dulcis. The second nut of antiquity is the almond which again is a native to the Persian Gulf. Over the millennia it has been spread by ancient traders along the shores of the Mediterranean into northern Africa and southern Europe. Domesticated almonds appear in the early bronze age (3000–2000 BC) of the Near East. A well-known archaeological example of the almond is the fruit found in Tutankhamun's tomb in Egypt (c. 1325 BC), probably imported from the Levant. Its fruit is somewhat sour, but is a popular snack in parts of the Middle East where they are dipped in salt to balance the sour taste. It also gets a good early mention in genesis 30:37.

'...Jacob, however, took fresh-cut branches from poplar, almond and plane trees and made white stripes on them by peeling the bark and exposing the white inner wood of the branches...'

Olive - Olea europaea. Don't be confused by its European sounding name as this is yet another valuable food crop native to the Persian Gulf region. It is not known exactly when the wild olive became a domesticated crop but it has all the historic credentials necessary for place in the garden of Eden. Not only is it mentioned in Homer's classic Odyssey it is also mentioned in chapter 8 of Genesis when Noah finds olive leaves the dove's beak.

Modern Persian cooking still holds a link to the plants of its land, with each province featuring dishes, as well as culinary traditions and styles, distinct to that regions. Their main dishes are combinations of rice mixed with meat, chicken or fish. These would be eaten with with onion, vegetables, nuts, and herbs. Herbs are also commonly added to local fruits such as plums, pomegranates, quince, prunes, apricots, and raisins. However in order to achieve a balanced taste, characteristic flavourings are added such as saffron, dried limes, cinnamon, and parsley. It just goes to show that even in this modern age of world food availability, their culture of food has changed very little.

But it wasn't just beautiful - as well as economically important - trees that were around during the time of the Garden of Eden, some of the ornamental plants that we still cherish today would have been growing there too. Look in your garden and you probably already find Persian favorites such as tulips, jasmines, hyacinths, fritillaries, Poppies, and Pittosporum. Along with everything else in the region the garden of Eden must have been a truly magnificent sight.

Main image credit - By Lucas Cranach the Elder - The Yorck Project: 10.000 Meisterwerke der Malerei. DVD-ROM, 2002. ISBN 3936122202. Distributed by DIRECTMEDIA Publishing GmbH., Public Domain, https://commons.wikimedia.org/w/index.php?curid=149737
In text image credit - By Peter Paul Rubens - www.geheugenvannederland.nl : Home : Info : Pic, Public Domain, https://commons.wikimedia.org/w/index.php?curid=8769226 and By Thomas Cole - Unknown, Public Domain, https://commons.wikimedia.org/w/index.php?curid=182975

For related articles click onto the following links:
BBC Garden of Eden
ELCHE GARDENS - The Huerto del Cura
GINGER ROOT
HOW TO GROW THE POMEGRANATE
HOW TO GROW POMEGRANATE FROM CUTTINGS
HOW TO GROW POMEGRANATE FROM SEED
Plants in the Garden of Eden
THE GARDEN OF EDEN
THE POMEGRANATE  -  Punica granatum
WHAT IS THE EDEN PROJECT?
WHAT IS A PARTERRE?

HOW DOES MISTLETOE GROW?


With the widespread disappearance of orchards in the UK it has been commonly accepted that the mistletoe was in decline However recent research has shown that this is only partially true. While populations of mistletoe have been decreasing in the West Midlands and central England, there are now more specimens growing in the south of England. We are also seeing it growing on a broader range of host plants such as poplars, false acacia, and hawthorn etc. It is also increasingly found clinging onto lime trees and sometimes even rose bushes.

Mistletoe is in fact a parasite, unable to grow without feeding from a host plant. It manages this by producing a specialised root system that searches for and then taps into the host plants own vascular system. This enables the mistletoe to draw water and nutrients directly from the host, although it is able to create some of its own sugars using limited photosynthesis. The mistletoe also releases growth regulation hormones into the host causing localised swelling and helping to increase the yield of nutrient and water.

More than just a Christmas favourite, the English mistletoe is also believed to have important medicinal properties. Currently undergoing research, there are already compounds identified and isolated which are helping scientists with their search for a cure for cancer.

In its own environment mistletoe reproduces naturally with the assistance of birds such as the mistle thrush or the blackcap. This works in two ways.

1. They eat the berries, but are unable to digest the seed. This seed is then excreted from the bird within its droppings and with a bit of luck, these seeds will land on a suitable host tree’s bark where they will germinate.

2. When they are eating the berries, some of the seeds often become ‘glued’ to the bird's beak by the sticky, viscous flesh - known as viscin - which surrounds them. The bird then tries to wipe off the seeds by rubbing its beak against the bark of a neighbouring tree. This seed then sticks to the bark instead triggering the embryonic plant to start growing.

Although difficult to germinate, - fact only about 10% of seed grows on to become a viable plant - it is possible to give nature a hand. Click onto the link below to learn how to propagate and grow mistletoe.
Main image credit - Elie plus CC BY-SA 3.0

For related article click onto the following links:
HOW DOES MISTLETOE GROW?
How to Propagate and Grow Mistletoe
HOW TO GROW MISTLETOE FROM SEED
RHS Mistletoe
WHAT IS MISTLETOE?

HOW TO PROPAGATE AND GROW MISTLETOE


Christmas takes a long time to build up nowadays, especially as the retail sector tries to makes the most of this peak selling period. Walk around the high streets in October and you will see the first displays of Christmas decorations being lovingly put together by specialist merchandisers. Even as early as the third week in November garden centres will be receiving the first of their Christmas tree orders, but there is nothing like the arrival of the first box of Mistletoe to bring home the magic of Christmas.

Mistletoe has always been a bit of an enigma, and although it's a parasite on some of our native deciduous plants it holds such a serene beauty that it's captured the imagination of European cultures throughout the ages. Thankfully, as a native to the UK, it’s relatively easy to grow mistletoe from seed, but along with the decline of our fruit industry – the apple tree is one of its predominant host plants - the mistletoe is no longer as common as it had once been. But with a little effort, and a touch of patience, your garden may well provide the next host for this beautiful and enigmatic species.

To save leaving seed germination to chance, you can improve your germination rates by following these six tips for successfully growing mistletoe.

1. The best time to propagate mistletoe is from March to April when the seed is fully ripe. Try to obtain seed from a host plant similar to the one you want to sow onto as this gives the best chance of germination. If you are obtaining your seed from shop bought mistletoe the chances are that they have been imported in from French apple groves located in Normandy and Brittany. If the berries have been stored then re-hydrate them for a few hours in a little water. Whether they are fresh or stored, the seed will need to be squeezed out of the berry, along with a quantity of its sticky, viscous flesh, known as viscin.

2. Harvest intact berries only, because if the berry skin ruptures the contents inside will harden hindering germination. Unfortunately germination rates for mistletoe seed can be quite low as only about 10% of their seeds survive to becoming a mature plant. With this in mind it's advisable to propagate at least twenty seeds, as when mature mistletoe will require both male and female plants to produce berries.

3. When choosing your host tree bare in mind the mistletoe's preferences – apples are first, then poplars, limes, false acacia, and then hawthorn. Occasionally they have been known to grow on oak.

4. Select a branch 10 cm (4 in) or more in girth, preferably on a tree at least 15 years old. If possible sow seeds in the crooks of the higher branches so that sufficient light can reach the seedlings as they grows Mark each berry with some coloured string to identify where they have been positioned. Alternatively make shallow cuts into the bark, remove the seed coats from the seeds, and insert them under the bark flaps. Cover the flaps with Hessian and secure the bark back in place with twine protecting the seed from birds.

5. Germination is fairly rapid and a short green hypocotyl (a growing tip which bears the embryonic leaves) should appear and bend to make contact with the host bark. At this stage these tiny plants are particularly susceptible to grazing invertebrates and birds. They are also prone to dehydration until their roots have connected with the hosts vascular system. If all goes well the hypocotyl will remain unchanged until the following February. Only then will a small new plant appear.

6. As the mistletoe develops the host branch will begin to swell in girth. Growth of this juvenile plant will remain slow taking five years to reach berrying-size. If either all male, or all female plants develop you can attach more seeds the mistletoe parent plant. Strangely mistletoe will readily act as a host to its own parasitic seed.

Main image credit - Elie plus CC BY-SA 3.0

For related articles click onto the following links:
How Does Mistletoe grow
HOW TO GROW MISTLETOE FROM SEED
HOW TO PROPAGATE AND GROW MISTLETOE
RHS Mistletoe
WHAT IS MISTLETOE?
.

OLD, BROKEN AND UNUSUAL DUTCH TULIP VARIETIES

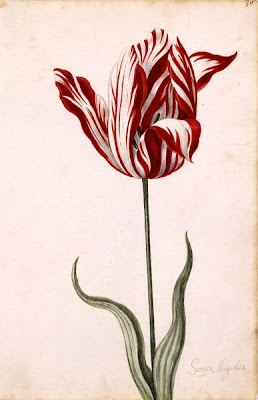
botanical illustration of tulip semper augustus
Old, broken and unusual Dutch Tulip varieties

You may be familiar with the stories of 17th century Holland and the speculative frenzy now known as 'tulip mania'. It was a time during the Dutch 'Golden Period' when tulip bulbs were treated like a form of currency, and just like the California gold rush, people abandoned jobs, businesses, wives, and homes, all to become tulip growers.

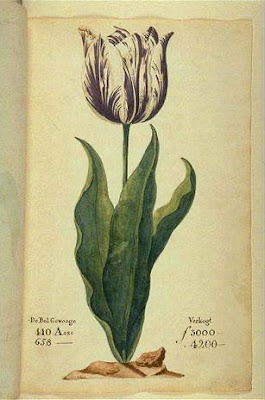
Records during this period show that one Dutchman got completely carried away with one investment. In fact after a long period of hard bargaining, he paid out thirty-six bushels of wheat, seventy-two of rice, four oxen, twelve sheep, eight pigs, two barrels of wine, four barrels of beer, two tons of butter, a thousands pounds of cheese, a bed, a suit of clothes, and a silver cup, just for a single Viceroy bulb! This was worth in today's money approximately £25,000, clearly a sellers market.

Another such story is this, an 'up and coming' bulb speculator managed to procure himself a rather special variety that cost him its weight in gold. Soon after, he found out that there was a second, identical specimen that was owned by a local cobbler. He approached and then bought the cobbler’s bulb, and in an apparent fit of madness crushed it. Perhaps he was sane after all as he believed that by doing so he would markedly increase the value of his first bulb. This proves that money does do strange things to people.

Dutch history is littered with such stories, although these are perhaps the most extreme. But what it does do is help us to understand how much the Dutch - as well as other European races -held the tulip in high esteem. Owning and flaunting rare specimens was a reflection of your wealth and standing within society. Up until this point contemporary tulips, although bold in colour, were only ever a single colour, ie if they were red then they would be a block of red colouration, if they were yellow then they would be a block of yellow colouration. The change came about with the introduction of the 'broken' tulip - this meant that the tulips lock on its single bold colour was broken allowing unique colour variations never seen before. We already know that tulips were very popular right across Northern Europe so when these rare and yet incredibly beautiful new strains arrived, the market for them was already waiting. It's no wonder that these stunning bulbs were so sought after and commanded such extraordinary prices.

botanical illustration of tulip viceroy
Old, broken and unusual Dutch Tulip varieties
Of course when you look around today's garden retailers you'll find that tulip bulbs only cost a few pounds per pack, but the question is this. Are you still able to by those old varieties that took Holland - if not Europe - by storm over 250 years ago, but now for a fraction of their original price?

The answer is yes and no, and maybe with a little bit of research thrown in. Specimens such as the famous 'Viceroy' and 'Semper Augustus' have unfortunately disappeared. As have the legendary 'Rembrandt' varieties, so called because of the abundance of tulips in famous Dutch Master paintings in this era; though strangely tulips were not a prominent theme in Rembrandt's own work. So how is it that such beloved varieties have become all but lost to us during the course of history when other cultivars from this period are still readily available? The answer is hidden in front of eyes and its all down to the secret of their broken colours.

During the eighteenth century broken colours, as far as the breeders were concerned were in the hands of god, but with today's modern techniques for genetic manipulation the answers have been discovered. It turns out that these once most highly prised of plants had gained their delicately feathered patterns from an infection known as the Tulip Breaking Virus or TuB virus. This form of the mosaic virus is carried by the green peach aphid, which passed on the infection every time it fed on a new tulip - although the virus did not break the colour in white or yellow bulbs. This was a common pest in European gardens during the seventeenth century, and while it did indeed produces some fantastic and colourful flowers it also weakened them, eventually killing them.

Today plants holding the virus are banned and nurseries finding infected stock will destroy them on sight. Any varieties bought today that display a similar colouration to these old favourites are not virus infected plants. Their colouration is in fact the result of a natural change in the upper and lower layers of pigment in the petals. But it wasn't just broken tulips that were popular during this period of horticultural history. Below is a list of species and cultivated varieties from the tulip mania period that - with a bit of persistence - you can still find today.

Tulip Viridiflora - 1700. These tulips have feathered green markings and striations on petals of various hues. Twentieth century viridiflora cultivars include "Golden Artist" (golden yellow with green stripes); "Groenland" (pale pink with flames and blushes of rose and pale green); and "Spring Green" (creamy white with blush green).

Tulip tarda - 1590s. This multi-flowering botanical tulip has chrome yellow petals edged in bright white. It's stunning, star-shaped blossoms open late in the season on sturdy six-inch stems.

Tulipa 'Duc van Tol' cultivars - Red and Yellow 1595, Rose 1700, Scarlet 1700, Aurora (Winter Dukes) 1700.

Tulip 'Absalom' - 1780

Tulip 'Habit de Noce' - (Wedding Coat). This variety dates back to the 1790's

Tulip 'Double Campernelle' and Tulip albus 'Plenus Odoratus' - 1601

Tulip 'Zomerschool' - 1620. A very popular variety during the Tulip mania (1635-1637)
period.

Tulip 'Perfecta' -1750. A parrot variety.

Tulip 'Admiral de Constantinople' - 1665
.
Tulip 'Markgraaf van Baaden' - 1750

Tulip ''Yellow Rose' - 1700

Tulip ‘Wapen van Leiden’ - 1729

Tulip ‘Keizerskroon - Classic red and yellow colouration with marginal feathering, also known as Grand Duc, 1750

In Holland there is a living museum of historic tulip bulbs found at the Hortus Bulbum. Here Dutch nurserymen try to collect, maintain and propagate what in many cases are the last remnants of this golden age. You can still buy tulipmania bulbs from here - in fact there are whispers of the existence of some old broken varieties - but their supply is heavily restricted. The only other supplier who has access to Hortus Bulbum bulbs is in the USA and that is the Old House Gardens nursery. Other suppliers of these fascinating bulb varieties are few and far between, but with a bit of courage and a lot of research I'll guarantee you will find one.

For related articles click onto the following links:
DO BLACK TULIPS REALLY EXIST?
How to Grow Species Tulips from Seed
HOW TO OVERWINTER RARE AND SPECIES TULIPS
HOW TO PROPAGATE TULIPS
LOST TULIPS OF THE DUTCH GOLDEN AGE - SEMPER AUGUSTUS AND THE VICEROY
OLD DUTCH TULIPS - Tulip 'Absalom'
OLD DUTCH TULIPS - Tulip 'Lac van Rijn'
SPECIES TULIP - Tulipa Wilsoniana
THE WORLD'S MOST EXPENSIVE TULIP - EVER!
Top Tips for Tulip Care
TULIPA ACUMINATA
TULIP HISTORY AND POPULAR VARIETIES
Tulip History
TULIP ‘SEMPER AUGUSTUS’ - DOES IT STILL EXIST?
WHAT IS THE TULIP BREAKING VIRUS?

POINSETTIA CHRISTMAS STORY AND HISTORY

red poinsettia flower with ornamental white spots
Poinsettia Christmas story and history


If you live in the west then you are likely to be familiar with the Christmas story and the traditions that go along with it. In fact Christmas wouldn't be Christmas without a sixpence in your pudding, a foot full of pine needles and more mince pies than you can shake a festive stick at.

It’s a matter of fact that all of these traditions have been passed down from generation to generation for centuries, or have they? While it's true that many go back to at least 150 years, without the timely publication of Dickens famous book ‘A Christmas Carol’ the Christmas holiday was not just drifting into obscurity, it was on its way to extinction!

Fortunately, the Christmas holiday has never been healthier, although it has come a long way away from its nativity origins. But the strange thing about these traditions is how they are constantly being changed and modernised, seemingly without anyone noticing. Look at our biggest Christmas icon, Father Christmas. Surely no-one would dare to change that?

Poinsettia Christmas story and history
They already have! In fact Santa owes his whole ‘Red’ look to a seasonal re-branding in 1931 by Coca Cola’s advertising agency. Prior to this he had always worn green as a sign of the returning spring.

It is a similar situation with our Christmas plants, from the last week of November the shops will be filled with holly wreaths, Xmas trees, mistletoe and poinsettias. Believe it or not, the poinsettia has been part of the English festive tradition for no more than twenty years.

As a cultivated plant native to Mexico, the history of the poinsettia goes back to the times of Montezuma. In those days the Aztecs knew it as ‘Cuetlaxochitl’ and was highly regarded as a economic crop. During the 14th - 16th century the sap was collected and used to control fevers, while the bracts (modified leaves) were used to make a reddish dye. Found growing naturally in the lowlands, the Aztec kings brought huge numbers of poinsettias required for their cloth-making industry up into what is now known as Mexico City for processing.

The poinsettias relationship with Christmas began in 16th century Mexico as explained by this charming story about a poor Mexican girl called Pepita. As was the tradition, each child from the village would present a gift to the Christ Child at the Christmas Eve Services. Unfortunately, Pepita was so poor that she had nothing to her name other than the clothes on her back and so a gift wasn't something she could give. On the way to the chapel she was accompanied by her cousin Pedro, but her heart became filled with sadness rather than joy. Seeing her sadness, her cousin tried to comfort her.

"I am sure Pepita," he said softly, "That even the most humble gift, if given in love, will be acceptable in His eyes,"

Not knowing what else to do, although some say she was inspired by an angel, Pepita knelt down by the roadside and gathered a handful of common weeds. On her way to the chapel she busied herself by fashioned them into a small bouquet. Looking at the scraggly bunch of weeds, she became sadder and even embarrassed by the humbleness of her offering. She began to cry as she entered the doors to the small village chapel. As she approached the altar, she remembered Pedro's kind words.

"Even the most humble gift, if given in love, will be acceptable in His eyes." Inexplicably, she felt her spirits lift as she knelt down to lay the bouquet at the foot of the nativity scene, and as she lay them down the bouquet of weeds burst into blooms of brilliant red. All those who witnessed the event believed that they had seen a Christmas miracle. And from that day forward, these bright red flowers were re-named as the Flores de Noche Buena, or the Christmas Eve flower. To us, they are known as the Poinsettia.

Traditions aside, poinsettias always make a fantastic addition to the Christmas table. However, there are a number of things that you must be aware of before you buy one.

For related articles click onto the following links:
RHS Poinsettia
CHRISTMAS COOKIE RECIPE
How to Care for Poinsettias
HOW TO GROW POINSETTIAS
MERRY CHRISTMAS - FROM WHERE I LIVE
POINSETTIA PESTS AND DISEASES
THE CHRISTMAS ROSE - Helleborus niger
THE HISTORY OF CHRISTMAS
THE PLANT HUNTERS
WHY IS MY POINSETTIA DROPPING ITS LEAVES?

WHAT IS SACRIFICIAL PLANTING

purple and green ornamental lettuce grown in the ground
What is sacrificial planting?
Although the terminology sounds a little blood thirsty, it is in reality a practiced organic method of protecting your garden plants from the pests that feed from them. This is achieved by the deliberate act of supplying plants that will either attract harmful pests away from, or attract natural predators to, the plants you're trying to protect.

For example, plant a row of lettuce that you are happy to have destroyed at the back of your herbaceous boarders and this will entices slugs away from your ornamental plants, attracted to the tastier salad leaves. Don’t panic though as the damaged lettuce leaves will soon be out of sight, becoming lost behind the taller ornamental plants as they grow through.

While it’s true that slugs love lettuce, they love marigolds more, so if its salad crops that you are trying to protect, creating a thick border of marigolds will act as a self healing edible barrier. Try using the larger American or African marigold hybrids as this will create a far bulkier defence compared to our smaller English or French varieties

Nasturtiums are great for attracting aphids therefore making an ideal trap for protecting precious roses. Again, plant them as a sacrificial border, remembering to pinch off and destroy the leaves and stems as they become overrun. Aphids will also infest sunflowers, and unlike nasturtiums whose swarming leaves have to be removed, sunflowers can be left alone to grow. Because they are so tough, the aphids cause very little damage and will still produce nice seed heads for native birds to enjoy. Like lettuce, nasturtiums also work well as a trap crop for slugs and snails.

This principle can work just as well for pest animals as well as for insects. For those suffering the constant damage caused by that naturalised foreign alien ‘the rabbit’, plant dill in your borders. This will protect the vulnerable young shoots of many of your perennials as rabbits will ignore the less tasty offerings preferring to go straight for the dill. This way the rabbit will remain unharmed particularly when compared to other commonly used control methods i.e. the shotgun or myxomatosis, and hopefully your borders should remain uneaten. Even without a rabbit problem, planting dill in the garden is also a good idea as it attracts hoverflies and predatory wasps, both of which will feed off aphids.

Fed up with your plants suffering the ragged bite marks of the dreaded Vine weevil? Although named for destroying the roots of grape vines it now seems to prefer a wide range of host plants, in particular Laurels and Viburnums. Try planting polyanthus and cyclamen for control of this destructive garden pest. Vine weevils love to lay their eggs beside these two species, not only making them great for attracting them away from the plants you love, but also for giving you a great starting place to look should you these destructive pests enter the garden.

A word of warning though if you are intent on spraying for vine weevil, the only product currently on the market that is suitable for their control is Provado, and this contains the active ingredient Imidacloprid. This lethal chemical is believed to be one of the factors in Colony Collapse Disorder, a serious disorder that affects our native bees. It’s absorbed into both nectar and pollen contaminating it with a deadly toxin that affects the bee’s nervous system. Once the nectar and pollen has been taken back to the hives it’s passed on through the food chain continuing to kill yet more bees. So next time you find yourself reaching for a bottle bug killer, consider sacrificial planting and reach out for a packet of seeds instead.

.For more about Provado and its effect on bees click onto:

HOW TO TAKE HARDWOOD CUTTINGS

yellow blooms on witch hazel
How to take hardwood cuttings

Perhaps the easiest way to increase stocks of deciduous shrubs and fruit bushes is to use the propagation technique of taking hardwood cuttings. Although this may sound complicated it is actually quite simple, and generally very successful. The most important thing you will need, apart from a knife or secateurs, is a little patience.

The period between November and January is the best time to propagate from hardwood cuttings, although they will be most successful if taken once your chosen parent plant has dropped its leaves. Plants that take easily from this type of propagation method include,

Black currants, Species and hybrid roses, Spirea, Buddleia, Willow, Cornus, and Viburnum – winter flowering varieties

You may find that some plants need their lower leaf buds removed from their cuttings material before being planted. In these cases rub them off using your thumb, leaving the top three untouched. These would include,

Gooseberry, Red currant Deutzia, Forsythia, Kerria, Leycesteria, Philadelphus, and Weigela.

The first step is to select a suitable stem from the parent plant. Make sure that the plant is healthy then look for a well ripened pencil thick stem about 30 cm (1 foot) long from near the base of the plant. Choose those stems that were originally produced early on in the year. If you choose immature stems then your cutting is liable to rot. Cut the stem from the plant using either a sharp knife or a good pair of secateurs.

The next step is to prepare your cutting. Making sure that you are holding it the right way up make a sloping cut just above your proposed top bud, then make a second cut – this time horizontal - approximately 6 inches below the first cut, and just below a bud. For those plants known to be difficult to take root, remove a 1-2 cm sliver of bark from its base. This is called wounding and helps the natural chemicals within the plant to initiate root development. Also consider applying rooting hormone to the base and wounded area, although this isn't usually necessary for hardwood cuttings.

Choose an area of soil that will not be over-exposed to harsh winter weather and dig it over loosely, breaking up any large clods as you go. Then, simply push the cuttings into the soil. Hardwood cuttings, although leafless will still lose some water through evaporation from their surface. Unfortunately, being allowed to dry out is the commonest reason as to why these cuttings may fail.

To avoid this water loss it’s important to leave only a small amount of the cutting exposed above the ground. However if you plant too deep the buds will not grow properly. In practice the third bud from the top is planted just below ground level. Therefore, for most plants, only an inch or so is exposed above ground level.

When finished, don't forget to clearly label your cuttings by their plants variety names. These cuttings should now remain undisturbed until the following autumn. By this time they would have rooted sufficiently enough to be either transplanted into a pot for growing on, or planted into their final position.
Main image credit - Keichwa  This file is licensed under the Creative Commons Attribution 1.0 Generic license.

For related articles click onto the following links:
RHS Hardwood Cuttings
HOW AND WHEN TO PRUNE SPIREA
HOW TO GROW THE VIRGINIA CREEPER FROM CUTTINGS
HOW TO PROPAGATE BOX HEDGING PLANTS
HOW TO TAKE CUTTINGS FROM GARDENIAS
What is Air Layering?
WHAT IS DOGWOOD?