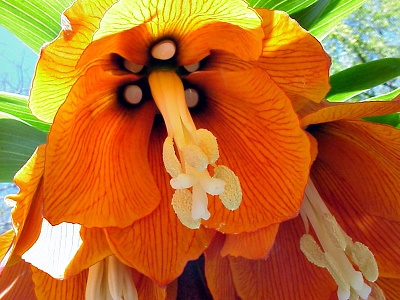
HOW TO PLANT FRITILLARY BULBS

How to plant Fritillaria bulbs

The genus Fritillaria is home to some of the most gorgeous and exotic bulbs know to European gardeners. Brightly coloured, architectural and ephemeral there is little that can compete with their fleeting splendour. However they can be tricky to grow, subject to the whims of the lily beetle and prone to rotting in the soil. So to get the best out of plants, how do you plant Fritillary bulbs?

How to plant Fritillary bulbs
To begin with you need to choose the right site as the majority of ornamental Fritillaria species and cultivars will require full sun, good drainage and positioned out the way of the extreme weather. If your plants do not receive sunlight for as much of the day as possible they will also struggle to flower. In fact your newly planted bulbs will often struggle to bloom in their first year if they are not big enough so don't make it harder for them by planting in a shady  or semi-shaded site. 

The second issue with planting fritillary bulbs is to get them in the ground without killing them later on. On the whole, Fritillaries' need good drainage as the bulbs can be prone to fungal rots. So if you do not have perfectly drained soil you will need to improve it by adding in and mixing a good amount of horticultural grit. This is also an excellent opportunity to add bone meal or fish blood and bone fertilisers to the soil below the bulbs so that the root system  can get access to valuable nutrients during the growing season. Furthermore it is a good policy to plant the bulbs on their side as water can settle in the crown increasing the risk of fungal infection. In poorly drained soils consider creating a mound to plant into to ensure that drainage is good however be aware that some Fritillaries will require a planting depth of approximately 30 cm deep!

Did I mention the optimal panting period for Fritillaria species and cultivars? No, well the end of the summer to the beginning of the autumn would be best.

For related articles click onto the following links:

Dracunculus vulgaris - The Dragonlily
HOW TO GROW THE CROWN IMPERIAL LILY
HOW TO GROW THE FOXTAIL LILY
HOW TO GROW FRITILLARIA IMPERIALIS FROM SEED
HOW TO GROW THE SNAKE'S HEAD FRITILLARY - Fritillaria meleagris
HOW TO PLANT LILY BULBS
How to Grow Native Wild Primroses and Polyanthus from Seed
How to Propagate and Grow Mistletoe
How to Propagate Box Hedging
How to Propagate the Snake's Head Fritillary
LILIUM NEPALENSE - The Lily of Nepal
Native Pond Plants
Old English Plants - Polyanthus 'Gold Lace'
RHS Snake Head Fritillary
THE GLORY LILY - Gloriosa rothschildiana

8 Top tips to help you plan your vegetable garden


Plan to grow varieties that you can’t buy in supermarkets, like multi-coloured beans!

Image: Dwarf French Bean Seeds - Colour Mix from Suttons


The start of a new year is the perfect time to reflect on last season’s successes and failures in the garden. There’s nothing quite as satisfying as sitting down with a large piece of paper and a cup of tea and dreaming about what you want to grow in the months ahead. To make sure you enjoy a long season of successful crops, here are some top tips for planning your vegetable garden from the Suttons horticultural team…

  1. Write a wishlist

Start by making a list of all the fruit and veg you’d like to grow. Consider what worked well in the past and rule out any crops that didn’t thrive in your growing environment. Don’t forget to research new vegetable seed varieties before you settle on your final choice. It might be easy to stick with what you know, but new vegetable cultivars are constantly being developed and tested to improve flavour, yields and disease resistance. 

  1. Only grow what you love to eat

It’s unlikely you’ll be able to grow everything on your wishlist, so narrow it down by prioritising your family’s favourite fruit and veg. Other things will stay on the list because the homegrown varieties taste so much better than anything you can buy (definitely broad beans!) Some vegetables are worth growing yourself because they’re cheap and easy to raise from seed but costly to buy in the supermarket. 

  1. Mind the gap!

When your list is ready, add columns for the sowing dates, planting out dates and harvest dates. A further column where you estimate the number of weeks from planting out to harvest will help you to identify any quick- growing crops that could be squeezed into gaps (like radishes that take just 3 weeks).


Summer cropping vegetables are usually started off indoors and planted out in about May when the soil warms up. But to make your veg plot productive for the longest possible time, you’ll need to remember to start your autumn and winter vegetable seeds off mid-summer, so they’re ready to plant out as soon as your other crops finish. 

  1. Draw a map of your vegetable plot

A visual map is the best way to plan your vegetable garden. Measure it accurately (you can even use squared paper and a scale) so you can see exactly how much room you have and how many plants you’ll be able to fit into the space. You should always sow a few extra seeds to allow for some to fail, or to plug unexpected gaps if something is harvested early. 

  1. Plot the plants on your map 

Add the crops to your map to ensure you’re making best use of every square inch of space. Could you squeeze some thin rows of spring onions or radishes between widely spaced rows of bigger things that take longer to grow? By the time your bigger crops have swelled to fill the space, your quick crops will already have finished. 


Start by adding vines like squash and pumpkins to the outside of your beds, as they need lots of space to spread out. Then think about the best place for crops that need support, like peas and beans, to make sure they don’t cast too much shade over sun-loving veg. Fill the remaining space with everything else. 


If you keep your map for next year, it will help you to rotate crops around the garden and avoid a buildup of pests and diseases in the soil.

  1. Don’t forget containers

Many vegetables are perfectly happy growing in containers, freeing up your plot for other things that prefer more space. If you’re struggling to fit everything in, consider what you could move to a large pot. Crops that are harvested in late summer like peppers, courgettes and tomatoes could be grown in large containers to make way for a succession of distinct, spring, summer and autumn crops with shorter growing seasons. 

  1. Order veg seeds in plenty of time

Don’t run the risk of your favourite vegetable seeds and plants selling out. Once you’ve decided what you want to grow and how much you’ll need to buy, place your order online and have it all delivered to your doorstep. 


It’s worth joining a scheme like Suttons Gardening Club before you place your order. For just £10 a year you get a 10% discount off every order, £20 worth of vouchers (4 x £5), access to exclusive special offers and seasonal tips to help you in the garden. 

  1. Organise your seeds

Make yourself a seed storage system with sections for each month. When your seeds arrive, simply place them in the appropriate section so you won’t forget to sow them when the time comes. 


It was the United States Army officer and statesman Colin Powell who said: “There are no secrets to success. It’s the result of preparation, hard work, and learning from failure.” And while it’s not likely that he was thinking about vegetable growing at the time, it’s a premise that certainly holds true in the garden! Planning your veg plot in advance will help you to make the most use of your space and harvest healthy veg over a longer season. Check out Suttons Gardening Club to see how to save money on seeds and plants for the next year.

WHEN SHOULD YOU PLANT FRITILLARIA IMPERIALIS BULBS?

When should you plant Fritillaria imperialis bulbs?

WANT TO BUY RARE AND UNUSUAL SEEDS? THEN CLICK HERE FOR THE 'SEEDS OF EADEN' SEED SHOP

The Fritillaria imperialis, common known as the crown imperial, imperial fritillary and even Kaiser's crown is an absolutely gorgeous collection of cultivars whose original species is native to a wide stretch of  territory from the Anatolian plateau of Turkey, Iraq and Iran to Afghanistan, Pakistan, Northern India and the Himalayan foothills. Flowering in early spring in the northern hemisphere, Fritillaria imperialis is notable for its brightly coloured, pendulous flowers topped by a 'crown' of small leaves. The common names and also the species name 'imperialis' literally means 'of the emperor', which refers to the large circle of golden flowers of the native species, reminiscent of an emperor's crown. There are a number of wonderful species available including the striking variegated from of Fritillaria imperialis 'argenteovariegata'. In fact both the species and the yellow-flowered 'Maxima Lutea' have received the Royal Horticultural Society's Award of Garden Merit. 

When should you plant Fritillaria imperialis bulbs?
So back to the question at hand, when should you plant  Fritillaria imperialis bulbs? Well, Fritillaria imperialis bulbs are considerably more expensive that the usual run-of -the-mill cultivars. In fact Fritillaria imperialis 'argenteovariegata can retail upwards of £12.00 for a single bulb! So when it comes to planting timing and technique you want to get it right otherwise your investment an come to a sticky end due to the risk of fungal rots. 

For best results grow Fritillaria imperialis 12 inches apart in well-drained soil, ideally on a bed of gravel or perlite, in full sun. Plant them five inches (12 cm.) deep, but take care to plant them on their sides as this reduces the risk of rots attacking the crown of the bulb. prior to plant it can be worth mixing a small handful of bonemeal to the soil below where the bulb will be sited.

As with other fritillaria bulbs, crown imperial fritillaria should be planted from late summer to autumn so September to October will be best.

For related articles click onto the following links:

Dracunculus vulgaris - The Dragonlily
HOW TO GROW THE CROWN IMPERIAL LILY
HOW TO GROW THE FOXTAIL LILY
HOW TO GROW FRITILLARIA IMPERIALIS FROM SEED
HOW TO GROW THE SNAKE'S HEAD FRITILLARY - Fritillaria meleagris
HOW TO PLANT LILY BULBS
How to Grow Native Wild Primroses and Polyanthus from Seed

HOW TO PLANT FRITILLARY BULBS
How to Propagate and Grow Mistletoe
How to Propagate Box Hedging
How to Propagate the Snake's Head Fritillary
LILIUM NEPALENSE - The Lily of Nepal
Native Pond Plants
Old English Plants - Polyanthus 'Gold Lace'
RHS Snake Head Fritillary
THE GLORY LILY - Gloriosa rothschildiana


HOW TO GROW LABURNUM ALPINUM

How to grow Laburnum alpinum


Commonly known as the 'Scotch Laburnum', Laburnum alpinum is a small, broad-headed tree grown primarily for its long, drooping racemes of fragrant blooms. As with so many garden plants the common name is misleading as Laburnum alpinum is not indigenous to Scotland. It is in fact a native to Central and Southern Europe, although it is a species which has naturalized in Scotland. The 'Golden Rain' or 'Golden Chain' tree are also used as common names and arguably far more appropriate.

 Laburnum alpinum
Laburnum alpinum has been under cultivation in Britain since around 1560 and was originally named Cytisus alpinum by Scottish botanist and former Curator of Chelsea Physic Garden, Phillip Miller (1691 – 1771). In 1830, it was reclassified and listed in the Laburnum genus by Bohemian natural scientist Jan Svatopluk Presl (1791–1849).

Depending on conditions you can expect Laburnum alpinum to achieve a height of between 5-7 metres, with a width of 3-5 metres. The leaves are trifoliate, a deep, shining mid-green on the surface, yet paler and slightly hairy underneath.

The panicles of vanilla scented, pea-like, bright-yellow flowers are borne from late May to early June and can be up to 30 cm long. Once pollinated, flattened, glabrous and glossy seed pods seedpods appear.

Laburnum alpinum will perform best in a well-drained, loamy soil but it will also tolerates heavy clay and nutritionally poor soils if needed. It will grow in either semi-shaded position or full sun, however it will always produce a better flowering display in full sun. It can withstand surprisingly strong winds once established although staking will be required for young specimens in exposed position. That being said has a history of performing poorly in coastal regions.

Warning. All parts of the plant, and especially the seed, are poisonous!

Click here for related articles:
ARE CHERRY LAUREL FRUIT POISONOUS?

HOW TO GROW LABURNUM WATERERI 'ALFORDS WEEPING'


How to grow Laburnum 'Alfords Weeping'


If your are looking for something other than the usual offering of Laburnum species and hybrids (notably Laburnum alpinum, and Laburnum × watereri 'Vossii), then consider the following form - Laburnum x watereri 'Alfold Weeping'.

Like Laburnum x watereri 'Vossii, Laburnum x watereri 'Alfold Weeping' is a selected seedling of the naturally occurring hybrids of  Laburnum alpinum and Laburnum anagyroides. However all hybrids from these parents are named after the type raised at Waterers nurseries in Knaphill, England - hence the 'watereri' part of the hybrid name.

Laburnum 'Alfords Weeping'
Laburnum x watereri 'Alfolds Weeping' is a small, vigorous, tree with an upright habit, a wide spreading head and long, drooping branches. Growing up to 4 metres tall, it is a deciduous tree with vivid green leaves consisting of 3 elliptic to elliptic-oblong leaflets up to 3 inches long. It produces fragrant yellow 2 cm long flowers on 15 to 25 cm long pendant racemes in June, however the foliage tends to partially obscure the flowers

It was a selected seedling from Hilliers nurseries, Hampshire, England, discovered by and named after Alfred Alford in 1965, the nursery foreman.

Plant container grown plants at anytime of year, so long as you have favourable weather. Bare-root specimen will need to be planted between October and March. Be aware that young plants will always need the support of a sturdy stake for the first few years after plating until its root system establishes and its truck thickens. It will perform best in any ordinary, moist, well-drained and slightly acidic soils, and will tolerate heavy clay, and even chalky. However avoid areas prone to waterlogging.

Laburnum x watereri 'Alfolds Weeping' will tolerate a partially shaded position but flowering will always be more impressive when in full sun. Be aware that young plants will always need the support of a sturdy stake for the first few years after plating until its root system establishes and its truck thickens.

WARNING. All parts of Laburnum x watereri 'Alfolds Weeping' are poisonous if ingested, in particular the seeds.

Click here for related articles:
ARE CHERRY LAUREL FRUIT POISONOUS?

HOW TO GROW THE 'ELEPHANT EAR' FIG - Ficus auriculata

How to grow the 'Elephant Ear' Fig - Ficus auriculata

WANT TO BUY RARE AND UNUSUAL SEEDS? THEN CLICK HERE FOR THE 'SEEDS OF EADEN' SEED SHOP

Commonly known as the Roxburgh fig (named after the Scottish botanist and founder of Indian botany, Sir William Roxburgh), Ficus auriculata is a species of fig tree, native to the Himalayas, Nepal, China and Southeast Asia. It is noted for its large round leaves which can grow upto 15 inches long hence its common name of 'Elephant Ear'. 

Ficus auriculata is a perennial evergreen shrub or small, multi-stemmed tree. Although it is classified as an evergreen, it can be deciduous during extended periods of cold temperatures. Leaves are ovate and when emerging being red before turning to green. The edible fruits are pear-shaped and reddish-brown, hanging on peduncles 2.5 cm or longer. The fruits appear on thin branches emerging from the trunk and, perhaps strangely, even from the roots! The fruits are are used to make jams, juices and curries in India. In Vietnam, unripe fruits are also used in salads. Leaves are used as fodder for cattle.

Ficus auriculata fruits
It is a small tree growing to 5–10 m  high with numerous bristle-covered branches. Ficus auriculata is dioecious, with male and female flowers produced on separate plants.

In its natural habitat,  Ficus auriculata is generally found in moist, lowland tropics, and is often seen growing along stream banks. So when growing as a house or garden plant it will require good drainage and considerable watering during the growing season. The optimum growing temperatures range from 16 to 25 degrees Celsius, however it will tolerate a range from 13 to 33 degrees Celsius. Be aware that   temperatures below 0 degrees Celsius may severely damage or kill the plant.This means that it can be grown outside over the summer in the more temperate Northern European countries but will need to be brought in under protection during the cooler months. In Mediterranean climates it can be planted outside permanently in the ground although winter protection may need to be provided once overnight temperatures start to drop below 7 degrees Celsius. 

Be aware that under protected environments Ficus auriculata can be susceptible to scale and may have minor issues with gall, mealy bugs, thrips, whitefly, and spider mite.

For related articles click onto the following links:
HOW TO GROW AECHMEA FASCIATA
HOW TO GROW THE CREEPING FIG - Ficus pumila
HOW TO GROW FICUS ELASTICA 'VARIEGATA' 
HOW TO GROW FICUS PUMILA
HOW TO GROW STROMANTHE SANGUINEA 'Triostar'

IS FICUS LYRATA AN INDOOR PLANT?


HOW TO PROPAGATE PASSION FLOWERS FROM CUTTINGS

How to propagate passion flowers from cuttings


Passion flowers are among the most exotic of all ornamental climbing plants, yet despite many species and hybrids being relatively hardy there are very few in general cultivation, particularly in the United Kingdom. However, while the range of passion flowers available from most plant retailers is generally limited, if you can find the species or hybrid that you are looking for and get permission from the owner they you can propagate your own passion flowers from cuttings. So, How do you propagate passion flowers from cuttings?

The best results are achieved by either taking softwood cuttings in the spring or semi-ripe cuttings during the summer. As a general rule passion flowers become hollow a certain distance back from the growing tip. These hollow sections are notoriously hard to root and are also prone to fungal rots so unless you are short of propagation material avoid using cuttings with hollow stems. If you have little choice other than to use material with hollow stems then consider blocking the hollow ends with lard or horticultural wax. Passiflora incarnata is a good example of this and have stems which become hollow a short distance behind after the growing tip.

Particular species can experience particular problems. For example Passiflora racemosa cuttings are relatively easy to root but will not produce any further stem growth unless the apical tip is left on the cutting.

How to propagate passion flowers from cuttings
Stem cuttings are at their most viable during the softwood stage which occurs around May. This is recognised when the growth tips break off easily when being bent. Be that as it may you can also receive good results from semi-ripe cutting in July and August. The best time to take cuttings is in the morning and if there has been little recent rain, thoroughly water the mother plant the day before. Using a sharp, sterilized blade take 3 to 5 inch cuttings, making your cut just below the leaf node of the first or second mature leaf from the end shoot. Remove the bottom half to two-third leaves and tendrils. Larger-leaved specimens may need part of the remaining leaves removed to prevent the cutting from drying out before it has a chance to produce roots. If you are not striking the cuttings immediately then place them in a polythene bag containing some damp kitchen roll. Keep the bag in cool, dark conditions until you are ready to work with the cutting material.

For the potting compost either use a sphagnum moss peat-based seed and potting mix or make your own using a 50:50 mix of horticultural sand and fine sphagnum mos peat. Using 3 inch pots, fill with the compost mix and then pre-drill one hole in the centre using a dibber. Dip the ends of the cutting rooting hormone and place it in the hole being careful not to wipe the rooting hormone off the end of the cutting. Gently compress the compost to secure the cutting in place, then lightly water.

Place the pots inside a heated propagator or propagating frame at a temperature of between 16-21 degrees Celsius. Alternatively seal the pots inside a clear polythene bag and place on a warm bright windowsill, but avoid direct sunlight. Don't let the cuttings get to wet inside their respective protection so provide adequate ventilation to allow the foliage to dry off each day.

You can expect new foliage to be produced within 3-4 weeks, but avoid tugging on the cuttings to check if rooting has occurred as this can easily damage the new root system. Instead check the drainage holes at the bottom of the pot to see if any root growth can be seen. Once the root system has established in the pot the cuttings can be potted on into 4-5 inch pots using John Innes 'No2' compost. If you are propagating plants from Tacsonia subgenus of Passiflora then use an ericaceous compost instead as they prefer alkaline to slightly acidic conditions.

Overwinter hardy species and hybrids under the protection of a cold greenhouse in their first year. Then harden off before planting outside into their final position once the threat of late frosts have passed.

HOW TO GROW HIPPOPHAE SALICIFOLIA - Willow-leaved sea buckthorn

How to grow Hippophae salicifolia


Native to the Himalayas, Hippophae salicifolia is a rare species of sea buckthorn found growing in the high altitudes of dry valleys. Introduced to European gardens in 1822, it was first described by the Scottish botanist, David Don 1799 – 1841.

While visibly similar to the common sea buckthorn - Hippophae rhamnoides, it is a taller species growing to approximately 15 metres tall, with less spiny pendulous branches. Hippophae salicifolia also displays broader and less silvery foliage, but the most obvious difference are its yellow berries. It will in flower in April, and if pollinated the fruits will appear from September to October. Hippophae salicifolia is dioecious, meaning that both male and female plants must be grown to produce berries.

How to grow Hippophae salicifolia
A wild variant also exists which occurs in the same restricted area of the Himalayas. However this form is found at even higher altitudes in the alpine zone, and rarely seen growing beyond 1 metre in height. The leaves are also much smaller reaching a length of between 1–3 centimetres.

Hippophae salicifolia will require a position of full sun as it will noticeably struggle in even partial shad.  However it is suitable for a range of soils, including those which are nutritionally as the roots are able to fix nitrogen. It will tolerates strong winds but unlike Hippophae rhamnoides it is not tolerant to a maritime exposure.

For related articles click onto the following links:

HOW TO GROW SEA BUCKTHORN - Hippophae rhamnoides

How to grow Sea Buckthorn


The common sea buckthorn - Hippophae rhamnoides is one of just seven species within the genus and is by far the most widespread. Native to the fixed dunes and sea cliffs of the United Kingdom, Europe and temperate Asia it is a hardy, spiny, deciduous shrub chiefly grown for its ornamental berries.

Sea Buckthorn berries and juice
It is a tall, bushy species growing to approximately 3-4 metres tall, however under favorable conditions it can morph into a small tree reaching a height of up to 10 metres. The brown scaled branches are clothed with sharp spines and linear, silvery leaves. Inconspicuous flowers are borne in April on male and female plants. When grown close enough together for effective pollination, the female plants will produce thick clusters of bright orange-yellow edible berries which can remain on the plants from September right through to December. While the berries are indeed edible they have an intensely acrid juice which are usually avoided by most birds. Be that as it may, it is said that pheasants are somewhat partial to them.

The common sea buckthorn will happily grow in any well-drained, ordinary garden soil, however it is particularly suitable for coastal positions where few plants can cope with the salt spray brought on the wound or a certain amount of salt contamination present in the soil. They thrive in sandy areas by the sea and make suitable windbreaks when planted close together in exposed regions. Plant in a sunny or partially shaded position from October to February.

When growing as a hedge, one male plant will easily pollinate six female plants. Set the young plants 18-24 inches apart, but this can be extended to one plant every 4-5 ft apart when growing or windbreaks. After planting, remove the upper third of all shoots to promote bushy growth.

The common sea buckthorn received the Award of Merit from the Royal Horticultural Society in 1944, and then the Award of Garden Merit in 1984.

For related articles click onto the following links:

HOW TO GROW AMELANCHIER CANADENSIS?


How to grow Amelanchier canadensis?


Commonly known as the Canadian serviceberry, Amelanchier canadensis is a medium sized suckering shrub or small tree with tall erect stems, oblong leaves and erect or curved racemes. Native to Canada from Newfoundland to southern Ontario, and in the United States from Maine to Alabama it is a deciduous species grown as both a medicinal plant as well as for its ornamental value.

Be aware that Amelanchier canadensis is often confused with Amelanchier lamarckii, however Amelanchier lamarckii has a more spreading habit and the potential to become a small tree, not just a large shrub. Alo the racemes of Amelanchier lamarckii tend to be more pendulous.

Amelanchier autumn colour
Growing up to 3-4 metres high with a similar sized spread, the mid-green leaves are woolly on both sides, sharply-toothed and produce soft red or yellow over the autumn before leaf-drop. A profusion of pure-white, star-shaped blooms appear in April which are followed by round, black, edible sweet-tasting berries which ripen in June. So if you fancy growing one of these gorgeous trees in your garden, just how do you grow Amelanchier canadensis 

Plant Amelanchier canadensis from November to early March in a sunny or partially shaded position. In its native habitat it is largely restricted to wet sites, and as you would expect will perform well in any decent garden soil that remains moist throughout the growing season. That being said it will always do better in a lime-free or slightly acidic soil.

Amelanchier canadensis received its Award of Merit from the Royal Horticultural Society in 1938.

For related articles click onto the following links:
BUY BAOBAB TREE SEED
HOW TO GROW AMELANCHIER

WHAT DOES POMELO TASTE LIKE?


What does Pomelo taste like?


Derived from Dutch word pompelmoes, the Pomelo is bit of a stranger to the UK supermarket but that doesn't mean you won't come across one from time to time. However if you do find one in front of you in the fresh produce aisles it will catch your eye. Its botanical name, Citrus maxima, explains why as it means 'biggest citrus', so it is no surprise that the Pomelo is the largest citrus fruit from the family Rutaceae and will positively dwarf all other citrus offerings. The fruit is approximately 15–25 cm in diameter, usually weighing 1–2 kg . It has a thicker rind than a grapefruit, to which unsurprisingly the Pomelo is the principal ancestor of and is divided into 11 to 18 segments. 

What does Pomelo taste like?

Nutritionally raw pomelo flesh is comprised of 89% water, 10% carbohydrates, 1% protein. It is rich in Vitamin C with a 100 gram portion providing 73% of your daily requirement as well as 38 kilocalories.

So what does a Pomelo taste like? The juice is regarded as delicious while the flesh tastes like a mild grapefruit, with little of its common bitterness. However the enveloping membranes around the segments are chewy, bitter and generally considered inedible, and unpalatable. The rind can be candied or used to make preserves. or may be candied.

Main image credit - By Ivar Leidus - Own work, CC BY-SA 4.0, https://commons.wikimedia.org/w/index.php?curid=98324833

Intext image - By Ivar Leidus - Own work, CC BY-SA 4.0, https://commons.wikimedia.org/w/index.php?curid=98359406

For related articles click onto the following links:

AT WHAT TEMPERATURE DO CITRUS SEEDS GERMINATE AT?

HOW TO GROW THE POMELO - Citrus grandis FROM SEED?

How to grow Pomelo - Citrus grandis from seed?

If you have never come across a ripening pomelo fruit in real life then you are missing out. You just can't help yourself from being impressed by its almost ridiculous size. Like many cultivars within the genus Citrus they are easy to grow from seed but you just need to be aware of two things. As you would expect the seeds of the Pomelo - Citrus grandis (formally Citrus maxima) are seriously large in size and as such tend to have a longer germination period. Secondly, unless you are blessed with living in a warm Mediterranean or subtropical climate you will need to germinate your seeds with the help of a heated propagator. That is not to say that you won't be able to provide decent germinating temperatures in an unheated greenhouse or conservatory over the summer months in the UK or other temperate climates which receive consistent temperatures of around 25 degrees Celsius for six weeks or so. So just how do you grow the Pomelo from seed?

Pomelo seeds
To begin with you can use individual pots, or a seed tray but I prefer to use large modular seed trays. It saves disturbing the root system when it comes to pricking out, and as it it a regular seed tray or half seed tray size it will fit perfectly inside a standard heated propagator. Although not an ericaceous species, I prefer to use a good quality John Innes Ericaceous compost. You can use regular seed composts or multipurpose if you prefer as they will still germinate. Its just that citrus are known to go a little chlorotic and the acid compost seems to reduce this issue.

Place one seed per pot or module and bury one centimetre below the surface. Gently compact the compost before watering in. Place your pots/tray inside a propagator/heated propagator in a bright position with the vents closed to prevent the soil from drying out. Set the heated propagator at between 25-30 degrees Celsius making sure that the compost is kept moist at all time. 

Pomelo seedling

After 2-3 weeks you can expect the first seedlings to emerge, at which point you can open the vents. Once the first true leaves appear then seedlings in pots can be removed from the propagator but still keep them under protection. Do not allow the seedlings to become waterlogged as this can damage the newly developing root system and allow the soil to partially dry out before watering. 

Once established in their pots they can be potted on and hardened off over a couple of weeks before placing outside. They will prefer a warm, bright sheltered position. In the UK Pomelo plants will need to be brought back in under protection once overnight temperatures begin to dip below 12 degrees Celsius. They can either stay in permanently in a cool bright position or placed outside after the risk of late frosts have passed so long as they have been once again hardened of beforehand.

For related articles click onto the following links:

AT WHAT TEMPERATURE DO CITRUS SEEDS GERMINATE AT?

AT WHAT TEMPERATURE DO CITRUS SEEDS GERMINATE AT?

At what temperatures to Citrus seeds germinate at?


Growing Citrus from seeds is easy, or, at least it should be. However when good natured gardeners try and flex their horticultural wings by planting these babies up for cossetting on their kitchen windowsill often nothing happens and their hopes are dashed! So what is going wrong? Assuming that all other conditions are correct then it is likely to be the soil temperature. So unless your windowsill is in the Mediterranean or some similar warm and lovely environment your seeds just won't have the impetuous to initiate germination. Therefore the question is this, at what temperatures to Citrus seeds germinate at?

The simple answer is at a surprisingly high temperature so assuming you live in a cooler temperate country you will certainly need a heated propagator - unless of course you sow your seeds during the summer months. 

Lemon seeds

A study by R. E. Rouse and J. B. Sherrod at the University of Florida tested the optimum germination temperatures of 17 citrus varieties using a temperature gradient from 15 to 38 degrees Celsius. The results showed that the optimum temperatures for germination Citrus seeds ranged from 25° Celsius for Citrus trifoliata to 33° Celsius for the Citrus limonia and Citrus sinensis hybrid rootstock. This gave a mean optimum temperature for all the citrus varieties covered in this study of 30°Celsius.

This is of course great for a laboratory experiment but for kitchen purposed I would suggest setting your day temperature to approximately 25°Celsius (with the view to increasing temperatures incrementally if germonation hasn't commenced after two to three weeks) and a night temperature of approximately 16 degrees Celsius. With regards to the higher germinating temperatures it is worth considering manufacturing an insulated propagator using a polystyrene box (usually obtained from your local tropical fish shop) and a heat mat.

For related articles click onto the following links:

AT WHAT TEMPERATURE DO CITRUS SEEDS GERMINATE AT?
DOES THE BUDDHA'S HAND CITRUS HAVE SEEDS?

HOW DO YOU GROW ACTINIDIA CHINENSIS?

How do you grow Actinidia chinensis?


Commonly known as the 'Chinese Gooseberry' or 'Kiwi Fruit', Actinidia chinensis is a vigorous climbing, deciduous species capable of reaching up to 9 metres in height. Native to northern Yangtze river valley in China, it was introduced to Europe in 1900 by the notable English plant collector  Ernest Wilson (1876 – 1930).

It has a dense covering of reddish, hairy shoots and large heart-shaped leaves which can be up to 20 cm wide. The blooms open to a creamy-white colour but fade to a buff-yellow as they mature. The fragrance flowers are produced in clusters over the summer and are approximately 4 cm across. However the most notable feature of Actinidia chinensis are its edible fruits.

Actinidia chinensis fruit
Once the flowers have been pollinated, the fruits appear, first green then turning to brown as they mature. They are 4-5 cm long and resemble a large, elongated gooseberry. Even the flavour is somewhat reminiscent of gooseberry. Actinidia chinensis is dioecious (meaning that the male and female flowers appear on different plants) and so to obtain fruit you will need to plant both sexes in near proximity. Only one male plant is necessary for effective pollination although several females can be planted. So how do you grow Actinidia chinensis?

Actinidia chinensis will be happy growing in any ordinary, reasonably drained garden soil, but will perform best in rich loams. Avoid chalky soils, those lacking in humus (although this can be improved prior to planting) and any ground prone to waterlogging.

Plant Actinidia chinensis from November to March in a sunny or partially shaded position against a high wall, tress or purpose-built supporting structures.Pinch out the growing points when young to encourage a spreading habit.

For related articles click onto the following links:
HOW TO GROW ACTINIDIA CHINENSIS
HOW TO GROW ACTINIDIA KOLOMIKTA


HOW TO GROW PASSIFLORA EDULIS

How to grow Passiflora edulis 

WANT TO BUY RARE AND UNUSUAL SEEDS? THEN CLICK HERE FOR THE 'SEEDS OF EADEN' SEED SHOP

Commonly known as the 'Purple Granadilla', Passiflora edulis is a tender, evergreen, vigorous climber with highly ornamental blooms and edible fruits. Native to the subtropical and tropical regions of Brazil, Paraguay and northern Argentina, it was introduced to the gardeners of England in 1810.

It is a shallow rooted, self-clinging species, and perhaps most notable for its extremely showy bowl-shaped, fragrant, purple-white passionflowers. The blooms are approximately 6 cm across and are produced throughout the summer. Each flower has white tepals, and a corona comprising of curling white filaments which are marked by a broad, purple band at the base.

Passiflora edulis is also grown for its edible fruit which are round to oval in shape, and either yellow or dull purple at maturity. They have a soft to firm, juicy interior filled with as many as 250 seeds inside. Each seed being surrounded by an orange sac containing juice.

Passiflora edulis fruit
The plant itself can grow to approximately 3-5 metres tall and 1-2 metres wide, clinging to its support by coiled tendrils. The finely-toothed, three-lobed leaves will grow to between  7-20 cm long. They are deep green and glossy above but dull green below with two small glands on the stalks. The young stems are tinged with red or purple.

Passiflora edulis will perform best when grown in moist, fertile, well-drained, sandy loams in full sun. They are in fact tolerant of positions which experience a certain amount of light shade, but this will reduce the number of blooms.

Despite its subtropical and tropical origins it is possible to grow Passiflora edulis in the mildest regions of Northern Europe, however wherever they are likely to experience freezing conditions they are perhaps best grown as a container plant and brought in under protect before the first frost are forecasted. Provide a humus rich compost, plenty of ventilation, and reduce watering.