Showing posts with label link removed. Show all posts

WEIGELA FLORIDA

Weigela florida
Weigela florida
Originally classified as Weigela rosea by English botanist John Lindley (1799 – 1865), Weigela florida was the first species within the genus to be collected for Western gardens. Names in honour of German scientist Christian Ehrenfried Weigel (1748 – 1831), it was first discovered for western science by Scottish plant hunter Robert Fortune (1812 – 1880) who sent back the first specimens to England in 1845. It was renamed as Weigela rosea by Russian-German botanist Alexander Georg von Bunge (1803 – 1890), and published in the Annales des Sciences Naturelles; Botanique in 1839.

 Weigela florida
Botanical illustration of Weigela florida 
Native to north China, Korea and Manchuria, Weigela florida is a medium-sized, deciduous shrub which under favourable conditions can be expected to reach a height and spread of approximately 2 metres. It has a wide spreading habit and arching branches with ovate-oblong to ovate, acuminate leaves. Each leaf is finely wrinkled with prominent veins.

The blooms are funnel-shaped, reddish or rose-pink on the outside, but paler within. Typically the flowers appear in May and June along all of the shoots produced the previous year. Occasionally a second crop of blooms can appear later on in the summer to early autumn.

Plant Weigela florida from October to March in any good, moist but well-drained soil.It will thrive in full sun or semi-shade.

This is arguably the most commonly seen species in production although there are a number of ornamental cultivars that are worthy of garden space. Both Weigela florida 'Foliis Purpureis' and Weigela florida 'Variegata' have received the Award of Garden Merit from the Royal Horticultural Society.

For related articles click onto the following links:
WEIGELA FLORIDA
WHEN AND HOW DO YOU PRUNE BACK WEIGELA

THE ELEPHANT-HAWK MOTH

The Elephant hawk moth
The Elephant hawk moth - Deilephila elpenor
The Elephant hawk moth - Deilephila elpenor is a large, impressive species with an adult wingspan of between 58-70mm. It is widespread in the England and Wales, scarcer in Scotland and only found in isolated pockets in Ireland.

It is arguably one of the most attractive of our native moths with olive-green patterned pink forewings and body. The hind wings are marked pink and black.

The Elephant hawk moth
Elephant hawk moth caterpillar - Deilephila elpenor
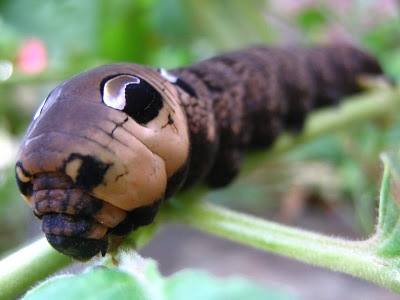
The juvenile caterpillars are green in colour, and appear from July to September, when they pupate. As the caterpillars mature will either remain this colour turn brown and heavily marked. They also have large eye-spots on the 4th and 5th body segments. The thick body tapers to an end with a backward facing, curved 'horn'.

Like the majority of moths, it's a nocturnal species with the adults emerging in May and August. It can sometimes been seen at dusk feeding on nectar-rich blooms, and resting during the day.

The Elephant hawk-moth usually only produces one generation per year which overwinters as a pupae. The common name reflects the trunk-like front of the body, which along with the eye spot will swell up when alarmed to scare off predators. The 'trunk' is also raised up in a snake pose in order (it is believed) to protect the head of the caterpillar.

Honeysuckle is a particular favourite as well as other tubular flowered plant species such as petunias and the Fuchsia triphylla cultivars. The caterpillar feeds on Rosebay Willowherb, Great Willowherb, Bedstraw and various garden fuchsia species and hybrids.

Main image credit - nick goodrum licensed under the Creative Commons Attribution 2.0 Generic license.

For related articles click onto the following links:
THE ELEPHANT-HAWK MOTH

NAKED MAN ORCHID - Orchis Italica

Naked Man Orchid - Orchis Italica
At first glance the naked man orchid - Orchis italica, does not appear to deserve its rather cheeky common name. Native to the Mediterranean, this species of orchid looks like many other European orchids with its bright pink, densely clustered flowers. However, bend down and take a closer look and you may not quite believe what you are seeing. Why? Because each individual flower looks remarkably like a naked man in all his glory.

Naked Man Orchid - Orchis Italica
Given the right conditions, the naked man orchid plan will appear in large clusters in the spring, flowering from late March to April. The flowers borne in a dense spike approximately 20 inches in height and can vary in colour from white to dark pink. They sometimes have darker spots on the lip and the hood has dark pink veins. It prefers to grow in a  low nutrient soil partial shade.

Like most plants whose shape give indications of organs or parts of the body that can be healed, this one is no different. Since Roman times, it has been used as a treatment for men's virility as an aphrodisiac.

Luckily the naked man orchid is edible, in fact its tuberous root is particularly nutritious and can be made into a flour similar to arrowroot, known as salep. It’s used predominantly in Turkey in desserts and beverages however its popularity caused the naked man orchid to become a victim of its own success. Without sustainably grown populations, wild plants have been collected for centuries and in the past century has created a decline in the wild orchid population. It now has a 'threatened status' making it illegal to harvest wild plants or to export true salep powder.

For related articles click onto the following links:
CHRISTMAS STAR ORCHID - Angraecum sesquipedale
THE ANGEL ORCHID - Habenaria Grandifloriformis
THE MOTH ORCHID -  Phalaenopsis species and cultivars
THE ORCHID CACTUS - Disocactus ackermannii
THE SWADDLED BABIES ORCHID - Anguloa Uniflora
HOW TO GROW THE WHITE EGRET FLOWER - Pecteilis radiata

THE MOTH ORCHID - Phalaenopsis species and cultivars

The Moth orchid - Phalaenopsis species and cultivars
The Phalaenopsis genus of orchids contains approximately 60 species and numerous cultivars, many of which have been produced artificially under laboratory conditions. Native to southern China, the Indian Subcontinent, Southeast Asia, New Guinea, the Bismark Archipelago, and Queensland, Phalaenopsis orchids are a highly ornamental, extremely popular and long lasting flowering plant.

The generic name Phalaenopsis simply means 'Phalaen-like', this comes from the similarly named genus Phalaena, which contains a group of large moths. The flowers of some of the species within Phalaenopsis genus are said to resemble moths in flight, which explains their common name - Moth orchids.

The Moth orchid - Phalaenopsis species and cultivars
Phalaenopsis japonica
Most Phalaenopsis species are epiphytic (a plant that grows non-parasitically upon another plant) shade plants, although there are a few which are considered to be lithophytes (plants that grow in or on rocks). Unfortunately there hasn't been much research undertaken on Phalaenopsis in their natural habitat, although we know that in the wild some species grow below the canopies of moist and humid lowland forests protected against direct sunlight, while others will grow in seasonally dry or cool environments.

A number of Phalaenopsis species have a unique and fascinating 'body-part recycling' system whereby the spent flowers metamorphose into working green, photosynthesising leaves after pollination. As with many other flowering plants, the petals of the Phalaenopsis orchid are designed to attract pollinating insects, but in all other plant genera so far discovered the petals are discarded after pollination. In many Phalaenopsis species, the flowers escape a programmed death by producing chloroplasts. The flowers turn green, become fleshy and begin to photosynthesise just as regular leaves do.

Phalaenopsis orchids are typically hardier than other species of orchids, which makes them an excellent choice for first-time orchid growers. In the wild, Phalaenopsis species are accustomed to subtropical temperatures around 20 to 35 °Celsius, although they are robust enough to adaptable to indoor temperatures of between 15 to 30 °Celsius. Avoid temperatures below 18 °C as over-watering can causes root rot. As expected from their native habitat, they requires high humidity and low light levels so keep your Phalaenopsis out of direct sunlight and regularly spray with rainwater distilled water.

Phalaenopsis orchids are usually grown in clear pots with is the result of their epiphytic lifestyle. Like the spent flowers mature roots are also able to produce chloroplasts within the roots also allowing them to photosynthasise. This is why they will fair far better in pots that will allow in light.

When potting on use a coarse bark mixture with added charcoal, perlite. In warmer climates add some sphagnum moss, or horticultural sponge to prevent the rooting medium from drying out too quickly. Do not worry if your orchid roots are exposed about the rooting medium as this is perfectly natural. Avoid the temptation to try and push them back into the soil as this can do more harm than good.

there is a saying with orchids and that is to water weekly and feed monthly. The preferred method is to carefully submerge the entire pot for a minute or so and then allow to drain before placing it back in its usual position. Using tepid rainwater, or reasonably pure tap water if you are lucky enough to have it. Avoid using cold water and don't allow water to remain in the crown of the plants for more than a couple of hours as it can induce rotting. Do not allow the root system to fully dry out. Feed with a specialist orchid fertiliser or a quarter strength regular fertiliser.

Re-pot after flowering, but only to the next sized pot. If you over-pot then it may take several years for moth orchids to re-flower. Wash away old compost from the roots before working the new compost gently and firmly around the roots.

In text image credit - By snitch from Sapporo, Hokkaido, Japan - This file has been extracted from another file: Phalaenopsis japonica (Rchb.f.) Kocyan & Schuit., Phytotaxa 161- 67 (2014). (34153976831) (2).jpg, CC BY 2.0, https://commons.wikimedia.org/w/index.php?curid=69679255

For related articles click onto the following links:
CHRISTMAS STAR ORCHID - Angraecum sesquipedale
NAKED MAN ORCHID - Orchis Italica
THE ANGEL ORCHID - Habenaria Grandifloriformis
THE MOTH ORCHID -  Phalaenopsis species and cultivars
THE ORCHID CACTUS - Disocactus ackermannii
THE SWADDLED BABIES ORCHID - Anguloa Uniflora
HOW TO GROW THE WHITE EGRET FLOWER - Pecteilis radiata

SEDUM SPATHULIFOLIUM 'CAPE BLANCO'

Sedum spathulifolium 'Cape Blanco'
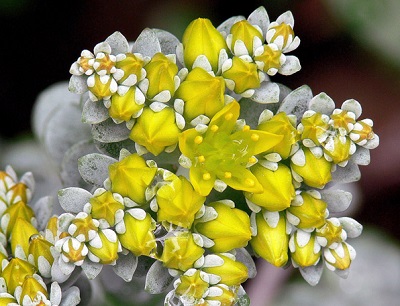
Also known under the cultivar name of  'Cappa Blanca', Sedum spathulifolium 'Cape Blanco', is a hardy, ornamental ground cover plant whose parentage is native to western North America. The Sedum genus is commonly known as the 'Stonecrops' due to their preference for rocky habitats. The species name spathulifolium refers to their spade-shaped leaves.

Sedum spathulifolium 'Cape Blanco' is an evergreen perennial with succulent stems and crowded rosettes of thick, purple-tinged grey-green leaves. The leaves emerging from the meristem are bloomed a striking, silvery-white. Under favourable conditions is can forming a wide mat up to approximately 10 cm in height.

Flattened heads, approximately 5 cm wide, of bright yellow flowers appear in May and June. After flowering, leave the dead stems on the plants until the spring when they can be easily snapped off.

Plant Sedum spathulifolium 'Cape Blanco' during suitable weather between October and May. Grow in a sheltered position in a moderately fertile, well-drained soil in full sun. That being said it is also known to tolerate light shade. It is surprisingly drought tolerant, but protect from excessive winter wet as this can cause root rots to take hold.

For related articles click onto the following links:
SEDUM SPATHULIFOLIUM 'CAPE BLANCO'
SEDUM SPECTABILE

NICOTIANA SYLVESTRIS - The Flowering Tobacco plant

Nicotiana sylvestris - the flowering tobacco plant
Nicotiana sylvestris is an imposing yet stunning flowering half-hardy annual, and is believed to be one of the parents of Nicotiana tabacum, the plant used in modern tobacco production. Nicotiana tabacum does not exists in the wild and is only found in cultivation.

Nicotiana sylvestris - the flowering tobacco plant
Nicotiana sylvestris - botanical illustration
Native to Argentina, Nicotiana sylvestris is a leafy plant which can grow up to  5 ft tall. Its stout stems carry lyre-shaped, and slightly sticky leaves which are mid-green in colour. The blooms are produced on spikes which appear in August. Each flower is white, trumpet shaped and approximately 3 1/2 inches long. The are highly fragrant and open in the evening. The scent is strongest at night, so that they can attract pollinating moths. They will close in full sun, but can remain open on dull days. Once pollinated each flower will eventually produce a large quantity of small seeds.

Grow Nicotiana sylvestris in a rich, well-drained soil preferably in a warm and sunny position. They may require additional support but only in exposed areas, and some shade from the mid-day sun in hotter climates.

Nicotiana sylvestris gained the Royal Horticultural Society's Award of Garden Merit in 1993, the genus name of which was named after Jean Nicot, a 16th century French diplomat and scholar.

For related articles click onto the following links:
NICOTIANA SYLVESTRIS - The Flowering Tobacco plant

HOW TO GROW THE WHITE EGRET FLOWER - Pecteilis radiata

White Egret Flower - Pecteilis radiata
White Egret Flower - Pecteilis radiata
The White Egret Flower - Pecteilis radiata (previously known as Habenaria radiata is an absolutely gorgeous species of terrestrial orchid native to China, Japan, Korea and Russia. Its natural habitat includes grassy wetlands and seepage slopes in moderate to high mountains, and while it is commonly found in cultivation it is sadly is in rapid decline over its entire natural range. Over collection would have been a contributing factor in the past, but more recently their loss has been due to the destruction of their habitat.

Pecteilis radiata comes in the form of small, pea sized tuber from which grass-like leaves are produced, alternately on a single stem. The leaves number up to 7, and are between 5-20 cm long and about 1 cm wide. The spike continues upwards until it releases an unbranched flower spike which can be up to 50 cm tall. Each spike will usually produce 2 or 3 flowers but sometimes it can be as many 8 which being to bloom in late July until their peak in August.

White Egret Flower - Pecteilis radiata
White Egret Flower - Pecteilis radiata
It is no surprise that Pecteilis radiata received its common name of 'white egret flower' from its exquisite, pearly-white flowers. The sepals are simple, small and green, while the extravagant lip has three main lobes. The two biggest extend laterally and are highly fringed, while the center lobe is simple, elongate, and pointing downward. Taken as a whole the flower looks remarkably like a white egret in full flight!

Over the summer new bulbs will form on short underground stems while the old bulb slowly dies away. A healthy bulb can produce up to 3 replacement bulbs and this new generation will be fully formed, individual plants by late October.

Pecteilis radiata is easy to cultivate due to its liberal production of new tubers each season. Grow them as you would any bog orchid and, very importantly, allow the bulbs to dry off in winter. Do not plant them in normal potting soil or liberally use fertilizer.

Plant them just below the surface, approximately 1 cm deep, pointy side up, in any mix that is water retaining and acidic in reaction. You can make your own rooting medium using natural weathered pumice, peat moss, and a bit of sand (ratio of 1 : 1 : 1/2) then top dress with a thin layer of dried sphagnum moss. Alternatively use perlite mixed with sand and moss peat.

Place them in a sunny, warm position and keep them moist, but not wet.  It can take a few weeks before the new growth emerges, but once it does, increase watering.  When the weather becomes hotter and the plants are growing strongly, water them so that they are permanently wet, but not waterlogged. Use clean rain water if possible, otherwise use tap water that has been allowed to stand for 48 hours.

Once they are finished flowering you will still need to keep them wet until the heat of summer has passed. Come the autumn they will only need to be kept moist. Once night temperatures start to drop below 15 C the bulbs will start to go dormant.  All dead growth can be removed at that time and the bulbs can be allowed to dry off, but not so that they dessicate otherwise the bulbs will die. Add small amounts of water every few weeks is necessary, particularly if the pot is kept in low humidity.  Keep the plants cool and dry throughout the winter at a temperature of between – 0 to 10 degrees Celsius.

Recover all newly formed bulbs in March or early April and throw away any old, dead or diseased bulbs and roots.  The new bulbs will be bright tan or light brown in color and firm to the touch while the old bulbs will be dark and soft.  Replant them immediately to start again.

Fertilize with a very dilute inorganic fertilizer with micronutrients.  In May and June  fertilize every other week, making sure that the pots are fully flushed with fresh water to avoid salt build up.

Main image credit - By sunoochi from Sapporo, Hokkaido, Japan - [Toyama, Japan] Pecteilis radiata '蘭月 - Rangetsu' (Thunb.) Raf., Fl. Tellur. 2: 38 (1837), CC BY 2.0, https://commons.wikimedia.org/w/index.php?curid=81949089

For related articles click onto the following links:
CHRISTMAS STAR ORCHID - Angraecum sesquipedale
NAKED MAN ORCHID - Orchis Italica
THE ANGEL ORCHID - Habenaria Grandifloriformis
THE MOTH ORCHID -  Phalaenopsis species and cultivars
THE ORCHID CACTUS - Disocactus ackermannii
THOW TO GROW THE WHITE EGRET FLOWER - Pecteilis radiata

BULLEY'S PRIMROSE - Primula bulleyana

Bulley's primrose - Primula bulleyana
Bulley's primrose - Primula bulleyana is an absolutely gorgeous species of semi-evergreen perennial from the Primulaceae family. Native to the Yunnan province in China, it was first introduced to European gardeners by George Forrest in 1906. Forrest named this new species of primula after Arthur K Bulley, a cotton broker from Liverpool and a keen amateur gardener who was the first to sponsor Forrest on his many plant hunting expeditions to China. Bulley also founded the Bees Ltd. nursery and was responsible for the introduction of many new hardy plant and alpine species to the UK in the early 20th century.

The natural habitat of Bully's primrose are damp, free-draining hillsides, so it makes sense when planting in a garden environment to plant them in a sunny position although it will tolerate partial shade. Primula bulleyana is best grown in a deep, damp, even boggy soil and will do particularly well beside a pond, but not with the roots completely submerged. It will establishes itself as a strong clump with a couple of years and has proven itself to be very hardy when grown in northern European conditions.

Primula bulleyana will form a basal rosette of simple light-green leaves, 5–14 inches long and 1–4 inches wide and is listed as one of the group known as candelabra primulas. So called because of the tiered arrangement of their flowers. The sturdy, erect flowering stems appear from June to July and can be as much as 24 inches in height. These stems rise in groups bearing 5-7 whorls of orange-yellow flowers 1 inch across which open from red buds. Cut back any spent flower stems.

Primula bulleyana can be propagated by division in early spring, although it will propagate itself by self-sown seedlings so long as the seed lands in damp conditions.

 Primula bulleyana gained the Royal Horticultural Society's Award of Garden Merit in 1993.

Main image credit - By Eric in SF - Own work, CC BY-SA 3.0, https://commons.wikimedia.org/w/index.php?curid=8317802

For related articles click onto the following links:
POLYANTHUS 'GOLD LACE'
THE ORCHID PRIMULA - Primula vialii

THE ORCHID PRIMULA - Primula vialii

The Orchid primula - Primula vialii
The orchid primula is arguably one of the most delicate and beautiful of all the primula species. Native to the Chinese regions of north-west Yunnan and south-west Szechwan this distinctive species differs from many of it relatives because of its highly ornamental, compound flower spike.

Primula vialii was first brought to the attention of European gardeners after its discovery by the well-known Scottish plant hunter George Forrest (1873-1932). It was originally named Primula littoniana after his friend, Consul G. Litton, however this is now relegated to a synonym. It turns out that Forrest was beaten to the post by another plant hunter, the French missionary botanist Père Delavay who had already named this new discovery Primula vialii.

The Orchid primula - Primula vialii
In its native habitat the orchid primula prefers to grow in wet meadows, near water in valleys and rather strangely in thickets of prickly oak bushes.

The erect, spear-shaped (lanceolate) leaves are produced in tufts and are a light green in colour. They are are soft, hairy and can be as much as 30 cm long on mature plants.

The flowers are produced from June to July and are formed on stout stems up to 60 cm tall. The flower buds and calyces are scarlet while the flowers themselves open up to a lavender-blue colour.

When grown as a garden plant the orchid primula is best grown under light woodland conditions but in a suitably moist, slightly acidic soil. They will they also grow in a more open situation so long as the are not allowed to dry out over the summer. They are often grow as an aquatic marginal plant and while they may tolerate waterlogged conditions they will not thrive.

Primula vialii received the Award of Garden Merit (AGM) from the Royal Horticultural Society in 1993.

Image credits - By I, KENPEI, CC BY-SA 3.0, https://commons.wikimedia.org/w/index.php?curid=4041931

For related articles click onto the following links:
POLYANTHUS 'GOLD LACE'
THE ANGEL ORCHID - Habenaria Grandifloriformis
THE ORCHID PRIMULA - Primula vialii

OSMANTHUS DECORUS

Osmanthus decorus
Osmanthus decorus
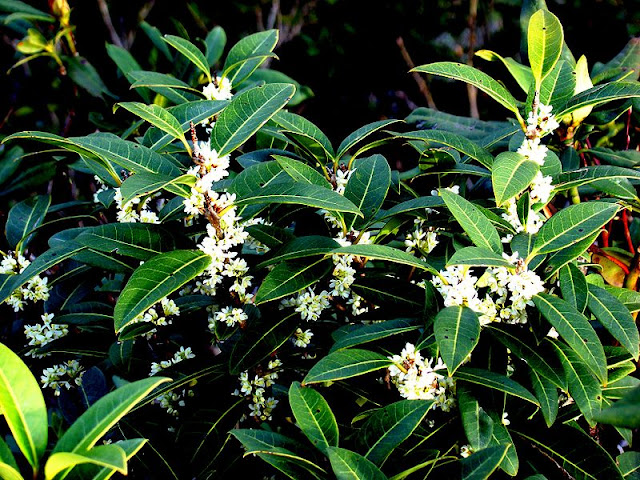
Commonly known as the Caucasus osmanthus (although in this instance it is better known by its botanical name), Osmanthus decorus is a dome-shaped, tough evergreen shrub native to west Asia. Introduced to western science in in 1866 it is noted for its large, glossy leaves and fragrant blooms.

Under favourable condition you can expect Osmanthus decorus to reach a height of up to 3 m with an approximate width of 4-5 m. The long, narrow leaves are between 5-10 cm long with a leathery surface texture.

Osmanthus decorus
Caucasus osmanthus in bloom
This species is hermaphrodite meaning that it has both male and female organs on the same plant. The clusters of small, white blooms are borne freely in the spring (around April) and are followed by purplish-black drupes (stone fruit) in September.

It will grow in any well-drained soil full sun or part shade, however it will flower more freely in a sunny, sheltered position. It will prefer a neutral to acid soil, but Osmanthus decorus has also proven to tolerate some chalk. It will even succeeds in dry shade. It can become damaged in exposed conditions although it is more tolerant of strong, cold winds than other members of this genus. However it will not perform well with maritime expose. Once established, Osmanthus decorus has proven to be hardy to about -20°C.

No regular pruning is necessary.

Images by Carduelis - Made self, Public Domain, https://commons.wikimedia.org/w/index.php?curid=4891545

For related articles click onto the following links:
HOW TO GROW OSMANTHUS DELAVAYI
HOW TO GROW PHOTINIA RED ROBIN
OSMANTHUS DECORUS
OSMANTHUS YUNNANENSIS
OSMANTHUS DECORUS

THE ANGEL ORCHID - Habenaria Grandifloriformis

Angel orchid - Habenaria Grandifloriformis
The Angel orchid - Habenaria Grandifloriformis is an exquisite orchid species from the open high altitude grasslands of southern India. It was first described by Charles McCann and Ethelbert Blatter in 1932, and is noted for its beautiful, white bilobed petals which with a little imagination resemble a levitating, cloaked angel.

Each plant can have one or more flowering stems but usually no more than five per plant. The stems tend to be no more that 12 cm high and produce one flower at the top of each stem. The blooms emerge from June to July  at the onset of monsoons.

Angel orchid - Habenaria Grandifloriformis
During the growing season it usually produces just a single, heart shaped and rounded leaf which lies flat on the ground.

It is rare to come across the Angel orchid as it is rarely seen in cultivation, but when they are available it is usually as tubers. Plant the tubers approximately 4 inches deep in deep pots containing in a well drained medium. You can produce your own recipe by creating a mix of 50% river sand, 40% leaf mulch and 10% vermiculite. Water well and place in a temperate, shaded environment with excellent ventilation.

You will need to water the Angel orchid regularly throughout the growing season, which will be from the spring and right through to the autumn. Once the day temperatures begin to cool you will need to reduce watering down to just once every two weeks. Over the winter you will need to stop watering altogether.

The compost will need to be kept on the dry side but not so much that the compost becomes desiccated. To prevent this from happening, periodically drench the compost but allow it to dry off for a while before watering again. You can expect new shoots to emerge at the end of winter and at this point you can begin watering again, but only once every couple of weeks for the spring and then once or twice a week as required over the summer. The angel orchid thrives is nutrient poor soils so avoid feeding as you would for epiphytic orchid species. Instead apply a slow release fertilizer to the compost during the spring, and no more until the following year.

Main image credit - sumukha 13@gmail.com

THE ORCHID CACTUS - Disocactus ackermannii

The Orchid cactus - Disocactus ackermannii
The Orchid cactus - Disocactus ackermannii is an species of epiphytic cactus that occurs in the cloud forests of Veracruz and Oaxaca, in Mexico. It was originally named Epiphyllum ackermannii by English botanist Adrian Hardy Haworth in 1829.

It is a gorgeous, evergreen plant with an arching trailing habit. It produces dark green, long, flattened leaves which are only 2-3 inches wide but up to 36 inches long! Each leaf has a slightly wavy edge with fine 3-4 mm spines on the nodes. The spines disappears at the leaf matures.

The orchard cactus - Disocactus ackermannii
 Disocactus ackermannii - botanical illustration
The most notable feature of the orchid cactus are is surprisingly large and absolutely gorgeous scarlet, funnel shaped flowers. The  flowers can be as large as 6 inches in diameter and are produced in late spring to early summer. The plant will need to be a couple of years old before it is mature enough to bloom and each flower will only last a couple of days, closing up each evening only to re-open again come the morning. If fertilized, the flowers are followed by green to brownish red fruits, 1 1/2 inches long and up to an inch wide.

It will do best in dappled shade but can become scorched when grown in full sun. While the orchid cactus is by no stretch of the imagination hardy it will benefit greatly from being kept outside once the threat of late frosts have passed. It is believed that being subjected to the changing light levels and seasons will help to encourage it to flower far earlier in its life compared to when being grown indoors as a houseplant.

Just make sure that it is hardened off for a couple of weeks before leaving outside permanently. Once nighttime temperatures start to drop to 7 degrees Celsius it will need to be brought back in under protection.

The orchid cactus can be grown in any good quality compost, and while it will require more watering
than traditional cactuses, allow the top third of the soil to dry out between watering and never allow the root system to become waterlogged. Feed monthly with a liquid soluble fertilizer over the growing season.

In cultivation, Disocactus ackermannii has been confused with Disocactus × hybridus (a hybrid of Disocactus phyllanthoides and Disocactus speciosus).

Main image credit - By Andreas Maisch - kaktus Uploaded by Epibase, CC BY 2.0, https://commons.wikimedia.org/w/index.php?curid=8740062

For related articles click onto the following links:
CHRISTMAS STAR ORCHID - Angraecum sesquipedale
THE ORCHID CACTUS - Disocactus ackermannii
CHRISTMAS STAR ORCHID - Angraecum sesquipedale
CHARLES DARWIN'S FAVOURITE ORCHID - Catasetum species
HOW TO GROW THE HYACINTH ORCHID
HOW TO GROW MONKEY FACE ORCHIDS FROM SEED
HOW TO GROW THE WHITE EGRET FLOWER - Pecteilis radiata
MONKEY FACE ORCHIDS
NAKED MAN ORCHID - Orchis Italica
SCHOMBURGKIA EXALTATA
THE ANGEL ORCHID
THE ANGEL ORCHID - Habenaria Grandifloriformis
THE FLYING DUCK ORCHID
THE ORCHID CACTUS - Disocactus ackermannii
THE SWADDLED BABIES ORCHID - Anguloa Uniflora
THE VAMPIRE ORCHID - Catasetum macrocarpum
THE WHITE EGRET FLOWER - Pecteilis radiata

PLANTS POISONOUS TO DOGS AND CATS

Plants poisonous to dogs and cats

Whether it’s lilies on a dining room table or a monstera in the living room, plants can add a bright abundance to any space. However, they can also be harmful to dogs and cats. Nearly half (40%) of dog owners say their dog has had a negative reaction from eating an indoor or outdoor plant*.

Typically this results in discomfort and diarrhea, but 29% of pet parents reported that their pet threw up after ingesting a plant.

Plants poisonous to dogs and cats
Pet Poison Helpline receives over 2800 calls a year regarding plant exposures in or around the home. Of those calls, 66% are about dogs and 34% are about cats. The majority of these calls come from pet owners in the state of California.

Because indoor and outdoor plants are an essential part of any household, it’s important to be familiarized with the beloved but potentially toxic plants to pets.

Pet Poison Helpline Tabatha Regehr, DVM, helped to categorize each plant’s toxicity as mild-moderate or severe.

Of the nearly 200 plants, Pet Poison Helpline receives the most calls about the following:

Lilies
Tulips
Daffodils
Rhododendrons
Kalanchoe
Philodendrons
Yew
Poinsettia
Begonias
Aloe Vera

Plants poisonous to dogs and cats
The full list here is intended to be a helpful resource to pet parents and be educational. Just because monsteras, for example, are toxic to dogs and cats doesn’t automatically mean that someone shouldn’t have one in their house.

It’s beneficial to learn about which to watch out for and put them in hard to reach spots. However, if you suspect your pet has ingested a plant that could make them sick, contact your veterinarian or an animal poison control service.

There are also plenty of plants that are perfectly safe for pets. If you have a dog or cat that tends to munch on your household greenery, consider one of the following options as a safety precaution. The ASPCA does not recommend that you let your cat or dog eat a plant, regardless of its toxicity status.

Plants safe for dogs:

Polka Dot Plant
Haworthia
Swedish Ivy
Christmas Cactus
Spider Plant
Cast Iron Plant
Money Tree
African Violet
Boston Fern
Prayer Plant

Plants safe for cats:

Bamboo
Moth Orchid
Bromeliads
Burro's Tail
Lipstick Plant


Plant information provided by Pet Poison Helpline and *A 2020 survey of 2,000 dog owners in the US by CivicScience

Image credits - Pixabay License Free for commercial use, No attribution required - https://pixabay.com/photos/schnauzer-smelling-the-flowers-735412/

CHRISTMAS STAR ORCHID - Angraecum sesquipedale

Christmas Star Orchid  - Angraecum sesquipedale
Christmas Star Orchid  - Angraecum sesquipedale
The Christmas Star Orchid  - Angraecum sesquipedale, is an epiphytic orchid species native only to Madagascar, an island country in the Indian Ocean, off the coast of Southeast Africa. It was first discovered in 1798 by the French botanist Louis-Marie Aubert du Petit-Thouars (1758 – 1831), although it was not formally described by him until 1822.

Christmas Star Orchid  - Angraecum sesquipedale
Angraecum sesquipedale and pollinator moth
It is of particular interest due to its association with the English naturalist Charles Darwin (1809 - 1882). In 1862, Darwin received a container of orchid specimens by Joseph Hooker, the director of the Royal Botanical Gardens, Kew. In the January of that year, Darwin wrote a letter back to Joseph Hooker. It stated:

 ‘...I have just received ..... the astounding Angraecum sesquipedale with a nectary a foot long. Good Heavens what insect can suck it?...’

Later that year, Darwin predicted that the long flower spur must have co-evolved with a pollinator moth with an equally long proboscis, a theory which drew particular ridicule from this critics. However, it was not until after his death in 1903, and 41 years after writing his original letter to Hooker, that the pollinator (the Malagasy subspecies of the African hawk moth) was discovered by Lionel Walter Rothschild and Karl Jordan and Darwin's theory was finally vindicated. The hawk moth was named Xanthopan morganii praedicta in honour of Darwin’s original prediction. Since then it has also gained the common name of Darwin's orchid.

Christmas Star Orchid  - Angraecum sesquipedale
Angraecum sesquipedale botanical illustration
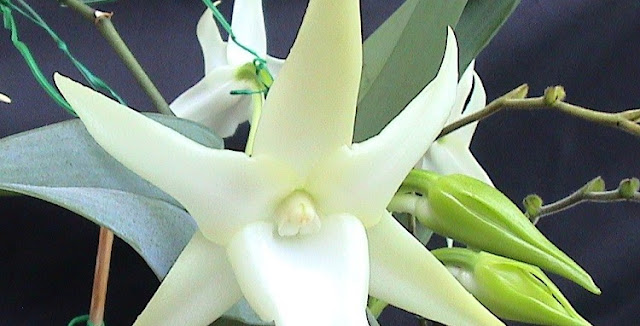
Growing up to a metre high, the Christmas Star Orchid is noted for its gorgeous, creamy-white blooms which emerge from between the upper leaves on pale greenish stems. The star-like flowers are large, fleshy with pointed sepals and petals between 7–9 cm long. Between 2-6 blooms are produced per flowering stem. However it is the 30–35 cm long green spur which attracts the most interest.

In their native habitat the flowers will emerge from June to September, however when cultivated in Europe however, the flowers appear between December and January. They produce an intense spicy scent, but as this species is moth pollinated the fragrance is only present at night.

The leathery leaves are dark green with a grayish bloom and a bilobed tip. They measure approximately 22–30 cm long and 3 cm wide. Like the majority of epiphytic orchid species the roots are thick and silver-grey in colour.

For related articles click onto the following links:
CHRISTMAS STAR ORCHID - Angraecum sesquipedale
CHARLES DARWIN'S FAVOURITE ORCHID - Catasetum species
HOW TO GROW THE HYACINTH ORCHID
HOW TO GROW MONKEY FACE ORCHIDS FROM SEED
HOW TO GROW THE WHITE EGRET FLOWER - Pecteilis radiata
MONKEY FACE ORCHIDS
NAKED MAN ORCHID - Orchis Italica
SCHOMBURGKIA EXALTATA
THE ANGEL ORCHID
THE ANGEL ORCHID - Habenaria Grandifloriformis
THE FLYING DUCK ORCHID
THE MOTH ORCHID -  Phalaenopsis species and cultivars
THE ORCHID CACTUS - Disocactus ackermannii
THE SWADDLED BABIES ORCHID - Anguloa Uniflora
THE VAMPIRE ORCHID - Catasetum macrocarpum
THE WHITE EGRET FLOWER - Pecteilis radiata

HOW TO GROW BLUEBERRIES FROM CUTTINGS

How to grow blueberries from cuttings


Considered by many to be a bonafide super-food, blueberries have become increasing popular over the years in both the supermarkets and allotments. There are a number of excellent varieties to choose from, however much of the fruit bought today is imported from across the globe as far away as Poland and even Argentina. Not only is this rather ridiculous with regards to air miles, the artificial atmospheres and refrigerated environments take out all the flavour. Of course to get the very best flavour you will need to eat blueberries straight from the bush, but purchasing pot grown plants, let alone planting out a bed load can be expensive. However if you are on a budget or if you need a lot of stock there is an alternative. Produce your own blueberry plans by taking propagation material from established plants.
How to grow blueberries from cuttings
Blueberry cuttings - http://forums.gardenweb.com/discussions/

If you are only looking for a couple of blueberry bushes and don't mind waiting then long shoots can be layered and pegged down in September. These are usually ready for severing and replanting after one or two years.

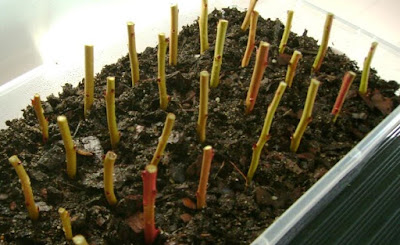
Alternatively, and particularly if you are looking to propagate a lot of stock, 3 - 6 inches long semi-ripe cuttings can be taken in July. The 3 inch cuttings will be needed if you are striking into a standard seed tray, however 6 inch cuttings are better but these will need a deeper, bed made inside a shaded cold frame. The timing of this is important. Take your cuttings to late in the year and they will tend to form flower buds rather than roots. Take cuttings to early and the shoots will be too young and succulent and will wilt before rooting can occur.

As a good indication, select cutting material with leaves that are intermediate in colour, between the darkest older leaves and the palest young shoots. Cuttings that snap easily when bent are too young. What you are looking for are stems which are bendable and starting to become woody. Collect cuttings in the morning from plants which have been well watered the night before. Try and strike your cuttings as soon as possible to prevent them from wilting as this will adverse affect their ability to root. If the day is expected to be hot or if there is a delay between taking the cuttings and striking the cuttings then keep the cuttings in a damp container or bag that has a couple of cool packs inside. Do not allow cool packs to touch the cuttings as they can freeze and therefore damage the plant material.

Using standard seed trays, fill with a good quality compost such as John Innes 'Seed and Cutting' or make your own from equal parts by volume moss peat and horticultural grade lime-free sand. Moss peat is naturally acidic which is useful as blueberries are ericaceous. Do not use sedge peat as a substitute as its pH can vary from acid to alkaline depending on where it is from.

Strike the cuttings 2 inches apart in the seed tray, approximately half the cutting should be in the compost.  Gently water and then place inside a shaded cold frame. Keep the compost moist and the atmosphere humid and you can expect your cutting s to have rooted in 6 - 8 weeks. Leave them in place until they go dormant in the autumn. At this point they can be carefully lifted so to avoid damage to the young root systems and either potted on or planted into their final positions.

For related articles click onto the following links:
HOW TO GROW BLUEBERRIES IN POTS AND CONTAINERS

HOW TO TAKE CUTTINGS FROM POINSETTIA

How to take cuttings from poinsettias
As gorgeous as poinsettia - Euphorbia pulcherrima, bracts are (a bract is the botanical name for a modified leaf, which in the case of the poinsettia is larger and more brightly coloured than the true flower) they are only short lived, providing seasonal effect. As soon as the true flowers found within the rosette of bracts have finished blooming it will drop the bracts. Why? Because once flowered the plant will no longer need its bright red brats to attract pollinating insects.

As soon as the flowers have finished you can cut back the poinsettia stems to within 15 cm of the base. New shoots will arise and then from April to May they will be ready for being used as propagation material.

Using a sharp sterilized blade, take cuttings approximately 10 cm long. Avoid choosing weak stems and any that appear to have signs of disease. Like many other species within the Euphorbia family the cut stems will 'bleed' latex, so make sure you wear gloves as the milky sap can be an irritant. To check this flow, dip the cut stem into powdered charcoal. Remove the bottom half leaves

Using 7-9cm pots filled with a good quality peat-based seed and cutting compost, insert one cutting per pot. Press the cutting in until the bottom third is buried, then gently press the compost against the stem for additional support.You can always consider making your own compost using equal parts by volume fine-blended moss peat and horticultural grade grit-sand. Sterile rooting conditions are important so you will need to oven bake your mix prior to its use.

Gently water in the cuttings using a watering can fitted with a fine rose, then place the pots inside a heated propagator. Set the basal heat at a temperature at between 16-18 degrees Celsius. Mist the cuttings on a daily basis to prevent desiccation. Allow the top few cm of compost to dry out before watering and never allow the compost to become waterlogged. You can expect the cuttings to have taken root after 2-4 weeks.

Pot the rooted cuttings on as necessary and begin feeding with a liquid soluble fertilizer once they are in their final pots.

For related articles click onto the following links:
HOW TO TAKE CUTTINGS FROM POINSETTIA
How to Care for Poinsettias
HOW TO GROW POINSETTIAS

HOW TO GROW ASPARAGUS FROM SEED

How to grow asparagus from seed

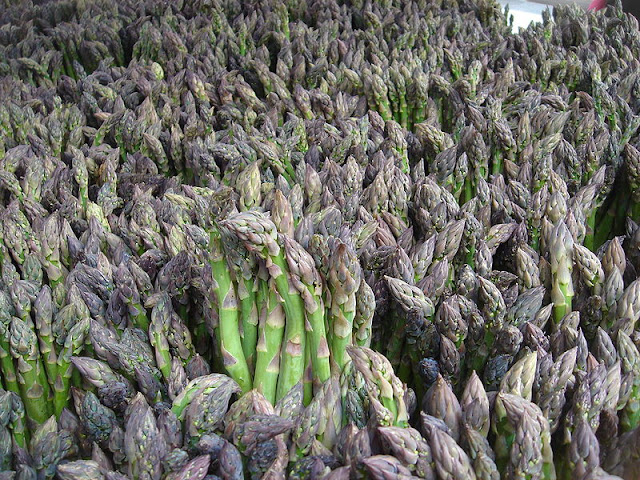
When it comes to growing asparagus from seed you will need to prepare a suitable seed bed during the previous autumn. Dig over the bed to a spit deep and incorporate plenty of well-rotted farm manure or garden compost at the same time. Then prior to sowing go over the soil surface to produce a fine tilth.

How to grow asparagus from seed
Asparagus seeds
You can direct sow asparagus seed in April however it can take approximately 6 weeks for the seed to germinate. Sow asparagus seed thinly in drills 1/2 an inch deep and gently water in. When the seedling reach 6 inches high they can be thinned out to the strongest specimens at a spacing of one plant every 12 inches.

Regularly hoe over the topsoil to keep it free of weeds, being careful not to damage or accidentally remove any of the young seedlings. Water regularly throughout the summer. In the autumn when the ferny foliage begins to change colour, it should be cut back to ground level and burned to prevent the berries of female plants from producing unwanted, inferior berries. In fact some growers believe that the very best crops are only from male plants so once female plants have been identified you may wish to lift and dispose of them. The following April, transplant the young plants to their permanent bed, but be aware that it will be another year or so before they will be mature enough to start harvesting the young, edible shoots.

The best crops are produced on light, sandy soils. Heavy soils can be improved by working plenty of  well-rotted farm manure or garden compost.

Growing asparagus seed indoors

Because it can take around 6 weeks for asparagus seed to germinate when directly sown outside you can get an early start on the competition by growing asparagus seed under protection from mid-February to mid-March. Soak the seeds in warm water for a few hours beforehand to help initiate germination.

How to grow asparagus from seed
Asparagus seedlings
Using a modular seed tray, fill with a good quality soil-based compost such as John Innes 'seed and Cutting'. Sow one seed per module at a depth of 1/2 inch deep and water in. Allow the excess water to drain away and then place inside a heated propagator at a temperature of 15-18 degrees Celsius. Move to a warm, bright windowsill, but one that does not receive direct sunlight. Alternatively seal the tray inside a clear polythene polythene bag and place that on the same windowsill.

You can expect the seedlings to germinate from 14-21 days, at which point remove the tray from the bag or propagator. Keep the seedlings moist and once their root systems has established in their modules they can be popped out and potted on into 3 inch pots using a soil-based, multi-purpose compost.

Once the threat of late frosts have passed they can be hardened off outside for a couple of weeks to help acclimate them before planting outside into their final position. Water you new planted asparagus plants regularly over the growing period and keep the bed free of weeds, and in particular perennial weeds.

For related articles click onto the following links:
HOW TO GROW ASPARAGUS FROM SEED
HOW TO GROW THE ASPARAGUS PEA

HOW TO GROW THE ASPARAGUS PEA

How to grow the asparagus pea
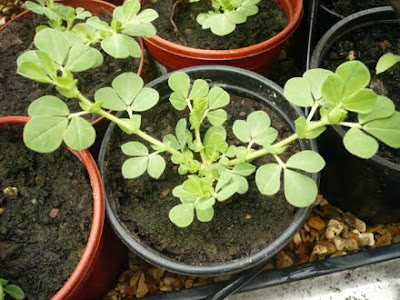
The asparagus pea - Lotus purpureus is a little known half-hardy annual that is grown for its edible seed pods. It forms a loose bush approximately 12 inches high and bears small, sweet-pea like, scarlet flowers. Once pollinated these are followed by cylindrical green seed pods with four wavy-margined flanges or wings. The pods can reach a length of about 3 inches, but for cooking purposes their flavour is at their best when they are half this length and left whole.

Native to Papua New Guinea, it is considered to be a gourmet vegetable and grows abundantly in hot, humid equatorial countries with high rainfall. However there are also varieties that can be grown in the cooler areas of Europe and USA.

How to grow the asparagus pea
Asparagus pea seedling
The asparagus pea will thrive in any fertile, well-drained soil that has been enriched with a dressing of well-rotted farm manure or garden compost in the top spit. Ty to provide a position that receives as much sun as possible throughout the day.

Sow asparagus pea seed directly outside in April or May, setting them 4 inches apart in rows every 18 inches. Each seed should be about 1/3 of an inch deep. Germination will usually occur between 7-14 days. Water in and provide appropriate support such as twiggy pea sticks - especially in exposed regions. Avoid watering too much when the plants are young but once they have produced their first pods they can be watered regularly during the rest of the growing season.

If you want to make the most of the growing season or live in an area with a short growing season then you can sow asparagus pea seeds earlier in March. Using 3 inch pots, fill with a good quality compost such as John Innes 'Seed and Cutting' and sow at a rate of 1 seed per pot under glass in pots in early spring or outdoors in late spring. Place the pots in a warm bright position at approximately. 19-21C.

Once the plants have become established in their pots, and the threat of late frosts have passed, harden them off outside in a cold frame before planting out nt their final position.

Pick pods regularly while young and tender.

For related articles click onto the following links:
HOW TO GROW ASPARAGUS FROM SEED
HOW TO GROW THE ASPARAGUS PEA
HOW TO GROW ASPARAGUS PEAS FROM SEED

RHODODENDRON SINOGRANDE

Rhododendron sinogrande
Rhododendron sinogrande and me
Rhododendron sinogrande is a broadleaved, evergreen native to Southwestern China, Tibet and upper Myanmar. It is an understory tree (or large shrub) usually confined to coniferous forests in alpine regions. It was discovered and introduced to western science by renowned plant hunter George Forrest in 1931, but formally named and described by Scottish botanists Sir Isaac Bayley Balfour (1853 – 1922) and Sir William Wright Smith (1875 – 1956).

Rhododendron sinogrande
Rhododendron sinogrande 
It is noted for its huge, glossy, dark-green leaves which can grow to as much as 80 cm long and 30 cm wide. It is in fact the largest leaved Rhododendron in existence! The lower surface of the leaves have a silvery-grey or fawn indumentum (surface covering of hairs). The blooms are produced in huge trusses in April. The flowers are creamy-white with a crimson blotch. Under favourable conditions you can expect Rhododendron sinogrande to grow up to 15 metres tall.

Plant Rhododendron sinogrande in part shade to full shade as the leaves can scorch in full sun. It is best grown in acidic, humus-rich, moisture-retentive but well-drained soil. A pH of between 4.5 and 6.5 is ideal. Like most other rhododendrons, alkaline soils can be acidified using digging in plenty of ericaceous compost, moss-peat or other such product prior to planting. Acidifying products will need to be re-applied on an annual basis. Provide an acidic mulch in the spring, such as pine needles or composted bark. Be aware that Rhododendron sinogrande has a shallow, fibrous root system, so cultivate other plants species beyond the expected canopy of the mature specimen.

Rhododendron sinogrande received the Award of Merit from the Royal Horticultural Society in 1922 and the First Class Certificate in 1926.

For relate articles click onto the following links:
HOW TO GROW RHODODENDRON IMPEDITUM
HOW TO GROW RHODODENDRON SINOGRANDE
HOW TO GROW RHODODENDRONS IN ALKALINE SOIL
RHODODENDRON SINOGRANDE