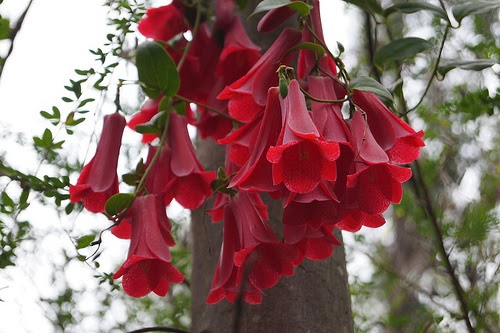
HOW TO GROW LAPAGERIA ROSEA FROM SEED

The Chilean Bellflower - Lapageria rosea


Commonly known as the Chilean Bellflower or Copihue, Lapageria rosea is an ornamental climbing plant noted for its gorgeous evergreen foliage and tropical effect, waxy blooms. Native to the Valdivian temperate rain forests flora of Chile, it can grow to a height of over 10 m high given favourable conditions.

Lapageria rosea seeds - http://home.onehowto.com/
Lapageria rosea seeds should be sown as soon as they are purchased and it is not unknown for shop bought seed to have begun germinating in its packet. These of course should be sown immediately. Any seeds not showing signs of germination can be soaked in lukewarm water for 25 hours prior to planting. Before sowing, as there can sometimes be a layer of pulp which can inhibit germination.

In its native habitat, Lapageria rosea will be found growing in the humus-rich, lime-free soil. So when propagating from seed use a good quality ericaceous compost rather than a specific seed compost. Using 7.5 pots, sow at a rate of one seed per pot. Cover seeds with its own depth of compost or vermiculite. Place inside a heated propagator at a temperature of between 15-18 degrees Celsius or seal inside a clear polythene bag. Place in a warm bright position but avoid direct sunlight during the warmest part of the day. Germination will occur from 1-3 months.
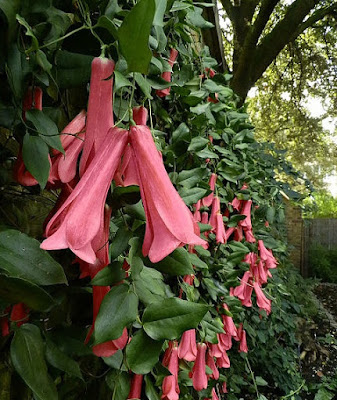
Lapageria rosea - plantpostings.com
Keep the compost moist but not waterlogged and do not allow the compost to dry out as this can cause germination to fail. If you live in a hard water area, avoid using tap water. Instead, water with soft water, or boiled rainwater.

Germination is somewhat sporadic and so each pot-grown seedling should be removed from the propagator or bag as it emerges and grown on under frost-free conditions. It can often take a couple of months for the root system to establish inside the pot so water sparingly during this period.

Lapageria rosea seedlings require very little plant food, and are known to be sensitive to fertilisers high in phosphates. Pot on as required into 20-25 cm pots or plant directly into the ground in dappled shade. In regions that experience prolonged freezing conditions, plant into a greenhouse border or overwinter under protection. Provide support for the young plants to climb and provide a minimum winter temperature of 7 degrees Celsius.

For related articles click onto the following links:
CLIMBING PLANTS FOR AUTUMN COLOUR

HOW TO GROW FUCHSIA 'GENII'

Fuchsia 'Genii' - plantify.co.uk


Fuchsia excorticata 'Genii' is a dwarf, upright, deciduous shrub with red shoots and attractive lime-yellow foliage. It is a popular, easy-to-grow garden plant suitable for both full sun and semi-shaded positions although the leaf colour will be at its best when grown in full sun.

Fuchsia 'Genii' - http://media.growsonyou.com/
Under favourable conditions you can expect it to attain a height of approximately 60 - 90 cm, and with a spread of 30 - 60 cm over a period of 2 to 5 years. The simple, yet attractive blooms appear from June to September. They are smaller compared to other ornamental flowering Fuchsia cultivars, with a violet, turning reddish-purple corolla and cerise calyx. To encourage more flowers, remove any blooms as they begin to fade.

It will grow in almost any moist, well-drained soil, however digging in a good amount of humus rich organic compost will pay dividends. When grown as a container plant, use a quality, well-drained compost such as John Innes No.3. Pinch out the growing tips of young specimens to promote bushier growth and more flowers.

Apply a deep, dry mulch of bark chips around the base of the plant to protect the roots from freezing winter conditions cold. Avoid mounding the mulch up against the main stem. Prune stems back to just above ground level in the spring.

Little is known about its history although it was brought into commercial production in 1951

Fuchsia excorticata 'Genii' received the Award of garden 1993.

For related articles click onto the following links:
ARE FUCHSIA BERRIES EDIBLE?
MEXICAN ORANGE BLOSSOM - Choisya ternata
HOW TO GROW CHOISYA TERNATA 'SUNDANCE'
HOW TO GROW FUCHSIA 'AUTUMNALE'
HOW TO GROW FUCHSIA 'GENII'
HOW TO GROW FUCHSIA MAGELLANICA 'Riccartonii'
HOW TO GROW FUCHSIA 'TOM WEST'

WHEN DO YOU HARVEST PARSNIPS?

Parsnips - http://www.saga.co.uk/


Parsnips are a hardy biennial root vegetable, but one which is grown as an annual for cropping. The roots are ready for harvesting as soon as the leaves begin to die down in the autumn. First trim back any remaining foliage to within 1 inch of the roots, then use a fork to carefully lift them.

Unfortunately they cannot be pulled straight from the ground like carrots as the root is likely to break. In light. sandy soils loosen the ground around the parsnips before pulling, while in heavier soils each parsnip will need to be dug up in its entirety. Avoid damaging the roots as broken or damaged roots do not store well.

Parsnip harvest - https://www.quickcrop.ie/
Remove any excess soil from the roots if you are going to use them right away. However, you can leave soil clinging to the roots for any parsnips lifted for storage as exposure to the air will cause the root to dry up and shrivel.

They can be lifted as required, although lifting a few extra in November in regions prone to long periods of freezing temperatures will ensure you still have parsnips to eat even if the top few inches of soil frozen frozen and therefore too hard to dig into. Alternatively lift the entire crop come December for storage inside a clamp.

It is generally accepted that the flavour of parsnips is improved if they are left in the ground until at least after the first frost. The freezing conditions encourages the plant to convert starch from within the root into sugars. Any parsnips still left in the ground come he following March should be lifted before any new foliage emerges as this will seriously affect the quality and flavour of the root. As time continues the root will also begin to develop an unpalatable hard and woody core. 

For related articles click onto the following links:

HOW TO GROW ACER PALMATUM 'OSAKAZUKI'

Acer palmatum 'Osakazuki' autumn foliage


Acer palmatum 'Osakazuki' is one of the most popular of all Japanese Maples grown notably for its outstanding autumn colour. It is a small, hardy, deciduous tree with an open habit, and is suitable both as a pot grown specimen or as a feature plant in the garden.

The leaves are considerably larger compared to other Acer palmatum cultivars and are a mid-green colour. While this in itself isn't particularly striking, the long-lasting fiery scarlet autumn colour is. In fact it is arguably the most eye-catching of all Japanese maples at this time of year. Autumn colour can be improved by providing slightly acidic conditions.

How to grow Acer palmatum 'Osakazuki' in a pot

Acer palmatum 'Osakazuki'
When growing as a container plant, use a good quality compost such as John Innes 'No 3'. A soil-based ericaceous compost would be best but this is rarely seen, so consider adding moss-peat to your compost mix to help increase acidity.

Water regularly over the summer, but do not allow it to become waterlogged. More importantly perhaps is not to allow the compost to dry out as Acers are particularly sensitive to drought. This can cause leaf-drop and, in a worst-case scenario, death of the plant. Over the growing period consider watering with a liquid soluble ericaceous fertiliser one every few weeks. Do not over fertilize as this will produce overly vigorous growth that is prone to pests and pathogens.

In regions that are prone to extended periods of freezing temperatures overwinter in a frost-free environment - if the pot is not too heavy to move! Replace the top inch or so of old compost with new compost each spring.

How to grow Acer palmatum 'Osakazuki' in the garden

Acer palmatum 'Osakazuki' will be happy growing in well-drained, but moist garden soils. It will tolerate both clay and chalk soils but will perform best when conditions are either acid or neutral. It is suitable for positions of both full sun and semi-shade, but avoid exposed areas as the foliage can easily become wind scorched.

Dig in a hole twice the size of the root ball, and dig in plenty of well-rotted organic matter before planting. If necessary provide a stake but avoid penetrating the root-ball when securing it into the ground. Newly planted specimens will benefit from a with a thick mulch of bark chips.

For related articles click onto the following links:

HOW TO GROW JAPANESE MAPLES

Japanese Maple - http://www.hardytropicals.co.uk/


Japanese Maples are a large group ornamental shrubs and small trees and arguably amongst the most ornate and colourful of all hardy garden plants. The majority of Japanese Maples are hybrids and selected cultivars of Acer palmatum, a native to Japan, Korea, eastern Mongolia, and southeast Russia so it is fair to assume that they will be equally at home in northern European climates.

Japanese Maple
The closer Japanese Maples are to the species type then the hardier and more tolerant to exposed conditions they are. Palmate, green-leaved varieties are generally suitable for open, sunny positions while the fine-leaved forms will require sheltered positions in dappled or even heavy shade. Some of the more extreme cultivars can even show signs of wind burn or scorch just by looking at them funny!

Japanese Maples are best planted in the autumn ( up until March) in a cool, well-drained, but moist soil. However, the majority of specimens are purchased as pot-grown specimens in late spring and early summer and so long as they are watered during dry spells they will establish with little effort. Those cultivars nearer the type species are usually found to be lime tolerant while the more ornamental selections can suffer if not planted into slightly acidic soil. If in doubt dig in plenty of ericaceous compost before planting.

Acer palmatum
Cultivars with delicate foliage will need protection from cold winds, and late frosts followed by early morning sun. Those grown specifically for their autumn colour should be planted in areas sheltered from prevailing autumn winds

Japanese Maples have compact root systems, so when planted in regions prone to drought they can be put at risk. In this instance try to provide consistent water conditions and a thick dry mulch. As equally important, avoid soils prone to waterlogging. Japanese Maples do not perform well on heavy fertilization as this can cause overly vigorous growth that is prone to pests pathogens. Instead lightly fertilize using slow release fertilizers.

For related articles click onto the following links:

HOW TO GROW THE BUSHMAN'S PIPE - ceropegia ampliata

THE BUSHMAN'S PIPE - ceropegia ampliata


Ceropegia ampliata is best used as a container plant in any good quality, well-drained potting compost. Water sparingly and feed with a liquid soluble fertiliser just once a month. Be aware that to much fertiliser can damage the root system so increase the dilution by 50%.

THE BUSHMAN'S PIPE - ceropegia ampliata
It is not frost hardy and will do best with a minimum temperature of 16 degrees Celsius. It is suitable for full-sun to semi-shade and with that in mind it will be quite happy grown as a house plant. Just remember to place it outside when flowering.

You can put some kind of support in place but Ceropegia ampliata is a weak climber and so will need a helping hand to keep it in place.

Water plants sparingly as Ceropegia ampliata is found in areas where rainfall occurs mostly over the summer. With that in mind you will need to give your plant a resting period by withholding water in winter.

Ceropegia ampliata is prone to infestation by mealybugs, woolly aphids and red spider mite. Woolly aphids usually attack the roots and this causes secondary infection by a black fungal rot that can easily destroy your plant.

How to propagate Ceropegia ampliata

In its natural environment, root development is stimulated when the stems touch the soil. This therefore makes Ceropegia ampliata very easy to grown from cuttings. Just make sure the cutting contains a few nodes, and allow the wound to dry out and callous for a few days before potting on in a good quality cutting compost such as John Innes 'Seed and Cutting'.

If you can get hold of a packet, Ceropegia ampliata is easily grown from seed. Again use a good quality compost such as John Innes 'Seed and Cutting' and keep the seed damp until the germinate. This will normally take 14 - 21 day. Be sure to treat the young seedlings for damping off and fungal infections.

For related articles click onto the following links:
CEROPEGIA AMPLIATA - the Bushman's pipe

HOW TO GROW JAPANESE MAPLES FROM SEED

Mature Japanese Maple


The Japanese Maples - Acer palmatum cultivars and hybrids are a large group of generally large shrubs or small trees with a low, rounded head. Native to Japan, Central China and Korea, many cultivated varieties have been raised from this species which exhibit a wide range of forms in both leaf-shape, colour and habit. They are notable for their gorgeous red, orange or yellow autumnal colours.

Acer seeds - http://www.asknature.org/
Japanese Maples are relatively easy to grow from seeds, but be aware that only seedlings from the typical Acer palmatum will grow true to the parents. Hybrids and cultivars are unlikely to produce progeny similar to the parents and if this is your aim then you would be better off using vegetative propagation techniques such as grafting. That being said there is of course a chance that you would produce the next outstanding cultivar.

The seeds will be readily available from Japanese Maples in the autumn. They are easily recognised as they are attached in sets of two with a wing extending from each seed. Maple seeds have a natural dormancy of approximately two years which will need to be broken (either naturally or otherwise) before germination can proceed. Sow them in 3 inch pots or a large modular seed tray containing well drained, sterilized topsoil or an ericaceous, soil-based seed compost.

Acer palmatum seedlings - Marco Ernst
Sow at a rate of one seed per pot or module and then cover with approximately 3/8 of an inch of soil. Gently water in and then allow the soil surface to dry out completely before watering again. Move them to an unheated, protected environment such as a cold frame and let nature take its course. Once the seedlings begin to emerge move to a sheltered, partially shaded position which avoid direct sunlight during the hottest part of the day. Pot them on as required and plant out into their final position so long as there is no longer a threat of late frosts.

Although the typical and stronger forms are known to tolerate chalk soils, the Japanese Maples perform at their best in moist, but well drained loam, sheltered from cold winds especially from the east.

Breaking dormancy

Germinating Japanese Maple seeds - http://bonsaibeginnings.blogspot.co.uk/
To break the dormancy of Japanese Maple seeds soak them in warm water for approximately 24 hours. You may need to use a thermos flask to maintain the temperature over this period. Drain off the water, then place the seeds in a clear polythene bag with a damp mixture (not waterlogged) of 50:50 horticultural grade sand and moss peat.

Make some small holes in the bag using a sharp pencil to allow air circulation and place inside in a refrigerator for approximately three months. After this period the seeds can be planted outside into a prepared nursery bed which will need to be shaded during the hottest part of the day. Once again, cover the seeds with approximately 3/8 of an inch of soil. Water thoroughly, but allow the soil to dry out completely before watering again.

For related articles click onto the following links:

HOW TO GROW VERBENA BONARIENSIS FROM SEED

Verbena bonariensis - http://www.summerhillgardencentre.co.uk/


Verbena bonariensis is an ornamental flowering herbaceous perennial plant, and a popular choice for both wildlife gardens and late summer effect borders. Native to tropical South America, it is a tall and slender-stemmed species, which under favourable conditions can grow to 6 ft tall and with a 3 ft spread.

When it come to sowing Verbena bonariensis, the best time is from February to March.

Verbena bonariensis - http://higgledygarden.com/
Sow Verbena bonariensis seeds in modular trays or 3 inch pots filled with a good quality compost, such as John Innes 'Seed and Cutting', and at a rate of just one seed per module ot pot. Press the seed gently into the compost and then cover with a thin layer of compost of vermiculite.

Place inside a heated propagator at a temperature between 15-18C, or alternatively sealed inside a clear polythene bag. Position on a bright windowsill, but one which is out of direct sunlight. This will reduce scorching of new growth and excessive drying out of the compost.

Germination is normally quite erratic and can take up to 2-3 weeks. Once the seedlings have emerged remove them from the polythene bag or propagator. Keep the compost cool and moist, but avoid overwatering at all times.

Once the root systems of modular grown seedlings have established they can be potted on onto 3 inch. pots. Once the threat of late frosts have passed they can be hardened off for a week or so to outdoor conditions before planting outside into their final positions. Plant Verbena bonariensis plants 2 ft apart.

Verbena bonariensis will perform best in a moist, well-drained soil. It prefers full sun, but can tolerate semi-shade.

For related articles click onto the following links:
HOW TO GROW VERBENA BONARIENSIS FROM SEED

HOW TO GROW RUDBECKIA

How to grow Rudbeckia


The Coneflower - Rudbeckia species, is one of late summer's great flowering plant families. At a time of year when most plants are spending their time producing seeds, the Rudbeckia hybrids and species are up there with the best of them producing large, long lasting flowers that are as colourful as anything seen in the spring.

Rudbeckia flower
If you have your heart set on a successional flowering garden then you would be 'mad in the head' not to have at least a couple of cultivars of this hardworking perennial.

Rudbeckia is a plant genus of 23 species, all of which are native to North America.

Perhaps the most popular species is Rudbeckia hirta, also known as the 'black-eyed-susan'.

There are a number of fantastic cultivated varieties ranging both in colour and height, and producing bold colours blooms up to 5 inches across!

The name was given by Carolus Linnaeus (the father of our modern system of classification) in honor of his teacher at Uppsala University, Professor Olof Rudbeck the Younger (1660-1740), and his father, Professor Olof Rudbeck the Elder (1630-1702), both of whom were botanists.

Rudbeckia blooms
Luckily for us Rudbeckias will grow in any well-cultivated and well-drained soil. they prefer an open and sunny site, but some taller species may require staking in exposed conditions.

Plant Rudbeckias in October, March or April, but if your soil is particularly dry then you can mulch with peat or well-rotted manures early in the spring unless you want to reduce the height of the taller species

The flowers appear from August to October and are produced in daisy-like inflorescences, with yellow or orange petals arranged in a prominent, cone-shaped head.

It is this arrangement that has brought about its common name of the cone flower.

For related articles click onto the following links:
HOW TO GROW ERIGERON KARVINSKIANUS
HOW TO GROW RUDBECKIA
HOW TO GROW RUDBECKIA FROM SEED