WHAT IS A STUMPERY?


When I visited Arundel castle gardens earlier in the year, they were still in the process of designing their brand new stumpery garden. At face value, it looked bleak, somewhat desolate and had a feel of a haunted graveyard rather than a stylised garden.

Of course, other than the upturned tree stumps - impressive as they were - the ground was bare, and only a fool would judge an incomplete design.

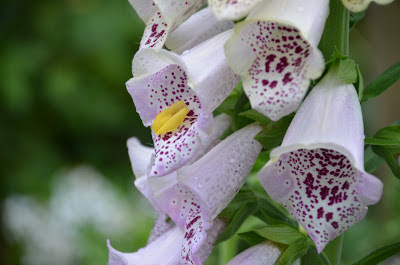
Foxglove flowers
Foxglove blooms
Luckily I managed to fit in another visit to Arundel castle gardens over the weekend and the changes were impressive. Foxgloves were the order of the day, a favourite of mine at the moment as they are one of the few native English plants to make the grade in an ornamental garden.

Fully stocked with a range of herbaceous plants, the planting scheme had completely changed the character of the stumpery garden, giving it a peaceful, mystical feel.

The colour palette was kept muted across the display and so the eyes were not distracted away from the overall fantasy. It would have been tempting to add splashes of colour, but this would have drawn away from the overall impact. That being said, rather than being the main attraction, the upturned stumps had now become a wonderful backdrop worthy of a such a fanciful design. Well done to the gardeners.

So, just what is a stumpery?

Stumpery with spring blooms
Spring stumpery
A stumpery traditionally consists of tree stumps arranged upside-down or on their sides to show the root structure

 The first stumpery was built in 1856 at Biddulph Grange and they remained popular in Victorian Britain.

The pieces are arranged artistically and plants, typically ferns, mosses and lichens are encouraged to grow around or on them.

One of the most famous modern stumpery is found at Highgrove House, Gloucestershire. This is the home of Prince Charles, and is considered to be the largest stumpery in Britain. The Prince built the stumpery from sweet chestnut roots, held in place by steel bars, when he first purchased the estate in 1980, and it now provides a home for organically grown ferns, hellebores and hostas.

Understandably, stumperies can sometimes be mistaken for garden rubbish. When Prince Philip first saw his son's stumpery, he remarked: "When are you going to set fire to this lot?".

For related articles click onto:
ELCHE GARDENS - The Huerto del Cura
WHAT IS HOMEOSTASIS
What is a Stumpery?
Why is my Tree Fern Dead?

HOW TO GROW ONIONS IN AFRICA

African women attending to their onion crop
How to grow onions in Africa


The problem with growing onions in Africa, is that they tend to produce little green plants with no bulbs. This is absolutely down to a combination of a harsh climate and shorter day lengths compared to its native habitat of Iran and central Asia. Although it is perfectly reasonable to say that the onion has evolved to cope with warm, dry environments, the high levels of heat, and light experienced in central African countries are far greater than this crop can be expected to cope with. This is why onion crops struggle to produce decent bulbs here.

Be that as it may, if you can find suitable onion seed and are prepared to make the effort to make your local environment more comparable to onion production, then why shouldn't you be able grow onions in Africa

Onions being harvested in Africa
How to grow onions in Africa
I have come up with some solutions regarding, but be aware that the increased cost of producing onions using these solutions may end up being more that the actual value of the crop.

In Nigeria you have the problem with excessive rain. Of course, you can provide protection against the rain by planting your onions under cover. A simple frame protected by some a clear covering of plastic will do the trick, but you will need to provide adequate ventilation so that you don't end up 'boiling your crop.

Be aware that you will need a cover that won't break down under ultra-violet radiation. You can reduce the effect of this damage by re-enforcing any areas of the plastic that are resting on supports with a heavy duty tape.

Of course, once your crop is covered, your onions will still need to be watered especially during the growing season. Then, once your onions have stopped growing then they will need to be able to dry out for harvesting otherwise they will rot off.

If you can provide shade during the hottest part of the day, the risk of boiling your plants will be reduced.

Add automatic shade screens, additional lighting and better
ventilation and you could have the perfect
 conditions to growing onions in Africa!
Also, be aware that when onions get too hot their growth will become checked. Furthermore, if the onion plant is losing more water through transpiration than it can physically draw up through the roots then they can shut down and begin to dry out no matter how much you water you put on it.

Any hotter and you are at risk of losing the crop. You can try planting your onions through white plastic material  - called a plastic mulch - as this will help to reduce the amount that the soil will heat up by reflecting heat from the sun back into the air.

A simple solution to reducing the heat on the onion crop is to use lengths of shading material. This does mean physically putting it in place and then removing it later on a daily basis as your onion crop will actually benefit from the less intense morning and evening light levels and so may not be very practicable. Alternatively, plant in your crop where mid-day shade already exists or plant some suitable trees in the appropriate position.

Regarding the high levels of rainfall, protecting the crops from the rain isn't going to work if the the water table is so high that the ground becomes waterlogged no matter what you do. If this is the case then growing your onions in raised beds 6-12 inches high should do the trick. You can also consider growing your crop on a slope or digging out drainage gullies around the crop to help remove the run-off.

It goes without saying that your onion beds need to be kept weed free.

Bagging up onions in Africa
Bagging up onions for market
Onions are very sensitive to daylength. The kind of onion that is grown in the higher European latitudes
requires long day length to form bulbs.

When onions are grown during short days - as they are in equatorial Africa- it is important to plant what are called 'short day onions'. Most onions grown in the tropics are of the short-day type, but many different kinds of short day onions exist.

All onions are physiologically ‘long-day’ plants, but the mechanism that controls onion bulbing is really a phytochemical response to the length of the night. Therefore, in the so-called ‘short-day’ onions that are grown in the tropics, bulbing is in fact induced in response to night lengths, which are relatively long, at around 12 hours. Intermediate-day and long-day cultivars grown at higher latitudes are induced to form bulbs by nights that are relatively shorter - ie. nights of 11-8 hours, corresponding to days of 13-16 hours.

If you grow long day onions near the equator they grow into small green onions which may thicken a little at the base. This can be preferable because the short day varieties can form bulbs too soon.

So how do you overcome this? Providing additional lighting at the end of the day is clearly the key to getting around the short day issue. Light bulbs with a wave length as similar to natural day length are best, but if resources are limited then try using fluorescent tubes. My guess is that you will need an additional 2-3 hours of light extra each day, but this is something that you will need to find out through trial and error.

Growing onions from onion sets

Onion set ready for planting
Many growers in the tropics use onion set system to get onions going near the end of the rainy season in order to extend the onion harvest forward in time and therefore produce a larger bulb. Onion sets are commercially available in Zimbabwe.

However, the quality of onions grown from sets can be inferior, producing more double bulbs.

If you want to grow your own onion sets, try this method. Just as the hot season is starting, sow seeds at a very close spacing. Do not thin out the onions. Harvest at ½ inch (1.25 cm) diameter or else they will bolt. If they are sufficiently crowded and if it is well past the day length where the variety would normally bulb, they will die down naturally.

It may take a few seasons of trial to find out what works best for you.

For related article click onto the following links?
Growing Garlic in Pots and Containers
Growing onions in Africa
HOW TO GROW GARLIC FROM CLOVES
HOW TO GROW GARLIC IN POTS AND CONTAINERS
HOW TO GROW JAPANESE ONION SETS
HOW TO GROW ONIONS FROM ONION SETS
HOW TO GROW ONIONS FROM SEED
HOW TO GROW ONIONS IN AFRICA
HOW TO GROW WELSH ONIONS
HOW DO YOU PLANT OUT ONION SEEDLINGS?

THE EYEBALL PLANT - Actaea pachypoda

Eyeball plant - Actaea pachypoda


Looking for all the world like a collection of disembodied eyes hanging from individual stalks, the Eyeball plant - Actaea pachypoda has got to be one of the creepiest plants around.

Each of these striking features is a 1 cm diameter white berry, topped with a black stigma scar. The size, colour and shape of these fruits gives this species its other common name of 'doll's eyes'. However, for those of who do not pander to such foolishness, it is simply known as the 'White Baneberry'. These bizarre looking berries ripen over the summer, turning into a fruit that persists on the plant until frost.

Eyeball plant - Actaea pachypoda
The white baneberry is an herbaceous perennial plant native to the hardwood and mixed forest stands of eastern North America. It grows up to 2 feet tall and 3 feet wide and prefers clay to coarse loamy upland soils. In cultivation it requires part to full shade, rich loamy soil, and regular water with good drainage to reproduce its native habitat.

If your conditions are not quite right then they can be improved by enriching the soil with organic matter, and watering thoroughly in dry weather.

Cut back after fruiting

WARNING: Both the berries and the entire plant are considered poisonous to humans. The berries contain cardiogenic toxins which can have an immediate sedative effect on human cardiac muscle tissue. This can lead to cardiac arrest and death. The berries are the most poisonous part of the plant, although they are harmless to birds, the plant's primary seed dispersers.

The eyeball plant, sorry, the white baneberry has gained the Royal Horticultural Society's Award of Garden Merit.

For more information click onto:
CALLICARPA BODINIERI var. giraldii 'Profusion'
CEROPEGIA AMPLIATA - The Bushman's Pipe
HOW TO GROW THE BUSHMAN'S PIPE - ceropegia ampliata
HYDNORA AFRICANA
THE EYEBALL PLANT - Actaea pachypoda
THE LIZARD VINE
THE ORANGE PEEL CLEMATIS - Clematis tangutica

HOW TO CARE FOR THE JADE PLANT

Crassula ovata

Jade plants are succulents, and as such, store water in their leaves and stems. Why? Because they have evolved in the arid regions of South Africa and Madagascar.

With little water available in their natural environment, when it does rain the jade plant will make the most of this precious resource by locking as much of it away as possible within its own body.

Equally, the roots have evolved to survive in this harsh dry environment, so provide waterlogged conditions and they will quickly deteriorate!

So. although it sounds counter-intuitive, they like very little water. In fact, too much water can easily damage the root system and even kill a jade plant.

Therefore, it's recommended that you should only water when the leaves feel a little squishy or dried out. Sometimes it is hard to tell when this happens, so a good rule of thumb is to water just once a month in the summer and even less in the winter.

As for soil type, the jade plant will prefer a  sandy or coarse soil. The best mixture is four-parts loam and one part each of sand and broken brick. Jade plants don't mind being root-bound, in fact most seem to thrive on it. When you do need to re-pot your jade, only re-pot it in a pot one size larger than the original.

Wild plant from Karoo National Park - care of www.bihrmann.com
Jade plants enjoy a sunny location. When given enough sun, the leaves develop a reddish colour. Jades vary in size and shape, but can grow up to ten feet tall. They also make great bonsai. When old enough and if given enough light, the plant will produce a small white flower and seeds. In the summer they can live outdoors, but being a desert plant they don't like the cold, so bring them inside in winter.

If the jade plant becomes too top heavy, and is at risk of branches breaking under its own weight, try pruning some of the branches back to the first bud along the stem. This is best done in March. Alternatively, this could be caused by the plant having too small a root system. This can be attributed to watering the plant too often; the roots become lazy and don't grow. When they have less water they'll start to grow in search of more moisture.

What is a Jade plant?

As ornamental plants go, the jade plant is a bit of an enigma. Why? because it has so many names attached to it!

Not only is it often found under the two commonly seen botanical names of Crassula ovata and Crassula argentea, there are another five variety names that have been attributed to it.

Be that as it may, C. ovata is its currently agreed scientific name.

The very same issue occurs with common names. While the names 'Jade Plant' or Jade Tree'  are perhaps the most popular, Crassula ovata is also known as the the friendship tree, the Chinese rubber tree or even the money tree.

Chinese money tree
Even then there are still arguments as to whether the jade tree can really be called the money tree as another plant 'Pachira aquatica' seems to lay claim to that one by way of being the tree species that the Chinese traditionally knew as the money tree.

To make things even less clearer the Pachira aquatica has the common names of the Malabar chestnut, Guiana chestnut, provision tree, or saba nut.

Back to the common name 'money tree' which has it roots far back in Chinese history.

Chinese legend has it that the original money tree is a kind of holy tree which can bring money and fortune to the local population. It is also a symbol of affluence, nobility and auspiciousness, and can be traced back to primitive societies when the adoration of a holy tree was prevalent.

Whilst Money trees may be derived from the Sun tree myth associated with paradise, the coins link paradise with a material bounty in this world.

 I think that I can confidently say that the Crassula argentea was not the tree species the early Chinese coveted.

Many people who practice Feng Shui say that having one of these plants in your home, with their small round leaves like coins, helps to bring money into your life.

In fact a wealthy employer of mine from my youth was so convinced of the power of the money tree that the larger his Crassula ovata plant became, the more wealth he would posses. He therefore forbid anyone from damaging it or removing material for cuttings in case the reduction in the size of his tree would cause a reduction in the size of his fortune.

I of course took several cuttings, two of which are still with me today.

Crassula ovata in flower
If you really want to know what the Jade tree is then it is an evergreen, succulent plant, native to South Africa. In time, it produces thick branches and smooth, rounded, fleshy leaves that grow in opposing pairs along the branches.

The leaves are a rich jade green - hence the common name, although some cultivated varieties may develop a red tinge on the edges of leaves when exposed to high levels of sunlight.

The new stem growth is the same colour and texture as the leaves, but becomes brown and woody with age. Under the right conditions, they may produce small white or pink star-like flowers in early spring. They are a popular house-plant in northern Europe, but can be grown outside in countries that enjoy a more Mediterranean climate. Be aware though that as tough and as rugged as these popular plants look, they are not frost hardy and will need to be brought in under protection if temperatures look to drop past 6 degree Celsius.

For related articles click onto:
THE GIANT HORSETAIL - Equisetum giganteum


Looking more like an emerging, ground dwelling snake than an actual plant, the giant horsetail - Equisetum giganteum, is (despite its looks) a true plant species, and furthermore, a member of the world's oldest surviving plant family!

The genus Equisetum is now the only living genus of the entire class - Equisetopsida, which has managed to survive on this planet for over one hundred million years! Go back into prehistory, and this genus was far more diverse and dominated the under-story of late Paleozoic forests. In fact, some members of Equisetopsida grew into large trees which were able to reach an impressive height of up to 30 meters tall.

Equisetum giganteum is native to South and Central America, ranging from central Chile east to Brazil and north to southern Mexico.

In our modern era it is one of the largest horsetail species, growing between 2 and 5 metres tall.

The stems are the stoutest of any horsetail, 1–2 cm diameter (up to 3.5 cm diameter in some populations), and bear numerous whorls of very slender branches.

The giant horsetail prefers wet sandy soils, in full sun to semi-shade. Like bamboo, the stalks arise from rhizomes that are deep underground and almost impossible to dig out. Once established, these deep root systems will travel so it is wise to try to put in place some form of subterranean physical constraint otherwise your garden may become over-run with it.

For more information click onto:
THE GIANT HORSETAIL - Equisetum giganteum

PAEONIA lactiflora 'Bowl of Beauty'

Paeonia lactiflora 'Bowl of Beauty'


Native to central and eastern Asia, the habitat for Paeonia lactiflora ranges from eastern Tibet across northern China to eastern Siberia. It is one of 33 species of hardy herbaceous and shrubby perennials, and was first known as the white peony (P. albiflora) when it was first introduced into Europe. When it finally reached the gardens of England during the mid-18th century, its prolific blooms became became an instant for the early cut-flower business.

The true species of Paeonia lactiflora is rarely grown now as it has been superseded by hardy garden forms - one of the most eye catching being the sumptuous cultivar Peony 'Bowl of Beauty'.

Paeonia lactiflora 'Bowl of Beauty' - http://www.rhsplants.co.uk/
Peony 'Bowl of Beauty' is an herbaceous perennial that will grow to a height of up to 3 ft tall. It produces mid-green, divided leaves, but more importantly, delicious, cupped, cerise-pink flowers that can grow to an impressive 8 inches wide. Inside of each bloom is a central mass of narrow, creamy-white petaloids.

It performs best when planted into a deep, fertile, humus-rich soil that is moist but well-drained. Avoid planting peonies too deeply as it can take a few years to settle in before it begins to flower. Sometimes it is best just to have it slightly raised in the new soil level. In my experience, planting this way has away resulted in flowers during the very next season.

To save damage to these delicate flowers, choose a sheltered position in full sun or partial shade. Be aware that the blooms on Peony 'Bowl of Beauty' are huge and as such can weighed down on the stems which can subsequently break them in wet or windy weather. Therefore, mature specimens may well need additional support.

Paeonia lactiflora 'Bowl of Beauty' has been given the 'Award of Garden Merit' by the Royal Horticultural Society.

For related articles click onto:
HOW TO OVERWINTER TREE PEONIES
HOW TO GROW PEONIES
HOW TO GROW PEONIES FROM SEED
HOW TO GROW THE TREE PEONY

THE MARLBOROUGH ROCK DAISY - Pachystegia insignis

Marlborough Rock Daisy - Pachystegia insignis in flower bud
Marlborough Rock Daisy - Pachystegia insignis 


Looking a lot like a dwarf rhododendron, until it flowers of course, the Marlborough Rock Daisy - Pachystegia insignis is a rare and unusual sight in the English garden. And why wouldn't it be? After all, its home is found on the far side of the planet!

Rhododendron yakushimanum species displaying downy indumentum
It turns out the the Marlborough rock daisy is a native to the rocky cliff sides of Kaikoura, a town on the east coast of the South Island of New Zealand.

Frost hardy, and evergreen, the Marlborough rock daisy has striking, dark green leaves which, when new, are covered in a heavy felting of silvery, white tomentum.

This tomentum is a covering of closely matted, fine hairs which protect the young leaves from drying out in harsh conditions. This naturally sheds as the leaves toughen up with maturity.

From June to August the immature flower heads begin to emerge as felt drumsticks. These bear large white daisy-like flowers

As previously mentioned, Pachystegia insignis naturally occurs on dry, rocky and coastal areas, and this makes it extremely tolerant to both strong winds and salt damage.

Marlborough Rock Daisy - Pachystegia insignis with white blooms
Marlborough Rock Daisy - Pachystegia insignis flower
However, for it to thrive in the garden you need to able to replicate its natural environment, so provide a fertile soil, in a sunny position with excellent drainage at the roots. Get it right and you will find that this jewel of a plant is trouble free and resistant to pests and diseases.

Get this wrong and your Marlborough rock daisy is likely to suffer from root damage in the form of fungal rots.

Alternatively, plant your Marlborough rock daisy into, preferably, a porous, terracotta pot using a compost mix that has had plenty of horticultural grit or vermiculite added.

How to propagate Pachystegia insignis

Sow seed in containers in a cold frame in the autumn using a good quality compost such as John Innes 'Seed and Cutting', but add a few hand full of horticultural grit or vermiculite in order to improve drainage further. Alternatively, semi-ripe cuttings can be taken during the summer.

For related articles click onto:
THE MARLBOROUGH ROCK DAISY - Pachystegia insignis

HOW TO GROW THE ORIENTAL POPPY - Papaver orientale

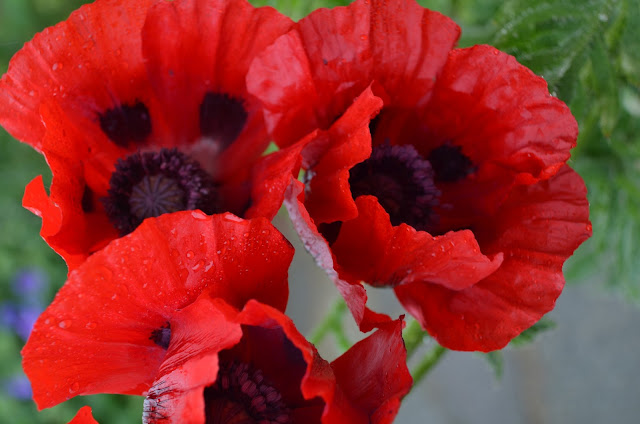
Oriental poppy in bloom
How to grow the oriental poppy - Papaver orientale


Although the very name 'oriental poppy' can conjurer up images of remote and verdant Chinese hillsides, Papaver orientale doesn't come from anywhere near as far away as that. In fact the word 'oriental' stems from an earlier era when Europeans viewed the exotic regions east of the Mediterranean as lands full of romance and intrigue.

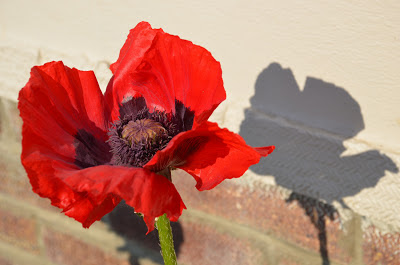
Single oriental poppy in full sun with shadow
How to grow the oriental poppy - Papaver orientale
Geographically, lands of the oriental poppy spread from the Caucasus, north-eastern Turkey, and northern Iran. And it's these harsh, dry environments which have made the oriental poppy what it is.

With only a short growing season, these plants need to grow, flower and become pollinated as fast as possible.

The trouble is that the other native plants that the oriental poppy shares its home with tend to flower at the same time, and this creates a highly competitive environment for limited resources. Therefore, big, bright flowers are an absolute necessity in order to attract the maximum about of insect pollinators in the shortest possible time.

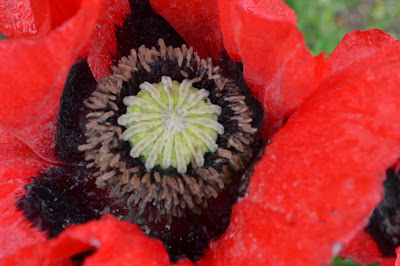
Oriental poppy flower
Oriental poppy - Papaver orientale flower
But it doesn't stop there. After flowering the foliage dies away entirely, a strategy that allows their continuing survival in the summer droughts of Central Asia.

So there is no getting away from the fact that as far as ornamental plants go, the oriental poppy doesn't flower for very long - two to threes weeks at best. But when it does, it is truly spectacular and certainly well worth the wait.

The scarlet, flamboyant, paper-like, scarlet blooms, appear in late May or early June. They usually have a black blotch at the base of each petal, and and each flower can be up to an 'eye boggling' 5 inches wide!

Numerous cultivated varieties have been produced over the years, many of which have been awarded the Royal Horticultural Society's 'Award of Garden Merit'.

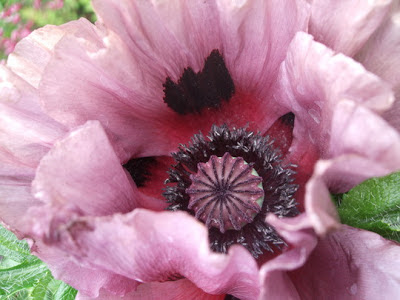
Oriental poppy flower Patty's Plum
Patty's Plum - image care of www.growsonyou.com
Perhaps the most popular cultivar is Papaver orientale 'Patty's Plum'. This cultivar flowers earlier than most, but tends to fade in sun. Incredibly, it was discovered on the compost of heap of a nearby Somerset nursery woman - Mrs Patty Marrow.

The oriental poppy is easy to grow, but prefers an free draining soil in full sun. If they are in an exposed site then they may need staking in order to support the tall flower stems. If you are lucky, then you can encourage a few more flowers in the autumn if the the first flower stems are cut down after flowering.

Oriental poppies are easily propagated by division in March or April.

For related articles click onto the following links:
Grow Blue Poppy Seeds
HOW TO GROW THE CALIFORNIAN POPPY

CLEMATIS montana 'Grandiflora'

CLEMATIS montana 'Grandiflora'


If you ignore the blousy, old fashioned clematis hybrids, Clematis montana 'Grandiflora' has got to be one of the most impressive flowering climbing plants that money can buy. It is certainly a favourite of the future Mrs. Eade, and it sits 'pride of place' in her blue and white garden.

A recipient of the prestigious RHS Award of Garden merit, Clematis montana 'Grandiflora' produces dazzling, clear white from late spring to early summer.

CLEMATIS montana 'Grandiflora'
Its very hardy in nature and makes it perfect for exposed sites, such as the coastal garden that we posses.

Like all early-flowering clematis, it requires little pruning other than to tidy its habit and remove any dead or damaged growth after flowering.

It has been known for mature specimens to suddenly die off for no apparent reason. This is usually due to a condition called slime flux, caused by an injury to the stem early in the season. This occurs when sap leaks out and becomes infected with bacteria. You must act quickly by cutting out infected stems, and pruning back to good wood - even if this involves going down to ground level!

Surprisingly, the species name 'montana' has nothing to do with the American state Montana, located on its north-western border. In fact, Clematis montana is a native to the Himalayas.

It was discovered in 1818 and was introduced to European gardens in 1831 by the Countess of Amherst.

Growing to a height of up to 40 feet, this deciduous and vigorous species is one of the easiest flowering climbers to grow.

CLEMATIS montana 'Grandiflora'
It tends to produce upright leaders at first, but then they begin to branch out nearer the top. They can be planted during suitable weather any time between October and May, preferably in an alkaline soil.

Clematis montana need to be kept in an open position, but one which also shades the base of the plant and the roots from strong sun. A confliction of course, so consider under-planting the clematis in order to produce the desired effect.

Clematis are generally self supporting, but they will need some kind of framework to hold onto. Young growth may need to be tied in from time time to time to keep the plant tidy, and give an annual mulch with a well rotted manure.

For related articles click onto:
CLEMATIS CIRRHOSA species and cultivars
CLEMATIS MONTANA - The Anemone Clematis
CLEMATIS montana 'Grandiflora'
Clematis 'Nelly Moser'
HOW TO GROW CLEMATIS ARMANDII
HOW TO GROW CLEMATIS ‘Bill Mackenzie’
How to Grow Clematis florida 'Sieboldii'
HOW TO GROW CLEMATIS TANGUTICA
HOW TO GROW THE SNAIL VINE FROM SEED
HOW TO PROPAGATE CLEMATIS BY LAYERING
HOW TO TAKE CUTTINGS FROM CLEMATIS
HOW TO TREAT FOR CLEMATIS WILT?
THE EVERGREEN CLEMATIS - Clematis armandii
THE ORANGE PEEL CLEMATIS - Clematis tangutica
Trachelospermum jasminoides
WHY IS MY CLEMATIS NOT FLOWERING?