HOW TO GROW THE KING KONG BANANA- Musa balbisiana 'Gigantea' FROM SEED

How to grow Musa balbisiana from seed

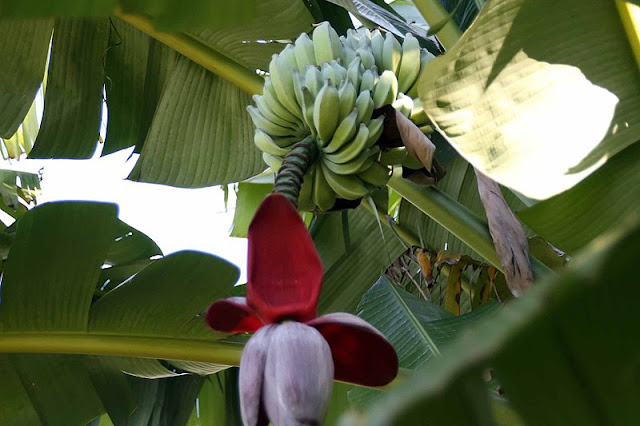
Commonly known as the 'King Kong' banana or the Giant Banana - Musa balbisiana 'Gigantea' is a surprisingly tough, fast-growing species noted for its enormous paddle-shaped leaves and striking black stems. Found growing in a remote region of Arunachal Pradesh, a North Eastern state in India, Musa balbisiana 'Gigantea' is a popular choose in its native lands due to a higher resistance to various pests and diseases compared to the original plantain species.

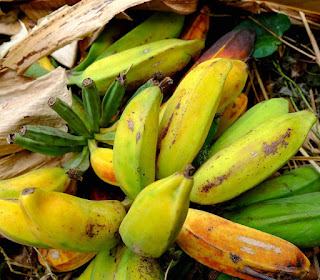
Under favourable conditions you can expect the stem to reach a height of between 16-20 feet. It is a fast-growing species with gorgeous upright leaves up to 9 feet long and about 2 feet wide. Leaves are a blue-green color above (caused by a relatively thick layer of surface wax ) and paler green underneath. The midrib is green to yellow-green. Musa balbisiana Gigantea produces huge yellow flowers, followed by large clusters of tasty bluish green fruits which eventually develop yellow skin as they mature. They do have a little pulp, are heavily seeded and difficult to eat. The fruits are bigger and more compact then normal Musa Balbisiana.

King Kong bananas
Surprisingly, its higher altitude environment has meant that Musa balbisiana 'Gigantea' has evolved to become one of the most cold-hardy of all banana species and cultivars, even capable of tolerating medium frosts. This means that it can be grown outside in the milder regions of the United Kingdom.

Before sowing your seeds soak for 24 hours in warm water. Then using a seed tray or large modular tray, fill with a good quality seed compost such as John Innes ‘Seed and Potting’. Using a dibber sow the Musa balbisiana seed ¼in deep, then backfill the hole with a little more compost. Water thoroughly, but allow the excess water to drain away before placing the tray in a heated propagator or sealing inside a clear polythene bag and placing in a warm bright area. If using a heated propagator set a day temperature of around 28-30 degrees Celsius and a night temperature of around 16-18 degrees Celsius. Be aware that the germination of Musa balbisiana can be slow and erratic taking between 1-6 months to germinate.

Keep the compost moist but not waterlogged and once germinated improve ventilation as fungal infections can take hold on both the foliage and the root system.

Once the root system has established the seedlings can be potted on into 9cm pots and allowed to grow on in a warm, frost free position. Water well during the growing season and feed with a liquid soluble fertiliser every couple of weeks.

For related articles click onto the following links:
BANANA PLANTS
HOW TO GROW MUSA BASJOO

WHAT IS THE DIFFERENCE BETWEEN PHORMIUM AND CORDYLINE?

Specimen Cordylines

WANT TO BUY RARE AND EXOTIC SEEDS? THEN CLICK HERE FOR THE 'SEEDS OF EADEN' SEED SHOP

What is the difference between Phormiums and Cordylines? This may seem to be an odd question at face value if you are familiar with the respective mature specimens, but if your only experience of there two genera are the 3 litre potted plants found on your local garden centres sales bench's then there are most definitely a lot of genuinely similarities. They both have evergreen sword-shaped leaves, the leaves themselves are approximately 2 feet long in that pot size, they both have various single blocked colour as well as multi-coloured leaves. Furthermore both genera are indigenous to New Zealand, although Cordylines are also found further afield in the western Pacific Ocean region.

Specimen Phormiums

Now let's looks at the differences between Phormiums and Cordylines. Taxonomically they are both in the order of Asparagales but that is as close as it gets. When looking at pot specimens, Phormium leaves are all produce from the base of the plant in a kind of linear, bulbous sheath and they are usual thicker than those of Cordylines. Cordyline leaves are formed in a cluster around a central stem however on smaller plants the stem may not be visible. However on smaller cordylines they do tend to have a characteristic 'rosette' of leaves.

Once they are mature the differences between Phormium and Cordyline are super easy to tell. Cordylines will grow into a widely branched tree with a stout trunk. In northern European countries you can expect them to grow to a height of 4-5 metres tall, however in their native habitat they can achieve a height f 20 metres! Phormiums, on the other hand, are herbaceous perennials monocot with leaves grow up to 3 metres in New Zealand although 1.5-2 metres os more likely in the UK.

Click here for related articles:
Cordyline tree
HARDY PALM TREES FOR GROWING IN COLD CLIMATES
HOW TO GROW A CONKER TREE FROM A CONKER
HOW TO GROW CORDYLINE AUSTRALIS
HOW TO GROW PALM TREES FROM SEED

HOW TO GROW PHORMIUM COLENSOI 'CREAM DELIGHT'
HOW TO GROW PHORMIUM COLENSOI 'TRICOLOUR'
HOW TO GROW PHORMIUM COOKIANUM (Phormium Colensoi)
HOW TO GROW PHORMIUMS FROM SEED
HOW TO GROW PHORMIUM TENAX
HOW TO GROW THE STRAWBERRY TREE - Arbutus unedo
HOW TO GROW SWEET CHESTNUT
HOW TO GROW YUCCA ELEPHANTIPES
HOW TO GROW YUCCA GLORIOSA 'VARIEGATA'
THE DRAGON BLOOD TREE
YUCCA ELEPHANTIPES
YUCCA FLACCIDA
YUCCA GLORIOSA

HOW TO PLANT HYACINTH BULBS

How to plant hyacinth bulbs

Hyacinths are a popular bulb choice, particularly around the Christmas period, and for good reason to. They are highly fragrant, available in a range of colours and are super easy to grow. In your local plant retailers they are predominately sold as a prepared bulb, ready to sprout into a seasonal 'houseplant', before being thrown away once they blooms are over. However Hyacinths will also create a great spring display so long as you follow a few cultivation rules. So the question is this, how do you plant Hyacinth bulbs?

Native to the eastern Mediterranean, Hyacinth bulbs have evolved in an area which experience mild to cool, rainy winters and warm to hot, dry summers. So to get the best flowering display you will need to mimic this environment as best as you can in you own garden.

How to plant hyacinth bulbs
The best time to plant Hyacinth bulbs is mid to late autumn, preferably after the first frosts but significantly before the ground freezes, if that indeed happens where you live. But let's be honest, most gardeners tend to buy them when they see them so in my book just plant them as soon as possible to avoid the bulb from drying out.

To get your bulbs to produce the biggest, most colourful blooms you must provide them with a well-drained, fertile soil, in full sun. If it is possible provide them with a site which receives full sun all day long, it makes such a difference.

Before planting, clear the site of weeds, including removing the rots of perennial weeds. Then before placing the bulbs incorporate organic matter like well-rotted farm manure, bone meal or fish blood and bone and mix well into the sol below where the Hyacinths will be sited. Unlike forced bulbs which have their growth tips above the soil line, plant outdoor hyacinth bulbs 4 inches deep and 3 inches apart. Just keep an eye on drainage as you don't want the bulbs to become waterlogged over the winter as this can cause fungal rots to take hold. To help avoid this you can mixing horticultural grit below where the bulb is to be planted or in poorly drained soils consider creating a raised area of soil and planting into that.

If large year on year blooms are  important to you, remove the spent booms to avoid the bulbs directing energy to produce seeds. Also provide a weekly liquid soluble plant fertiliser such as Miracle-grow as the foliage begins to die back.

For related articles click onto the following links:

Best vegetables to grow from seeds!


Image: Climbing French Bean ‘Cobra’ seeds from Suttons


If you’re starting a new vegetable patch or allotment, the cheapest and most satisfying way to grow your own vegetables is from seed. You don’t need a greenhouse or lots of fancy equipment. In fact, clean yogurt pots can be used to start seeds off on a bright windowsill. Some seeds can even be direct-sown into the soil outdoors. Check the back of your seed packets for the best time to sow each variety. 


For the chance to win eight packets of Suttons Vegetable Seeds along with 10 windowsill starter trays with lids, enter the competition now.  But be quick, it closes at noon on 12 January 2022. 

Easy veg to sow from seed


Some vegetable seeds are easier to germinate than others. If you don’t have a huge garden, many of these can be grown in pots or containers on a sunny balcony. Here are some of the best vegetable seeds for beginners: 


  • Tomato – F1 Sweet Million

  • Pea – Hurst Greenshaft

  • Beetroot – Rainbow mixed

  • Bean (Climbing French) – Cobra

  • Cucumber – F1 Burpless Tasty Green

  • Lettuce – Little Gem

  • Courgette – F1 Defender

  • Radish – French Breakfast 3


Quick tips for growing your own veg from seed


  • Add holes to clean margarine containers for cheap, reusable seed trays.

  • Good quality seed compost gives the best results.

  • To speed up germination, soak your beans overnight and lay them on some damp cotton wool to shoot. 

  • Seed swap with friends and family. If you each grow a different variety you can exchange the seedlings.

  • Always label your seed trays. Wooden ice lolly sticks work well.

  • Store spare seeds in a sealed container with a few grains of rice to keep them dry.

  • Sow salad leaves and radish seeds every two weeks for a constant supply through the summer.

  • Some vegetables stop producing crops if you don’t pick them regularly. Keep harvesting runner beans, French beans and courgettes to get more veg.

THE HIMALAYAN FOXTAIL LILY - Eremurus himalaicus

Himalayan foxtail lily
The Himalayan foxtail lily is one of the delights of the late spring/early summer garden and the popular Eremurus himalaicus is one of the hardiest of all the species within the Eremurus genus. Native to the temperate regions of the Himalayas, the Himalayan foxtail lily is a herbaceous perennial with light green, strap-shaped leaves, and a mass of white starry flowers densely packed on elegant tall upright spikes. It can reach between 4-8 feet tall and has beautiful white flowers hovering over medium green foliage.

Foxtail lilies prefer a moist well-drained loan that does not dry out of the spring growing period, They do well in a sunny position but one that is does not expose them to early morning sun.

The plant can be purchased as pre-packed bare roots in the autumn and will need to be planted in the ground as soon as they are available in September or October. The roots are easily damaged and so will need to be handled carefully when planting.

Before planting the crown add a thick layer of horticultural grit to the bottom of the hole, then back-fill to create a central raised area of soil in the shape of a cone. Plant the roots so that the crown is sat on top of the cone with the roots falling to the sides. When planted the crown should show above the surface of the soil and should never be mulched over.

If they are kept too wet over the winter then Foxtail lilies can be affected by a fungal disease known as winter root rot. With this in mind, grow them in a raised bed or alternatively place a layer of sand or gravel at the bottom of the hole before planting to ensure drainage. In cold regions the roots may need protecting from ground frost and so cover them with a dry mulch such as shingle or bark.

HOW TO PLANT THE FOXTAIL LILY - Eremurus species

How to plant the Foxtail Lily

The Foxtail lily -  Eremurus species is a gorgeous, exotic herbaceous plant reminiscent of other tall flowering spike producing genera such as the delphiniums, lupin and foxgloves. Native to Eastern Europe and the more temperate climates of Asia from Turkey to China the Foxglove lily (otherwise commonly known as the 'Desert Candle) is a rarely seen and sometimes unavailable gem of a plant. However unless favourable growing conditions can be provided it can also be a struggle to grow in northern European gardens.

The key to growing Foxtail Lilies successfully is to provide them with an organically rich, well-drained soil. To ensure strong and healthy growth add a good handful of bone-meal or fish blood and bone to the prepared planting area. Just make sure that this is thoroughly mixed into the soil below where the roots are planted. Do not pour these fertilisers directly onto the roots.

Regarding soil types, sandy loams are ideal however be aware of heavy, waterlogged-prone soils as this is the leading cause of Eremurus plants failing. So if your garden is a clay-based swampland consider planting them in raised beds or at a minimum into a raised mound. In less troublesome conditions add plenty of horticultural grit or gravel into the surrounding site before planting. Foxglove lilies will not tolerate waterlogged conditions as this will quickly cause the root system to die.

One planted avoid disturbing the root system from weeding or planted bedding close by as Eremurus really do not like to have their roots disturbed. In exposed gardens position supporting canes to prevent the flower spikes from being blown over in strong winds.

For related article click onto the following links:
Crocosmia 'Hellfire'
Hardy Spider Lilies
How to Grow the Foxtail Lily
HOW TO GROW THE GIANT HIMALAYAN LILY - Cardiocrinum giganteum
HOW TO GROW THE GIANT HIMALAYAN LILY FROM SEED
HOW TO GROW THE GINGER LILY FROM SEED
HOW TO GROW THE HARDY CRINUM FROM SEED
HOW TO PROPAGATE THE FOXTAIL LILY
LILIUM NEPALENSE - The Lily of Nepal
SPIDER LILY - Hymenocallis species and cultivars
THE HIMALAYAN FOXTAIL LILY - Eremurus himalaicus