HOW TO GROW SUNFLOWERS

How to grow sunflowers
Image credit - http://electricfertilizer.com/


The common sunflower - Helianthus annuus is a gorgeous large-flowered annual with large daisy-like blooms. Grown commercially for its edible oil and seeds they are a common sight come late summer in many warm-temperate or subtropical regions. Believed to have been first domesticated in in Mexico around 2600 BC, the sunflower made its way to Europe in the 16th century. Depending on the cultivar, most ornamental varieties with grow to between 1 and 3 metres although specific giant sunflower varieties can grow anywhere from 4 meters upwards!

sunflower seedling
Image credit - http://blog.cameronleger.com/
Sunflowers have erect hairy stems and characteristic mid-green, coarsely-toothed, heart-shaped leaves. The flowers are usually 30 cm across although small, modern cultivars exist that are half as wide. What we term as the flower is actually pseudanthium containing numerous small individual five-petaled florets. The large outer petals are known as ray flowers.

Although you can purchase small bedding sunflowers in late spring, most sunflower cultivars are grown from seed. Station sow the seeds outdoors where they are to flower in March or April. Choose a sunny position preferably in a fertile, moist, well-drained soil that has been improved with a heavy mulch and work in a slow release granular fertilizer  .Rake to a fine tilth before sowing and set 2 or 3 seeds per station. Gently water in and expect the seeds to germinate in 3 weeks or so. When they are large enough to handle thin out the two weaker seedlings to leave the strongest.

For really giant sunflowers, sow them indoors in late winter/early spring, individually into 3 inch pots at a temperature of between 15-18 Celsius. Grow on in bright conditions but out of direct sunlight. Once the threat of late frosts have passed harden off the seedlings before planting outside into their final position.

Feed often with a water soluble fertilizer and water regularly during dry periods and over the summer.

For related articles click onto the following links:
HOW DO YOU GET SUNFLOWER SEEDS OUT OF A SUNFLOWER?

HOW TO GROW CHAMOMILE


The common chamomile - Chamaemelum nobile is a popular garden herb notably grown as a low maintenance and fragrant alternative to grass, it is also used in herbal teas, perfumes, and cosmetics.

Native to both Europe and Great Britain, it is a fully hardy, mat-forming species with finely dissected, aromatic, mid-green foliage that gives it an almost mossy appearance. Once established it will grow to approximately 5 inches in height. The daisy-like flowers are between 2-3 inches across and appear from June to July. The blooms are borne on straggly stems 6-9 inches tall.

Chamomile lawns

Image credit - http://camomile.whiteline media.co.uk.
Provided it is not planted in areas prone to medium or high traffic Chamaemelum nobile is a popular choice for planting out a small lawn. Chamomile lawns are both cool on the feet and release an attractive, crisp, apple-like scent when crushed. Space individual plants 12-15 inches apart in any ordinary, well-drained soil.  Avoid heavy clay soils and very dry, stony conditions.

An open, sunny site is best for a chamomile lawn, although it will tolerate a certain amount of light dappled shade. It may be necessary to mow the plants once or twice a year to remove any renegade, long stems. The cultivar Chamaemelum nobile‘Treneague’ is a vigorous, non-flowering, low-growing form which grows to only 3-4 inches high making it the ideal choice for creating a chamomile lawn.

Do not use lawn weed killers on Chamomile lawns, any weeding must be done manually.

For related articles click onto the following link:
RHS Chamomile lawns

HOW TO GROW SPANISH MOSS - Tillandsia usneoides

HOW TO GROW SPANISH MOSS - Tillandsia usneoides


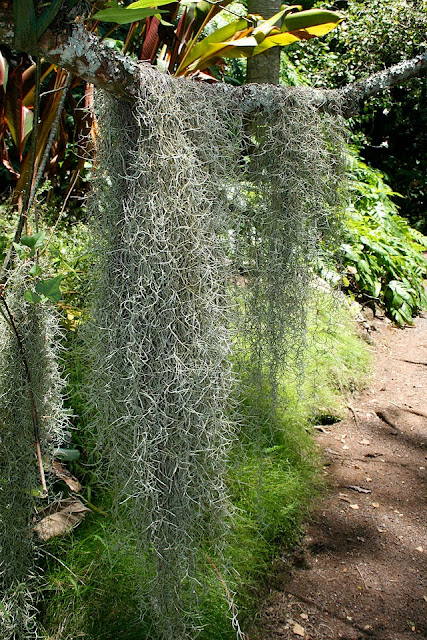
Despite its unusual looks, the Spanish moss - Tillandsia usneoides is a member of the bromeliad family. Its common name is rather misleading as it is neither a moss, nor is it indigenous to Spain. It is in fact a native to Southeastern United States where this species is well-known for hanging curtain-like from trees in the humid regions of Southern North America. It is most commonly seen on the Southern Live Oak and Bald Cypress, and given the right conditions will be happy growing in both full sun and partial shade.

Spanish moss - Tillandsia usneoides
Tillandsia usneoides is a pendulous epiphyte which is composed of long, moss-like tufts of wiry stems and tiny, linear, scaly grey leaves. Bright yellow-green, three petalled flowers of approximately 1/3 rd of an inch across emerge from the leaf axils at intervals throughout the summer. Although it will grow from seed it can also propagate itself vegetatively by fragments that get blown off the parent plant or are carried by birds as nesting material.The Spanish moss does not produce any roots.

It has a completely epiphytic habit and requires no growing medium as it absorbs nutrients (especially calcium) and water from the air and rainfall. To grow Spanish moss attach pieces of the plant to tree branches or wires and string in a greenhouse. A minimum winter temperature of 13 degrees Celsius is required.

Spanish moss will require a high degree of humidity to survive and so if this is not present in the local climate you will need to mist-spray frequently from April to September, and at least daily during periods of hot weather. If you are growing Spanish moss in a greenhouse then you will also need to provide shading during the warmest months as well as good ventilation.

For related articles click onto the following links:
HOW TO GROW PUYA RAIMONDII - Queen Of The Andes
HOW TO GROW TILLANDSIA
WHAT IS AN EPIPHYTE?

HOW TO GROW TILLANDSIA

How to grow tillandsia
Tillandsia cyanea - http://static.panoramio.com/


The Tillandsia genus is home to over 700 species of tender evergreen perennials, some terrestrial while others are epiphytic. They are named after the Swedish physician and botanist Dr. Elias Tillandz  (1640-1693) and are widely distributed throughout the tropical and subtropical regions of North and South America.

Tillandsia - botanical illustration
While the Tillandsia name is most commonly associated with a large range of epiphytic air plants, there are a couple of pot grown species which are also in general cultivation. These are Tillandsia cyanea and Tillandsia lindenii.

Plant or pot on both species in the spring during March or April starting in 4 inch pots containing equal parts by volume horticultural grade sand and leaf-mould. If leaf-mould is unavailable then osmunda fibre will make a suitable substitute.

Water regularly during the growing season, but from late autumn and throughout the winter reduce watering so that the compost reans just moist. Provide a minimum temperature of 10 degrees Celsius over the winter period.

Both species will require high humidity so mist spray frequently from April until September, and at least once a day during warm, dry weather. If kept as a greenhouse specimen then provide shading during the hottest months.

For related articles click onto the following links:
HOW TO GROW SPANISH MOSS - Tillandsia usneoides
Joy Tillandsia cyanea


LION FACTS

two adult lions

Lion facts - http://wallerz.net/


Of all the world's big cats, the lions are perhaps the most recognised and revered. Commonly known as the king of the Jungle, lions differs from other member of the panthera genus as they display obvious sexual dimorphism and are the most socially inclined of all wild felids.

Most lion populations live in eastern and southern Africa, however their numbers are now in rapid decline with an estimated 30–50% decline per 20 years in the late half of the 20th century.

Lion facts

Lion facts
1. There may be one species of lion but did you know that it was believed that there were up to 12 subspecies of lion? Unfortunately, some of these subspecies are now extinct and others have been discounted for being too similar. So today we are left with 8 - for now.

2. Lions have been known to breed with tigers (most often the Siberian and Bengal subspecies) to create hybrids called ligers and tigons. They also have been crossed with leopards to produce leopons and jaguars to produce jaglions. The marozi is reputedly a spotted lion or a naturally occurring leopon, while the Congolese Spotted Lion is a complex lion-jaguar-leopard hybrid called a lijagulep. Such hybrids were once commonly bred in zoos, but this is now discouraged due to the emphasis on conserving species and subspecies. Hybrids are still bred in private menageries and in zoos in China.

3. The lion is the tallest (at the shoulder) of all living cats, averaging about 14 cm (5.5 in) taller than the tiger. Behind only the tiger, the lion is the second largest living big cat in length and weight.


Lion facts
4. The longest known lion, at nearly 3.6 m (12 ft) in total length, was a black-maned male shot near Musso, southern Angola in October 1973; the heaviest lion known in the wild was a man-eater shot in 1936 just outside Hectorspruit in eastern Transvaal, South Africa and weighed 313 kg (690 lb).

5. The mane of the adult male lion, unique among cats, is one of the most distinctive characteristics of the species. It makes the lion appear larger, providing an excellent intimidation display. This can also helps to give the lion an advantage during confrontations with other lions and with the species' chief competitor in Africa, the spotted hyena.

6. The white lion is not a distinct subspecies, but a special morph with a genetic condition, leucism that causes paler colouration akin to that of the white tiger; the condition is similar to melanism, which causes black panthers. They are not albinos, having normal pigmentation in the eyes and skin.

7. Lions are the most socially inclined of all wild big cats, most of which remain quite solitary in nature.


Lion facts
8. Lions spend much of their time resting and are inactive for about 20 hours per day.

9. Lionesses do the majority of the hunting for their pride, being smaller, swifter and more agile than the males, and unencumbered by the heavy and conspicuous lions mane, which causes overheating during exertion.

10. The Nile crocodile is the only sympatric predator (besides humans) that can singly threaten the lion. Depending on the size of the crocodile and the lion, either can lose kills or carrion to the other. Lions have been known to kill crocodiles venturing onto land, while the reverse is true for lions entering waterways, as evidenced by the occasional lion claw found in crocodile stomachs.

11. Although adult lions have no natural predators, evidence suggests that the majority die violently from humans or other lions. Lions often inflict serious injuries on each other, either members of different prides encountering each other in territorial disputes, or members of the same pride fighting at a kill.


Roman mosaic of lion
12. Lions have an array of facial expressions and body postures that serve as visual gestures. Their repertoire of vocalizations is also large. Lion sounds include snarling, purring, hissing, coughing, meowing, woofing and roaring. Lions tend to roar in a very characteristic manner, starting with a few deep, long roars that trail off into a series of shorter ones. They most often roar at night; the sound, which can be heard from a distance of 8 kilometres (5.0 miles), is used to advertise the animal's presence. Lions have the loudest roar of any big cat.

13. Lions were kept and bred by Assyrian kings as early as 850 BC, and Alexander the Great was said to have been presented with tame lions by the Malhi of northern India. Later in Roman times, lions were kept by emperors to take part in the gladiator arenas.


Lion baiting illustration
14. The lion will only kill when it is hungry. Prey can usually sense when lions are hunting and grazing animals will often ignore lions at other times – even when they close by.

15. Lion-baiting is a blood sport involving the baiting of lions in combat with other animals - usually dogs. Records of it exist in ancient times through until the seventeenth century. It was finally banned in Vienna by 1800 and England in 1825.

16. Lions were once kept in the Tower of London. However, the presence of lions at the Tower of London was intermittent, being restocked when a monarch or his consort such as Margaret of Anjou the wife of Henry VI either sought or were given such magnificent animals.

For related articles click onto the following links:
CHEETAH FACTS, VIDEOS AND PHOTOGRAPHS
JAGUAR FACTS
MEERKAT FACTS
MOOSE FACTS
TIGERS
TIGER FACTS
THE ASIATIC LION
WHAT DO JAGUARS EAT?
WHAT DO SNOW LEOPARDS EAT?
WHY DID THE SABER-TOOTHED TIGER BECOME EXTINCT?

HOW TO GROW WELSH ONIONS

How to grow Welsh onions
Image credit - http://images.fineartamerica.com/


The Welsh onion - Allium fistulosum is a hardy non-bulbous perennial that also goes by the common names of 'ciboule', 'onion green' or 'Japanese bunching onions'. It will grow to an average height of approximately 12 inches tall and resembles a multi-stemmed salad onion. The pencil-thick stems grow together in close tufts or clumps. The shoots can be used as salad onions, while the leaves can be treated as chives.

How to grow Welsh onions
Image credit - http://www.hairypotplants.co.uk/
Despite the name, the Welsh onion is not a native to Wales or it it particularly used in Welsh cuisine. The world 'Welsh' is likely to have either originated from the old English word 'welisch' or the old German 'welsche' which means 'foreign'. The Welsh onion actually originated in Asia.

Welsh onions are very similar in taste and odour to the common onion, Allium cepa, however they do not develop bulbs, and possesses hollow leaves and scapes.

For best results plant Welsh onions in a moist, well-drained soil, which has previously been enriched with plenty of organic matter such as well-rotted farm manure or garden compost. They will need a sunny position and preferably a pH of between 6-7. That being said, Welsh onion will grow in almost all soils and will even tolerate a certain amount of shade. Rake in a couple of handfuls of bone meal per square metre before planting or sowing. Although they are fairly tolerant of drought, don't plant them in very dry soils as this will severely affect the size of your final crop.

Welsh onion seedlings
Image credit - http://www.namayasai.co.uk/
When growing from seed you can either direct sow in their final position in April or start off Welsh onion seed under protection in March. Using a good quality compost such as John Innes 'Seed and Cutting' fill a modular seed tray and gently water in.

Sow one seed per module and maintain a temperature of 15°C to 20°C . You can expect the seedlings to appear in a week to ten days. Once germinated, growth them on for a further 4 weeks before hardening them off for planting outside.

Welsh onion sets can be planted out in March and April. As with the seedlings, set them in rows 12 inches apart and with a spacing of 8-12 inches between plants. Water regularly during dry weather, but it will not be necessary to fertilize the crop for the rest of their production.

Welsh onions
Image credit - https://annisveggies.files.wordpress.com/
You can harvest whole clumps of Welsh onions from June onwards. However if you just want the leaves then do not lift the bulbs, just cut what you require down to the base of the plant. Replacement leaves will grow back rapidly and as such can be cut several times in the growing season to give a continuous harvest.

Plants grown from seed should not be harvested until the July of their first year. Also remove any flower heads as they form. This will give the young plants a chance to establish their root system before harvesting.

For related articles click onto the following links:
ALLIUM GIGANTEUM
HOW TO GROW AUTUMN ONION SETS
HOW TO GROW JAPANESE ONION SETS
HOW TO GROW ONIONS FROM SEED
HOW TO GROW ONIONS IN AFRICA
HOW TO GROW WELSH ONION
HOW DO YOU PLANT OUT ONION SEEDLINGS?
WHY DO ONIONS MAKE YOU CRY?

HOW TO GROW FATSIA JAPONICA

Fatsia japonica in bloom
Image credit - http://abbotsbury-tourism.co.uk/


Fatsia japonica is just one of three species within the Fatsia genus and the only one currently under commercial production. It is a popular evergreen shrubs native to southern Japan and Taiwan, grown for it handsome foliage and unusual flowers. While it is perfectly happy growing outside in the temperate European countries, it will require cold protection the further north you go. In fact it is not unknown for fatsias to be purchased as houseplants.

Fatsia japonica
How to grow Fatsia japonica
The name genus name 'Fatsia' comes from an old japanese word 'Fatsi' meaning eight. This relates to the 8 lobes of the mature leaves.

The leaves are rich and glossy, mid to deep green above (though paler beneath), and palmate in shape with 7-9 coarsely-toothed, oblong-lanceolate lobes. The white flowers appear in October in panicles 9-18 inches long and are composed of rounded umbels 1-1 1/2 inches wide.

If you are growing Fatsia japonica as a houseplant then they are usually purchased in 5 or 7 inch pots. As they mature they will need to be potted on into larger tubs but once they are of a size where they are difficult to move then they may be best hardened off and planted outside, but only when there is no threat of frosts. Use a good quality compost such as John Innes 'No 2' and provide a minimum winter temperature of between 2-4 degrees Celsius.

Fatsia japonica in terracotta pot
How to grow Fatsia japonica
Fatsia japonica will thrive in any good garden soil, preferably in a sheltered position either in full sun or partial shade. However a moist, well-drained soil will provide the best results.

In colder northern regions it will need to be planted against the protection of a south or west facing wall. Water regularly during its first growing season to help it establish.

Pruning isn't really necessary for Fatsia japonica although straggly growth can be shortened in April. Older tired leaves can be removed from the base as they appear

For related articles click onto the following links:
BBC: Fatsia japonica
MEXICAN ORANGE BLOSSOM - Choisya ternata

WHAT IS A BEETROOT

Beetroot - http://zingology.co.uk/


The beetroot is an often misunderstood root vegetable that has had its reputation suffer almost irreconcilably due to decades of being sold as a salad accompaniment drenched in vinegar. However there is a secret. For the very best beetroot you need to harvest it and then prepare it as soon as possible for serving. When cooked its purple-turnip appearance belies a sweet and juicy flesh, which stands it apart for all other root vegetables. It also possesses a unique almost desert-like flavour. It is the taproot portion of the beetroot which is eaten.

Beetroot - https://www.greenmylife.in/
Although a perennial it is cropped as an annual. Beetroot is hardy in northern Europe in all but the severest winters when it should be given the protection of a dry mulch or coches.

There are two main types, long rooted and globe rooted. The globe type are the most popular being less prone to bolting than other varieties and are able to be sown several weeks earlier. Globe varieties can provide roots from June onwards, in particular the cultivars 'Avon early', 'Boltardy', and 'Early Bunch' are recommended.

For later sowings which will provide roots for autumn and early winter use, sow the small-rooted, quick growing 'Little Bowl'.

The long rooted varieties are still used for main crops and will need to be allowed to mature in the ground before being harvested and stored in early winter. the variety 'Cheltenham Green Top' is recommended.

Other than a food crop, the beetroot is also used as a food colorant and as a medicinal plant for the treatment of blood pressure and cardiovascular disease

For related articles click onto the following link:
HOW TO GROW BEETROOT FROM SEED
HOW TO GROW TURNIPS FROM SEED
NHS Beetroot
WHEN DO YOU PICK BEETROOT?

HOW TO GROW HELXINE SOLEIROLII

Image credit - http://www.jardinsdugue.eu/


Native to the northern Mediterranean region in and around Italy and the nearby islands, Helxine soleirolii is a fast growing, half-hardy perennial and the only species within the Helxine genus. Commonly known as 'Mind-your-own-business' or 'Mother of thousands', it is a mat-forming evergreen with delicate-looking juicy, bright green or yellow leaves and has been introduced and cultivated across the globe as a houseplant or ornamental garden plant. It creeps by produces pink or green stems which root as they grow, and although not particularly showy Helxine soleirolii will multitudes of tiny pinkish-white flowers which emerge over the summer

Image credit - http://st.houzz.com/
While it is indeed evergreen in warmer temperate climates, it will die back in cooler northern regions. Be aware that if grown outside permanently it can be killed off during severe winters.

Grow Helxine soleirolii in a well-drained, but moist soil in a sunny or light shaded conditions where water logging does not occur. It will require protection from the sun during the hottest part of the day.

If you are growing it as a cool greenhouse or house plant then plant Helxine soleirolii in pot or low pans at least 4-6 inches wide. Overwinter in a greenhouse at a temperature of between 4-7 degrees Celsius and then provide light shading over the summer. Water freely from April to September, though less frequently over the winter. Helxine soleirolii can be potted on in April, but will perform best when raised as annuals.

To produce new stock detach stem pieces at any time from April to September, but best results will be avieve during the first two months of this period. Set the propagation material directly into their growing positions either outdoors or in pots with a good quality compost such as John Innes 'No1 or No2'

The botanical name Helxine soleirolii has now been superseded as it has been placed into a new genus Soleirolia. Now called Soleirolia soleirolii it is still the only member of its genus. It was re-named after  Joseph-Francois Soleirol, an amateur botanist who originally collected the plant in Corsica.

For related click onto the following link:
RHS Soleirolia soleirolii

WHY ARE MY ORANGE TREE LEAVES TURNING YELLOW?

orange tree with yellowing foliage
Image credit - http://www.gardeningknowhow.com/

If you live in a northern European climate but have accepted the challenge of growing an orange tree then be prepared for certain amount of heartache, some of it justified, some not. One of the things that is alway a concern is the yellowing of the new growth. The young leaves emerge in the spring a wonderful burnished, bronze colour, but once they fade to their regular vivid, mid-green colour they can often continue to change to a rather unhealthy yellow as the leave grow to their full size.

Iron Deficiency - http://www.yates.com.au/
The most common reasons as to why the leaves on your orange tree are turning yellow are also the easiest to correct which is usually down to a lack of availability of one nutrient or another. Citrus plants are heavy feeders in general and orange trees are no exception. If you are not feeding weekly during the growing period then nutrient deficiency is going to be just around the corner.

If the new growth is showing green veins with the rest of the leaf appearing light yellowish to white in colour then this is iron deficiency. If the new growth is pale green to yellow in colour the this is sulphur deficiency. If the leaves have a weird-looking inverted green V-shape at the base surrounded by yellowing then this is magnesium deficiency. If it is the older leaves that are turning yellow first and then followed by the newer growth then it s likely that nitrogen deficiency is the problem.

yellowing leaves on a orange tree due to nitrogen deficiency
Nitrogen Deficiency - http://idtools.org/
Although they are not ericaceous plants, orange trees will appreciate being kept in soil or compost that is slightly on the acidic side. This will improve the uptake of iron and magnesium which if in short supply will result in the characteristic yellowing colour known as chlorosis. You can acidify the soil or compost by feeding with a liquid soluble ericaceous fertiliser, or add more iron and magnesium to the rooting medium to increase it availability.

Before commercial acidic fertilizers were available, epsom salts (magnesium sulfate) were a popular method of treating yellowing citrus leaves. A tablespoon of Epsom salts dissolved into half a gallon of water, should do the trick and this too can be applied as a foliar spray. The magnesium in epsom salts addresses magnesium deficiency while the sulphur helps to acidify the rooting medium. What about iron deficiency I hear you say? Well it was traditional to add iron nail or iron horse shoes to the ground before planting.

Magnesium Deficiency on orange tree
Magnesium Deficiency - http://www.grantsgardens.com/
Citrus trees will also respond well to a seaweed based fertilized which are usually high in micronutrients. Not only are ericaceous seaweed fertilisers available you can also apply them as a foliar spray to help the orange tree receive its nutrients directly to the point of concern.

If your orange tree is not only showing a yellowing of its leaves but also other worrying characteristics such as a gummy inner bark, dry cracked bark with sap oozing lesions then it is probably suffering from one of several fungal diseases. Spray immediately with a systemic fungicide and withhold watering. If your orange tree is also suffering from die-back and dropping leaves then it is possibly under attack from honey fungus. Scrape away at the surrounding soil and if you uncover thick, licorice-like, bootstrap roots then your plant has been infected with honey fungus. Dig up and burn your orange tree to control the further spread of the fungus. Drench the surrounding soil with armillatox.

For related articles click onto the following links:

HOW TO GROW A MULBERRY TREE

Black mulberry tree in fruit
How to grow a Mulberry tree


There are over 150 species of mulberry trees so far discovered, although only 10–16 are generally accepted by the vast majority of botanical authorities. Of these only the three are subject to commercial cultivation.

White Mulberry - Morus alba
Black Mulberry - Morus nigra
Red Mulberry - Morus rubra

botanical illustration of mulberry tree
How to grow a Mulberry tree
They are hardy, deciduous slow-growing trees grown notably for their for their ornamental appearance and edible fruits. All species are of Asiatic and Northern American origin although mulberries were introduced into the UK prior to the 4th Century with the Roman invasion.

During the 16th and 17th centuries the white mulberry was cultivated for its leaves which are used in the silk production industry for feeding silkworm moth caterpillars. However it is the black mulberry that was species of choice for its edible fruits.

Native to western Asia the black mulberry is a bushy, round-headed tree with coarse dark-green foliage. It is able to reach an average height and width of 15-25 ft and 10-15 ft. Each leaf is broadly ovate and toothed, sometimes with two lateral lobes. Small green-yellow flowers appear in during May and June on 1/2 inch long catkins, and are followed by dark-red berry-like fruits. These small fruits fuse together to form an ovoid, multiple fruit. The berries ripen in August and September resembling loganberries.

Mulberry tree need deep, moist, well-drained rich loams. When grown for fruit production they are most likely to succeed on sites protected from north and east winds.. In cooler regions of northern Europe they will need the protection of a warm, south-facing wall.

Harvest the fruits in late August and early September by spreading a cloth and the tree and shake the branches.

For related articles click onto the following links:
BLACKCURRANTS - The new superfood
CAN YOU EAT SEA BUCKTHORN BERRIES?
HOW TO GROW SWEET CHESTNUT
RHS MULBERRY
THE AFRICAN TULIP TREE - Spathodea campanulata
THE DEVIL'S HAND TREE - Chiranthodendron pentadactylon
THE HEAVEN LOTUS TREE - Gustavia superba
THE ‘NATIVE’ TREES OF ENGLAND

HOW TO GROW CAPE GOOSEBERRY FROM SEED - Physalis peruviana

ripe cape gooseberry fruit
Image credit - http://www.kerneliv.dk/en/


The Cape Gooseberry - Physalis peruviana is a tender herbaceous perennial with a sweet, mildly tart flavour. Although not fully hardy in the colder regions of northern Europe its has been cultivated in England since the late 18th century - albeit with winter protection. Unfortunately it is still relatively little known in England due to its seasonal availability and relatively high prices in the supermarkets.

cape gooseberry seedlings
Image credit - http://www.gardenposts.co.uk/
Sow Cape Gooseberry seeds from February to March into a modular seed tray using a good quality compost such as John Innes 'Seed and Cutting. Water the compost and allow the excess water to drain away before sowing the seeds at a rate of 1 seed per module. Press each seed into the surface but do not sink the seed into the compost as Cape Gooseberry seeds require the presence of light to help initiate germination. Lightly cover the seed with vermiculite.

Place the tray inside a heated propagator at a temperature of 18-21 degrees Celsius and keep the soil damp. Move to warm, bright conditions such as a bright windowsill, but one that does not receive direct sunlight as this can cause seedlings to scorch or the compost to dry out. If you do not have propagator then seal the seed tray inside a clear, polythene bag.

Germination will usually takes up to 21 days and once the seedlings emerge remove the tray from the propagator or polythene bag. Once they are large enough to handle, pop out each plug and pot on into 3 inch pots and grow them on at a minimum temperature of 15 degrees Celsius until they are 8 inches high.

When all risk of frost has passed, plant Cape Gooseberry outside in any well drained soil in a position that receives full sun. However as they are unlikely to survive the freezing temperatures of winter you will be better off growing Cape Gooseberry in ground protected by a greenhouse or polytunnel.

For related articles click onto the following links:
BBC Cape Gooseberry

HOW TO GROW IRIS BULBS

How to grow Iris bulbs


Although still under discussion, the Iris genus is believed to contain between 250-300 species. Of course most people will think of the large, herbaceous flag iris with their large exotic, and brightly coloured flowers but the small bulbous species are as beautiful and intricate as any of their larger cousins.

Iris bulbs
For the cooler regions of northern Europe species from the reticulata group are the hardiest and therefore will be the most suitable for overwintering. Further south and iris from the little-known Juno subsection will be worth planting.

Avoid planting Iris from the Xiphium subsection unless you are in a region that experiences mild winters or if you intend to grow them in a pot with the view to bringing them in under protection.

Plant Iris reticulata bulbs in clumps 2-3 inches deep in September or October. They are best grown in a light, well-drained and chalky or limestone soil. They are ideal for planting in a rockery, alpine bed or at the front of a herbaceous border. Avoid planting in heavy soils as the bulbs can become damaged if overwintered in waterlogged conditions.

After flowering in the spring, feed with a liquid soluble fertilizer once a month but only during the growing period. This will help to produce bigger bulbs for the following spring and subsequently a better flowering display.

Pot grown Iris

Iris 'Katharine Hodgkin'
Plant 6 bulbs, 2-3 inches deep, in a 5 inch pot using a good quality compost such as John Innes 'No 3'.

Come the winter they can be brought into an unheated greenhouse until the spring. If you are growing Iris in pans or bowls for a spring table display do not be tempted to bring them into a warm room until the buds are showing full colour. bring them in too early and the buds will dry out and fail to open. However the atmosphere of a greenhouse will usually prevent the buds from drying out.

For related articles click onto the following links:
RHS Iris
HOW TO GROW THE BEARDED IRIS
HOW TO GROW BULBS
HOW TO GROW GLADIOLI
HOW TO GROW GLADIOLI FROM SEED
HOW TO GROW HELXINE SOLEIROLII
HOW TO GROW IRIS RETICULATA
IRIS 'KATHARINE HODGKIN'
IRIS RETICULATA
WINTER ACONITE - Eranthis hyemalis

HOW TO GROW BLUEBERRIES FROM SEED

ripe blueberry fruit
How to grow blueberries from seed? - http://www.notonthehighstreet.com/


Despite the popularity of blueberries they can still be relatively expensive, the reason for which (in England at least) is that there is no significant blueberry production in the United Kingdom. Of course there is nothing stopping you from purchasing your own blueberry bushes but again due to the propagation process these too can be expensive - especially if you are planning to plant out a significant number.

blueberry fruit
Blueberries - http://www.freshfruitportal.com/
If you have the relative skills and equipment then perhaps the best method of propagating blueberries is by taking cuttings but if you want a bit of fun or possibly create your own unique cultivars then consider growing blueberry plants from seed. Blueberry seeds are are usually sown in October and overwintered outside in a cold frame but with the all-year-availability of blueberry fruit they can be sown at anytime of year so long as you have a heated propagator and a frost-free environment.

The seeds of the blueberry are very small so take care in removing them from the fruit. Blueberries grow in damp, acidic conditions so these will need to be replicated. Using a deep, modular seed tray, fill with an ericaceous seed compost or consider making your own using a mix of two parts moss peat and one part horticultural grade lime-free sand. Water the compost in then once the excess has drained away gently press one seed into the surface of the compost of each module. Do not sink the seed into the compost as blueberry seeds need the presence of light to help initiate germination. If you wish you can sprinkle a light covering of vermiculite onto the surface.

Place the tray either in a cold frame over the winter and allow to germinate naturally or break the natural dormancy of blueberry seeds by placing them seeds in the bottom of a fridge for 6-8 weeks. After this cold period place the tray inside a heated propagator at a temperature of 16-20 degrees Celsius. Do not allow the temperature to drop below 16 degrees Celsius as this can cause the seedlings to die off. Position the propagator in a bright position but one that doesn't not receive direct sunlight as this can cause the compost to dry out and inhibit germination. Keep the compost moist and germination should occur in 4-5 weeks.

blueberry seedlings
Blueberry seedlings
Once the seedlings emerge, remove the tray from the propagator and provide cooler temperatures of between 12-16 degrees Celsius. When the seedlings have established in their modules, carefully pop them out, disturbing the root system as little as possible, and pot them on into 3 inch pots using a good quality cutting compost.

If the weather is mild then they can be grown outside in a cool, shaded cold frame. If freezing temperatures exists then provide a cool, bright, frost-free position until the threat of late frosts have passed. Then they will need to be hardened off for a couple of weeks before being planted outside.

Seedlings grown under cold frames can be planted out once they are about 6-8 inches tall, but only if there is no imminent risk of frost.

Blueberries will perform best in a moisture retentive, peaty or lime-free soil in the sun or partial shade. Once the seedlings are large enough to be planted outside there will be no further need to worry about cold damage as they will be perfectly tough once they have been hardened off from propagation conditions.

Note. If the seeds do not germinate in the heated propagator then they will need to be returned to cold conditions for a further 6-8 weeks.

For related articles click onto the following links:
BLACKCURRANTS - The new superfood
CAPE GOOSEBERRY SEEDS - Physalis peruviana
CAN YOU EAT SEA BUCKTHORN BERRIES?
Growing Blueberries from Seed
HOW TO GROW AN APPLE TREE FROM SEED
HOW TO GROW BLACKCURRANTS
HOW TO GROW BLUEBERRIES
HOW TO GROW BLUEBERRIES FROM CUTTINGS
HOW TO GROW BLUEBERRIES IN POTS AND CONTAINERS
HOW TO GROW A CHERRY TREE FROM SEED
HOW TO GROW KIWI FROM SEED
HOW TO GROW MANGO FROM SEED
HOW TO GROW A MULBERRY TREE
HOW TO GROW A PEACH TREE FROM A STONE?
HOW TO GROW RASPBERRIES
HOW TO PRUNE BLACKCURRANTS
HOW TO PRUNE RASPBERRIES
NHS Blueberry
HOW TO PRUNE AN APPLE TREE

HOW TO GROW BRACHYSCOME

Brachyscome in bloom on a wall
How to grow Brachyscome


The plant we know as just 'Brachyscome' is a gorgeous little half-hardy annual, often grown as summer bedding in northern Europe as a backdrop to larger, brightly coloured specimens such as roses or tall-stemmed, late blooming tulips. Although there are up to 80 species within the genus the most popular of all is Brachyscome iberidifolia, perhaps more commonly known as the Swan River Daisy.

It has an erect habit with deeply cut, pale-green leaves and can grow to a height of approximately 18 inches. The fragrant flowers are daisy like, 1 1/2 inches across and can range in colour from white to pink, lilac and blue-purple. You can expect Brachyscome iberidifolia to bloom from late-June to September.

Native to Western Australia, Brachyscome iberidifolia will thrive in a rich loamy soil, growing in a site that receives as much sun as possible. However it has proven to be both tough and adaptable, capable of providing a good display in even poor or sandy soils.

Young plants should be planted out in May and 15 inches apart, but only once the threat of late frosts have passed. Before planting make sure that they have been fully hardened beforehand. Brachyscome iberidifolia can be prone to straggly growth, so for best effect pinch out the growing tips to encourage the formation of side-shoots and plant in close-knit groups so that they can support each other as they grow. Individual specimens may require the support of inconspicuous twiggy sticks. New plants will require regular watering until they establish. Afterwards you will only water during dry periods as Brachyscome is surprisingly drought tolerant.

If growing from seed, sow under glass in March, giving a very light covering of compost or vermiculite is required to help initiate germination. Provide a temperature of 18 degrees Celsius and you can expect the seedlings to emerge in 10-15 days. Once established reduce the temperature to 16 degrees Celsius after pricking out.

Alternatively, sow Brachyscome directly in their final position in April and then thin out to their required spacing. If cold weather is expected then provide the protection of a cloche.

Main Image credit - Simon Eade gardenofeaden@gmail.com

For related articles click onto the following links:
GARDENERS HQ Brachyscome
HOW TO GROW ANTIRRHINUMS FROM SEED
HOW TO GROW CORN FLOWERS FROM SEED
HOW TO GROW ERIGERON KARVINSKIANUS

GROWING CHIVES FROM SEED

Chives in flower bud
Growing chives from seed


Chives are an easy to grow, aromatic foliage plant native to Europe, Asia and North America. As the smallest of all edible species within the Allium genus, it is really only the leaves of the chive plant that are mainly used. Even then they need to be picked fresh to provide the mild, onion-like flavour for salads, soups, and egg and cheese sauces.

Chive seedlings growing in a seed tray
Chive seedlings
Chives will perform best on any medium, loamy soil, preferably in the sun or partial shade, but to be fair they will still be happy in any fertile garden soil and can even produce a decent crop in a window box!

Sow chive seeds in March in drills 1/2 inch deep and 12 inches apart, and keep moist. They will germinate at temperatures of 15 to 20°C but if you are experiencing particularly cold weather then germination can be delayed. In this instance you can help to keep on track by providing the seedlings the protection of a cloche. Once large enough to handle thin the seedlings out to 1 plant every 6 inches. The seedlings will be ready for transplanting to their final position  in May. If you require more stock the following year then divide the existing plants.

In the winter chives will die back to ground level but will reappear in the following spring producing foliage ready for harvesting by early May. Clumps protected by a cloche will emerge earlier producing leaves in March or April.

chopped chives
Growing chives from seed
Give chives a top dressing of well-rotted manure or garden compost in March or April. Just make sure that the leaves are thoroughly washed before use.

Any plants that are starting to look old can be cut back to about 1 inch above soil level. When harvesting, remove the leaves you need by cutting them to the base.  During the growing season, the plant will continually regrow leaves, allowing for a continuous harvest.

Every four year lift the clumps in September or October and divide them with a sharp, sterilized blade into bunches of about half a dozen shoots. Replant them 12 inches apart in freshly manured soil.

For related articles click onto the following links:
HOW DO YOU PLANT OUT ONION SEEDLINGS?
HOW TO GROW AUTUMN ONION SETS
HOW TO GROW JAPANESE ONION SETS
HOW TO GROW ONIONS FROM SEED
HOW TO GROW WELSH ONIONS
RHS Chives

HOW TO GROW CHIONODOXA

Chionodoxa growing in woodland
Chionodoxa forbesii - https://davisla2.files.wordpress.com


Commonly known as the 'Glory of the Snow', the Chionodoxa genus is home to just 6 species of hardy, bulbous perennials native to the eastern Mediterranean but more specifically Crete, Cyprus and Turkey. They are all early spring flowering and all suitable for growing on rock gardens, at the front of borders or in short grass.

Chionodoxa blooms
Chionodoxa sardensis -  http://lambley.com.au/
While there is considerable confusion over their names and species identification in particular for Chionodoxa luciliae, C. forbesii or C. siehei. However in a  publication for the Royal Horticultural Society (RHS) which illustrated all three of these species, it was reported that the most commonly found garden species is usually Chionodoxa siehei.

Plant Chionodoxa bulbs in the autumn in any ordinary, well-drained soil in a position that receives as much sunlight as possible. However they can be grown under deciduous trees or shrubs, as they will flower and have their foliage naturally die back before the new foliage emerges in the spring. Avoid any areas that are prone to waterlogging as the roots are sensitive to being wet and can easily become damaged.

For best effect, plant the bulbs 2-3 inches deep in large groups, then water well to gently settle the soil around the bulbs. Once established they will require little attention except to lift and divide overcrowded plants, preferably just after the foliage has died back to ground level. Do not be tempted to remove the foliage until it has completely died back.

Chionodoxa seeds set freely under good conditions. Remove the round seed pods in late spring when the seeds are ripened black, but before the capsules have opened. Sow the seeds immediately onto the surface of a seed tray containing a good quality compost such as John Innes 'Seed and Cutting'. Gently water in and place inside a cold frame. Leave in place until the foliage dies back the following year, then lift out the seedlings to transplant them into their final positions over the summer.

For related articles click onto the following links:
HOW TO GROW IRIS BULBS
IRIS 'KATHARINE HODGKIN'