WHERE IS THE BEST PLACE TO PLANT A CAMELLIA?

Where is the best place to plant a Camellia?

If you have purchased a Camellia cultivar then well done, you obviously have good taste. Dark glossy leaves combined with absolutely gorgeous blooms, why wouldn't you want one in your garden? Well there may be a couple of reasons, one being the price of the more fancy varieties. The second, and arguably more pertinent is that once established they can often become pale and stunted! So in order to get the best performance out of your chosen specimen, where is the best place to plant a Camellia?

To begin with you need to check the family history and this will flag up one important piece of information. camellias are housed within the Ericales order meaning that they are closely related to plant in the ericaceous family. Ericaceous plants are known for their tolerance for acidic, infertile conditions and Camellias do indeed struggle when grown in alkaline soils. This means that even before you choose your site, if your soil is not naturally acidic you will then need to provide acidic conditions. You can achieve this by purchasing a couple of large bags of ericaceous compost, or help acidify the soil by adding flowers of sulphur or plenty of moss peat. Acidity between pH 7 and pH 5 is perfect. Humus rich soils are also preferable.

Now that has been dealt with the rest is easy although Camellias require a large amount of water, either from natural rainfall or from irrigation as in general they will not tolerate drought. let them get too dry over the summer and autumn and you can easily lose the growing flower buds. This means that planting in the ground will be so much easier than trying to grow them in containers.

Keeping is simple the rest of the requirements are simple. Camellias prefer a partially shady position, preferably out of direct sun during the hottest part of the day. To make it more challenging they also like to be out the way of early morning sun as this can dry out developing buds. One last thing, plant in a sheltered position protected from exposed conditions such as strong winds.

So to answer your question, if you can achieve all the points covered above then once again well done. You have now found the best place to plant camellias.

For related articles click onto the following links:
ARE AZALEAS EASY TO GROW?

CAMELLIA JAPONICA 'BLACK LACE'
CAMELLIA JAPONICA 'Desire'
CAMELLIA JAPONICA 'Mrs. Tingley'
CAMELLIA 'ROYALTY'


WHY IS MY PIERIS GOING YELLOW?

Why is my Pieris going yellow?

Native to the mountainous regions of eastern and southern Asia, eastern North America and Cuba, the Pieris genus could be considered to hold some of the most perfect of all ornamental garden plants. Hardy, evergreen and clothed in glossy and luxuriant leaves, its colourful new foliage and attractive racemes of bell-like blooms means that it kind of ticks all the boxes. Well at least it does when it's on display in the confines of a garden centre. However once it becomes established in your own garden these qualities can quickly deteriorate. One of the biggest issues with planting Pieris is that they become stunted and yellow, a condition that is generally related and known as chlorosis. So the question often asked by gardeners is this. Why is my Pieris going yellow?

The reason is twofold. Firstly, the Pieris genus is found within the family Ericaceae which is noted for its tolerance for acidic, infertile conditions. Secondly, many suburban gardens across northern Europe have an alkaline soil and herein lies the problem. The roots of ericaceous plants are unable to take up certain nutrients, notably iron, magnesium and zinc. The yellow that you see in the foliage of affected Pieris plants are the orange/yellow carotenoid pigments found and usually hidden below the green chlorophyll pigments. These chlorophyll pigments are the power drivers of the plant producing the sugars and energy with the plant needs to grow. Iron, magnesium and zinc are vital components of the chlorophyll molecule (iron being used in greater quantities) and without it the plant is unable to produce it. Therefore if the plant is unable to produce green chlorophyll pigments the green colour of the leaf will fade and reveal the yellow pigments beneath. This is why Pieris can go yellow. Without being able to produce the energy needed to grow the plant will become stunted. 

The good news is that this decline can be reversed. Also you need to do it provide conditions suitable for healthy growth and this can be achieved by either acidifying the soil around the root system or by supplying iron in a form which an be taken up by the root system.

Chelated iron is more readily absorbed by Pieris root systems and can be found in products such as sequestrien and Hydrangea blue colourant. Alternatively provide a liquid soluble plant fertiliser specially formulated for ericaceous plants such as Miracid by Sotts.

If you want to acidify the soil around the roots, but do so without disturbing the root system, dig in moss peat and/or apply flowers of sulfur to the soil surface and water in. One last option is to spray the foliage with iron sulphate (generally sold as known as ferrous sulphate) directly onto the leaves as a rate of 1 to 2 oz of ferrous sulfate per gallon of water.

For related articles click onto the following link:
Camellia japonica 'Black Lace'
CAMELLIA JAPONICA 'Desire'
CAMELLIA JAPONICA 'Mrs. Tingley'
CAMELLIA 'ROYALTY'

HOW DO YOU TREAT YELLOW LEAVES ON CAMELLIAS?

How do you treat yellow leaves on Camellias?

If you look over at the various front gardens of suburbia, you can be forgive for thinking that Camellias are a lovely mid-green colour, often attractively patterned with yellow markings. However the reality is that Camellias should be a glossy dark-green and the reason they are often not this hue is due to their ericaceous nature! So if they are not supposed to be yellow, how do you treat yellow leaves on Camellias?

Camellias are lime intolerant. If they are planted in soil which has a component of lime to it (making the soil alkaline in nature) camellias struggle in their ability to uptake the nutrients iron, magnesium and zinc. This is called chlorosis and it is identified by the leaves turning yellow in a characteristic manner.

Iron deficiency is by far the most common cause of chlorosis and is identified with yellowings on the younger or terminal leaves and later works inward to the older leaves. Conversely, Manganese and zinc deficiencies develop on the inner or the older leaves first and then progress outward.

Iron is essential for the production of the green chlorophyll pigment and so without iron, there is no green pigment and that is why you are left with the underlying yellow carotenoid pigments showing through instead. There are of course other reasons why iron uptake is prevented such as high levels of copper in the soil but for the benefit of tis articles we will concentrate on the most likely causes which is the increasing insolubility of iron in alkaline soils.

One of the easiest treatments is to plant your camellia into ericaceous compost smaller plants can be dug out and replanted in it, while container grown plants can be potted on into their next sized pot with it.

With regards to established garden plants treatment of yellow leaves on Camellias can be dealt with in a number of ways such as digging sulfur (often sold in garden centres as flowers of sulphur and always use the recommended doses) or moss peat in around the root system, while trying not to damage the roots themselves. Moss peat is naturally acidic and will therefore acidify the surrounding soil. Be aware that sedge peat can be acidic or alkaline and so unless you have checked its pH first it is not recommended to be used for soil acidification.

One simple method to treat yellow leaves on Camellias is to regularly apply a liquid soluble ericaceous fertiliser. Over time this will help to increase the acidity  around the root ball, allowing the plant t take up the available iron.

The last best option is an application of chelated iron. Ths is iron combined with an organic chemical (called a chelate) that helps keep it in a plant-available form. Always apply using recommended dose rates, but be aware that this treatment may need to be repeated several times during the growing season.

If all else fails, one last option is to spray iron sulphate (otherwise known as ferrous sulphate) directly onto the plant leaves as a rate of 1 to 2 oz of ferrous sulfate per gallon of water.

HOW TO GERMINATE BANANA SEEDS


Hardy banana seed can be sown at anytime of year so long as you can break its seed dormancy. To achieve this, soak the seeds for 24 hours in warm water before planting. 

Using either a seed tray of modular tray, fill with a good quality seed compost such as John Innes ‘Seed and Potting’. Then using a dibber – or an old pencil as in my case - sow the hardy banana seed ¼in deep. Backfill the hole with a little more compost then water thoroughly. Allow the excess water to drain then seal the tray inside a polythene bag in order to keep the compost moist. Now place the tray in a warm area while the seeds germinate. Be aware that germination is slow and erratic and even at a temperature of around 28 degrees Celsius banana seeds can take 1-6 months to germinate.

It is worth mentioning here that most banana seed will respond well to fluctuations in temperature. If you have both the time and the facilities, consider give your seeds alternating temperatures of 19 hours cool and 5 hours warm. You will find that some species will respond well to larger fluctuations of temperature – between 35 degrees Celsius and 15 degrees Celsius, while others are better with less severe fluctuations 25 Celsius – 15 Celsius or even 20 Celsius -15 Celsius. However, do not go much below 12 degrees Celsius as this can place your hardy banana seed back into dormancy.Perhaps the easiest way to produce your fluctuating temperatures is keep your seeded trays in a heated propagator. Switch it on during the day and turn it off at night. If your night temperatures are too cold then have the propagator on a night and turned off during the day.

How to grow banana plants from seed
Banana seedlings
Tropical species of banana will do better with a constant temperature between 20 and 35 Celsius - depending on the variety. Fresh seed will always be the best, although it has been known for banana seed to germinate at room temperature after being stored for 2 years! There are still a lot of unknowns with regards to germinating banana seeds, but the following research may be of help to you.

At a germinating temperature fluctuating between 35 – 15 Degrees Celsius. The banana species listed below had the following success rate:

Musa Helen's Hybrid 21%
M. Sikkimensis 23%
M. Sikkimensis Red tiger 0%
M. flaviflora 3%
M. Formosana 4%
E. Glaucum 1%

At a germinating temperature fluctuating between 25 – 15 Degrees Celsius. The banana species listed below had the following success rate:

E. Glaucum 24%
M. Sikkimensis Red tiger 30%
M. Sikkimensis 34%
M. Helens Hyb. 11%
M. Flaviflora 7%
M. Formosana 0%

At a germinating temperature fluctuating between 21 – 15 Degrees Celsius. The banana species listed below had the following success rate:

M. sikkimensis 3%
M. Sikkimensis Red tiger 27%
E. glaucum 18%
M Helens Hyb. 30%
M. flaviflora 15%
M. Formosana 2%

How to grow banana plants from seed
How to grow banana plants from seeds
It should be noted that further germination will occur so long as you have the patience to wait for it – including the difficult Musa Formosa which eventually germinated about 50% of all seeds sown.

As each seed germinates, lift carefully from the tray so as to prevent any damage to the juvenile root system, and transfer it to a 3 in pot of good quality, free draining compost. Pot on as required because the larger the container the larger your banana plant will grow.

Grow on in warm well lit conditions. During summer they can be stood outside or planted in the border but should be brought into well lit frost free conditions for the winter when it should be kept moderately dry. Some discolouration of the leaf ends may occur through the winter months but this won't harm the plant.

For related articles click onto the following links:

HOW DO YOU TAKE CARE OF A CAMELLIA BUSH?

How do you take care of a Camellia bush?

Originally native to eastern and southern Asia, the glossy foliage and outstanding colourful blooms of modern Camellia cultivars makes them a luxuriant, albeit often expensive, choice for the garden. However, once planted issues may occur in subsequent years which can take the metaphorical shine off of your coveted specimens. So to avoid this, how do you take care of a Camellia bush?

How do you take care of a Camellia bush?
If you have recently purchased a camellia and you just need to know where and how to plant it then here is a quick break down. If you have a choice, Camellias are best planted in autumn while the soil is still warm to encourage the roots to establish before winter sets in. However container plants can be planted at any time of year, just avoid disturbing the roots in the rootball a this will delay your plant from establishing. 

Most Camellia cultivars will prefer partial or dappled shade, but Camellia sasanqua can tolerate sunnier positions. If you do not have the benefit of acidic soils, plant you Camellia into ericaceous compost and subsequently feed with a water soluble ericaceous fertiliser such as Miracid.

Plant Camellias in a sheltered position, away from cold winds and early morning sun as this can cause the blooms to scorch. 

When Camellias are newly planted they will need to be watered regularly until they become established. This particularly important during the summer months as this is when the flowers are produced. Allow the plant to dry out during this crucial period and you can lose the flower buds. Try to keep the soil constantly moist but avoid becoming waterlogged as this will damage the root systems and once again the flower buds can be lost.

Once established, camellias require very little care but if you plant becomes too large for its position it may need trimming back. This will do no harm to your plant, it fact it will tolerate server lopping but be mindful of the following easons blooms. If you cut your plants back in the autumn or winter you will be effectively removing the dormant flower buds which will result in a complete lack of spring blooms. Always try to time your cutting to immediately after flowering.

Camellia with chlorosis
Quite often you will see established Camellias with yellow/brown foliage, often accompanied with black spots. The spots are usually caused by environmental stress, while the yellow foliage is due to the plants inability to produce adequate chlorophyll pigment due to alkaline soil conditions.This is called chlorosis. In extreme cases of chlorosis camellias can also exhibit stunted or malformed new growth, as well as leaf and bud drop.

Luckily this can be resolved by a weekly feed of liquid soluble ericaceous and forking in iron chelate around the root system, while trying to acid damaging the root system. If you can't find iron chelate in your local garden centre, you can supplement this is hydrangea blue colourant

Main image - By junichiro aoyama from Kyoto, Japan - Camellia sasanqua, CC BY 2.0, https://commons.wikimedia.org/w/index.php?curid=2787079

For related articles click onto the following links:
ARE AZALEAS EASY TO GROW?

Camellia japonica 'Black Lace'
Camellia japonica 'Desire'
Camellia japonica 'Mrs. Tingley'
Camellia 'Royalty'

HOW DO YOU TREAT YELLOW LEAVES ON CAMELLIAS?
How to Grow Camellias
HOW TO GROW CAMELLIAS FROM SEED
HOW TO PROPAGATE ABUTILON FROM CUTTINGS
HOW TO GROW THE VIRGINIA CREEPER FROM CUTTINGS
How to propagate the Foxtail Lily
HOW TO PRUNE CAMELLIAS
HOW TO TAKE CHRYSANTHEMUM CUTTINGS
HOW TO TAKE CUTTINGS FROM ABUTILON
HOW TO TAKE CUTTINGS FROM CAMELLIA
HOW TO TAKE CUTTINGS FROM CLEMATIS
How to take Cuttings from Strawberry Plants
HOW TO PROPAGATE BOX HEDGING PLANTS
HOW TO TO TAKE CUTTINGS FROM THE STRAWBERRY TREE - Arbutus unedo

WHERE IS THE BEST PLACE TO PLANT A CAMELLIA?
Why are my Camellia Flowers going Brown?
Why are my Camellia Leaves Turning Yellow?

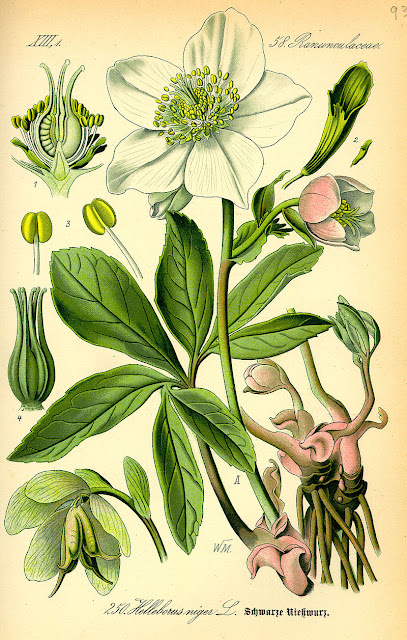
HOW POISONOUS ARE HELLEBORES?

How poisonous are hellebores?

Native to large swathes of Europe and Asia, Hellebores are a great choice for when deciding to introduce early flowering plants to the garden. This is especially true when you consider the number of improved hybrids being released from plant breeders on a year to year basis. Despite their beauty, there is a shadow that hovers over the Hellebore genus and that is down to its toxicity. In fact every part of the plant is considered poisonous! Luckily Hellebore poisoning is rare, but just how poisonous are hellebores?

How poisonous are hellebores?
In folk law, there is a long history of poisoning by hellebore, some of which misleading. Most notably hellebore poisoning is thought to be the cause of death of  Alexander the Great who was felled by a mysterious illness that left him too weak to move. However current research points towards the white hellebore which is believed to have been slipped into his wine. Despite the common name of white hellebore, it is actually a false friend as it actually denotes the species Veratrum album which is clearly not a true hellebore.

In the early days of medicine, black hellebore, a general name which included various species of the genus Helleborus, was used to treat paralysis, gout and in particularly insanity!

While Black hellebore is indeed  toxic, it contains protoanemonin, or ranunculin depending on the species which has an acrid taste. So if ingested you will quickly know about it as these compounds can cause burning of the eyes, mouth, and throat, oral ulceration, gastroenteritis, and hematemesis.

However, if you ingest enough of it Hellebore poisoning can cause tinnitus, vertigo, stupor, thirst, anaphylaxis, vomiting, slowing of the heart rate, and finally collapse and death from cardiac arrest! That is how poisonous Hellebores are.

For further reading click onto:
ARE CHERRY LAUREL FRUIT POISONOUS?
HELLEBORUS 'Penny's Pink'
HELLEBORES AND HAND POLLINATION
HOW TO GROW HELLEBORES FROM SEED
How to Plant and Grow Hellebores
How to propagate hellebores
Helleborus and Hand Pollination
Pests and Diseases of Hellebores
THE BLACK HELLEBORE
THE CHRISTMAS ROSE - Helleborus niger

WHICH IS THE BEST CLEMATIS MONTANA?

Clematis montana var. grandiflora

Clematis montana has proven itself to be a fantastic garden climbing plant and rightly so. It produces exotic, luxurious foliage and is one the first impressive early bloomers of spring. Native to the mountainous regions of Asia, from Afghanistan to Taiwan, it is a vigorous, deciduous climber coveted for its mass of small, fragrant blooms which appear for a period of about four weeks in late spring. Is is almost bulletproof hardy and a fantastic addition to the northern European garden. 

Clematis montana ‘Van Gogh’
So when it come to choosing a Clematis montana cultivar for your garden, assuming that you have enough room, which is the best clematis montana? This of course depends on your point of view and requirements, but with so many selected cultivars to choose from we will consider the following as the best of the bunch.

As an overall winner, Clematis montana ‘By the Way’ is arguably one of the best single flowering, medium cultivars, producing a flurry of soft-pink, deliciously fragrant open blooms from top to bottom.

If perfume is important then Clematis montana 'Mayleen' is the cultivar for you as it produces the strongest fragrant scent of all. This one must be at top of your list.

When looking for something with maximum sized blooms, look no further than Clematis 'Giant Star'. This mid-pink, upward facing form has some of the largest sized cup-shaped flowers in the genus.

Clematis montana are usually in bloom for no more than a few weeks but if that isn't enough for you then consider Clematis montana ‘Van Gogh’. It has some of the deepest coloured flowers and can remain in bloom for an impressive six weeks!

If you want a Clematis montana but don't have the space then you have to look at Clematis ‘Primrose Star’. Not only is it an excellent compact choice it is unusual in that it produces a lemon-yellow, double-flower. If this colour is not your cup of tea then the compact Clematis ‘Freda’ with its single mauve-pink blooms will tick the box.

Many gardeners just want hardy and reliable and you can beat one of the original garden favourites Clematis montana var. grandiflora. This white flowered marvel is one of the best selling and well known of all the montana cultivars and for good reason.

For related article click onto the following links:
CLEMATIS CIRRHOSA species and cultivars
CLEMATIS MONTANA - The Anemone Clematis
CLEMATIS montana 'Grandiflora'
CLEMATIS 'NELLY MOSER'
CLIMBING PLANTS FOR AUTUMN COLOUR
HOW TO GROW CLEMATIS ARMANDII
HOW TO GROW CLEMATIS ‘Bill Mackenzie’
How to Grow Clematis florida 'Sieboldii'
HOW TO GROW CLEMATIS TANGUTICA
HOW TO GROW LAPAGERIA ROSEA FROM SEED
HOW TO GROW THE SNAIL VINE FROM SEED
HOW TO PROPAGATE CLEMATIS BY LAYERING
HOW TO TAKE CUTTINGS FROM CLEMATIS
HOW TO TREAT FOR CLEMATIS WILT?

IS CLEMATIS ARMANDII SELF CLINGING?

IS CLEMATIS ARMANDII SELF CLINGING?

Is Clematis armandii self clinging?

Named after Father Armand David (1826-1900), a Jesuit missionary and plant collector of note in China, Clematis armandii is a gorgeous, choice specimen climber from China and Northern Burma. With its exotic, evergreen foliage, it is a fantastic choice for northern European gardens, able to withstand freezing conditions and happy to be sited in full sun or partial shade. So if you have purchased one then well done, it is one of my favourite climbers, but when it comes to providing support, are Clematis armandii self clinging?

Is Clematis armandii self clinging?
Once you have planted your Clematis armandii, it can take a little while to get going so it's best to try and provide it with its favourable conditions. Unlike the large flowering hybrids which should be planted approximately 30 cm below soil level to help combat clematis wilt infections, Clematis armandii will need to be planted at its same soil level. Do not bury it! Also the soil should be damp yet well drained and protected from cold winds otherwise your specimen can just sit there showing only weak growth.

Regarding whether Clematis armandii is self clinging the answer is no, it is more self twining, producing vigourous, extending tendrils which search for support of any kind to connect to. Unlike ivy or climbing hydrangeas, Clematis armandii does not produce adventitious roots along its stem which can secure itself into brickworks or fissured bark and so a support will need to be provided in the garden situation.

Yes, this Clematis armandii collapsed from its support!
When it come to support, be aware that over times Clematis armandii can grow huge over time, and huge means heavy. Even a well screwed in section of trellis can be pulled from the wall in high winds if the trellis itself is only stapled together! This means reinforcing your trellis prior to your specimen growing over it. You can consider using tension wires but unless the connections are well planted they will be pulled out the wall eventually.

Trying to deal with an enormous fallen specimen Clematis armandii is no joke. So my advice is this. When dealing with established plants 'cull' large sections of it every other year, taking the old growth back by as much as a half each time. I am aware that this sounds dramatic but it is better than dealing with a fallen specimen. 

If you do experience having a specimen Clematis armandii falling from its support you may need to cut it back to its main trunk, but don't worry. Once the plant gets over its initial shock it will produce new rigorous, extending stems from dormant buds. It will establish itself over its framework within a year and within two years you would never know anything had happened.

For related articles click onto the following links:
CLEMATIS CIRRHOSA species and cultivars
CLEMATIS MONTANA - The Anemone Clematis
CLEMATIS montana 'Grandiflora'
Clematis montana
HOW TO GROW CLEMATIS ARMANDII
HOW TO GROW CLEMATIS ‘Bill Mackenzie’
How to Grow Clematis florida 'Sieboldii'
HOW TO GROW CLEMATIS TANGUTICA
How to Grow the Morning Glory from Seed
HOW TO PROPAGATE CLEMATIS BY LAYERING
HOW TO TAKE CUTTINGS FROM CLEMATIS
HOW TO TREAT FOR CLEMATIS WILT?
How to Prune Honeysuckle
Passiflora 'Silly Cow'
THE EVERGREEN CLEMATIS - Clematis armandii
The Maypop - Passiflora incarnata

WHICH IS THE BEST CLEMATIS MONTANA?
WHY IS MY CLEMATIS NOT FLOWERING?

WHAT IS THE MOST FRAGRANT DAPHNE?

Daphne perfume princess and Mark Jury

Plants from the genus Daphne, at least those found in your local garden centre, are some of the most fragrant plants available. There is good reason for this and that is due to the environments they have evolved to inhabit. Many Daphne species inhabit high altitude, mountainous regions which due to the cooler conditions have fewer pollinating insects compared to those of warmer, lowers altitude environments. Therefore to help attract sufficient pollinators to their blooms they must make their presence known over a greater area and they achieve this buy emitting significantly more insect attracting perfume.

Of course, everybody's nose is slightly different when it comes to registering scents with some able to smell some fragrances more than others so rather than propose just one Daphne we will consider those generally accepted to be the most fragrant. However there is a recently hybrid which is generally agreed to knock the socks off the others.

Daphne odora
Historically, if you were looking for the most fragrant Daphne you would most likely be directed to Daphne odora. In fact the Latin specific epithet odora means "fragrant". So powerful is it perfume that in Korea it is commonly known as 'chunhyang', meaning a thousand-mile scent!

Not quite as fragrant, but still gorgeously pungent by anyone's standards are the species and cultivars of Daphne bholua, Daphne mezereum and the hybrid Daphne x burkwoodii.

So when it comes to being the king of all fragrant Daphne's there is one that is considered to take the crown. Unsurprisingly it is a hybrid of two of the best selected species already mentioned and that is Daphne x Perfume Princess, the result of a hybrid between Daphne odora and Daphne Bholua.

Beginning in 2003 this new hybrid was developed over a period of some 10 years by plant breeder, Mark Jury. His aim was to combine the tough, strong growth habit of Daphne bholua with the heady fragrance and flowering performance of Daphne odora.  However, Mark found the seed set extremely low, and almost gave up on the project. Finally, he found 6 ripened seeds, yet only one of these went on to germinate.

Over time, Daphne Perfume Princess was nearly forgotten in the breeders nursery in New Zealand as Mark Jury had moved on to develop new breeds of Magnolia. Luckily he was bowled over by the heady scent when the plant first bloomed. Not only does the resulting hybrid combine the strong growth of Daphne bhola and the unforgettable fragrance of Daphne odora, it is earlier and longer flowering than other varieties and produces larger blooms! To add another layer excellence Daphne 'Perfume Princess' is both the first and the last daphne to bloom each year, flowering up to 8 weeks earlier than traditional Daphne odora and continuing longer that all other daphnes!

Some would say that not only did he produce the most fragrant daphne, he may have inadvertently produced the world's most fragrant shrub!

In text image credit - Miya 's file: I took this photo in Hyogo, Japan., CC BY-SA 3.0, https://commons.wikimedia.org/w/index.php?curid=667053

For related articles click onto the following links:

WHERE IS THE BEST PLACE TO PLANT A DAPHNE?

Where is the best place to plant a Daphne?

The most popular cultivars of Daphne grown today, such as Daphne odora 'Aureomarginata', Daphne x transatlantica 'Pink Fragrance' and Daphne bholua 'Jacqueline Postill', are all known for their glorious fragrance. And it's because of their scented superiority that they are often planted near front and back doors. That way, those-in-the-know can profit the most from their heady, early-spring perfumes.

However, being near a door doesn't really cut it when it come to providing favourable environmental conditions, So just where is the best place to plant a Daphne?

Daphne glomerata in its natural habitat
To begin which it is always best to research the conditions plants live in their native environments, assuming that information is readily available. That way you can work out how to provide the most favourable conditions for your plants. In general these species are found in Asia, Europe and north Africa. Though specifically, Daphne odora is a native to China, although later spread to Japan and Korea. Daphne bholua habitat stretches from Nepal to southern China, while Daphne x transatlantica is a hybrid of Daphne caucasica and Daphne collina. As you would expect, Daphne caucasica is from the mountainous Caucasus. 

Daphne bholua grows at altitudes of 1,700–3,500 m and usually found in pastures and grassy glades. In a northern European gardens it will perform well it in a fertile, moist but well-drained soil in full sun to partial shade. 

Daphne odora grows best in fertile, slightly acid, peaty, well-drained soils in either full sun or partial shade.

Daphne x transatlantica will enjoy being planted in a moderately fertile, slightly acid to slightly alkaline, humus-rich, well-drained but not dry soil. Position in sun or partial shade and due to its high altitude parent consider mulching during the summer to keep the roots cool.

In text image credit - By Sergei Kazantsev - Own work, CC BY-SA 4.0, https://commons.wikimedia.org/w/index.php?curid=39928093

Main image credit - Miya GFDL, cc-by-sa-2.5, cc-by-sa-2.1-jp

For related articles click onto the following links:

HOW POISONOUS IS DAPHNE?

How poisonous is Daphne?

Daphne has always been considered a plant for the connasseur, and I guess there is some merit for that. However they tend to be overlooked as ornamental plants for the following reasons. They flower outside of the times most frequented by garden centre visitors They tend to look small and weak in the pot and they are comparatively expensive compared to other  similar plants on the display beds. All this means that you generally need to know what you are buying before hand.

So assuming you have purchased a Daphne for your garden or have correctly identified an existing specimen, you may be wondering how poisonous is Daphne? Hopefully your are asking this question out of general curiosity but if a pet of a child has accidentally eaten part of this plant what is the risk and what should you do?

All parts of Daphne species are poisonous however the berries are especially so. Luckily the fruits are particularly bitter and as such act as a deterrent to eating any in significant numbers. Depending on the species toxins can be variable, however they will contain daphnin, a glycoside which combines glucose with daphnetin. Some species within the genus are also known to contain the toxin mezerein. If digested symptoms can include include gastroenteritis, diarrhoea as well as burning sensations and lesions in the mouth and upper digestive tract. In severe cases, damage to the kidneys, irregular heart rhythm, and coma can occur.  Be aware that prolonged chewing on the flowers, foliage, bark, or red berries can be fatal.

With pets or farm animals symptoms such as drooling, vomiting, bloody diarrhea could point to the ingestion of Daphne.

Main image credit - Miya GFDL, cc-by-sa-2.5, cc-by-sa-2.1-jp

For related articles click onto the following links:
HOW TO GROW DAPHNE BHOLUA 'Jacqueline Postill'

WHAT IS THE MOST FRAGRANT DAPHNE?

WHERE IS THE BEST PLACE TO PLANT A DAPHNE?

HOW DO YOU PLANT ERYTHRONIUM BULBS?

How do you plant Erythronium bulbs?

Erythronium bulbs, or Dog's tooth violet as they are commonly known, are a great addition to the spring garden. The blooms are exotic and luxuriant while the leaves are architectural and handsomely mottled. Of course you can purchase pot grown Dog's tooth violets and simply plant them in the ground, but quite often you can have a larger range to choose from should you buy them as bulbs. This then begs the following question. How do you plant Erythronium bulbs?

Erythronium dens-canis
To begin with it's always a good start to find out the native conditions of any new plant you wish to grow. Unfortunately with regards to the Erythronium genus they have a huge international range which extends across north America and Eurasia. Twenty to thirty of these the hardy, spring-flowering perennial plants, all of which posses the long, tooth-like bulbs from which they receive their common name. In fact one species Erythronium dens-canis has the 'dog's-tooth' description latinized in its species name. 

As a point of information, Erythronium tuolumnense 'Pagoda' is arguably the most popular of all cultivars and is native to the Sierra Nevada of Tuolumne County, California. This, like many Erythronium species has evolved to thrive in moist, light deciduous woodland. Incidentally, the species and the hybrid cultivar 'Pagoda' have been awarded the Royal Horticultural Society's Award of Garden Merit.

As a general rule, Erythronium bulbs are best planted in the autumn and can be planted in any aspect so long as they have the protection of shade during the hottest period of the day. Be aware that they will be prone to scorching if left in full sun. Place the bulbs 10-15 cm deep in a fertile, humus-rich, well-drained soil with the pointed end of the bulb facing upwards. If you soil is dry then it can be improved by digging in plenty of organic matter. If it is prone to waterlogging then plant the bulbs within a mound, a raised bed or as a container-grown specimen.

For related article click onto the following link:
Hardy Spider Lilies
How to Grow the Bearded Iris
HOW TO GROW THE DOG TOOTHED VIOLET
HOW TO GROW IRIS BULBS
THE DOG TOOTH VIOLET - Erythronium 'Pagoda'
HOW TO GROW THE GIANT HIMALAYAN LILY - Cardiocrinum giganteum
How to Grow the Foxtail Lily
How to Grow Trilliums
SOPHORA MICROPHYLLA 'SUN KING'
The Windflower - Anemone blanda

CAN YOU CUT FORSYTHIA TO THE GROUND?


Can you cut forsythia to the ground?

If you are a big fan of yellow then Forsythia species and cultivars are definitely for you. They are one of the earliest of all ornamental flowering shrub to bloom and they are tolerant of most sites and soil conditions. However, when left to their own devices Forsythia can become large and unruly so if you wanted to cut a Forsythia down to ground level there are a couple of questions to ask first. Can I cut a Forsythia to the ground without killing it and, what is the best way to cut a Forsythia to the ground?

The good news is that for the most part, almost all of the species and cultivars within the Forsythia genus are as tough as old boots, so if the reason for such an aggressive cut it to reinvigorate a tired, old specimen then you can, but on very old specimens I would advise cutting the plant back in progressively lower sections over a period of two to three years as old plants can be shocked to death this way. The truth is that the ornamental value of Forthysia specimens can benefit from such a cut in order to maintain a good show of blooms the following year. 

Can you cut forsythia to the ground?
This is because Forsythias flower on the previous seasons wood, so by cutting back hard it will produce invigorated growth which in turn will produce new flower buds from along its entire length. However if this is the reason behind cutting it down to the ground you will be better off leaving 12-24 inches of truck proud of the ground so that there are plenty of dormant buds available to fire off the new growth. If you are dealing with a small specimen then this can be cut down to between 6 and 12 inches. 

Always make sure that you make an angled cut on your truck to reduce the risk of water sitting on top of the fresh cut which can increase the risk of pathogen infection. A horticultural bitumen paint with added fungicide will further reduce this risk.

However if your drastic cut is designed to kill your plant then no, this will not kill it. It is likely to just shoot out new stems from below ground. That being said they can be dug out, eventually, or just used one of the many insidious weed killers available on the market. Then once it has been killed off you can cut it down to the ground with peace of mind.

Main image credit - 松岡明芳 - 松岡明芳, CC BY-SA 3.0, https://commons.wikimedia.org/w/index.php?curid=11642218

For related articles click onto the following links:

HOW DO YOU GROW FORSYTHIA?

HOW TO PRUNE CAMELLIAS
HOW TO PRUNE FUCHSIAS
HOW TO PRUNE IVY

HOW DO YOU GROW FORSYTHIA?

How do you grow Forsythia?

Come the spring and you will probably notice that every man and his dog is growing a forsythia in the front garden, and when you think about it it's not really surprising. They are one of the first of the truly ornamental flowering shrubs to come into flower in the spring and they do so with a huge abundance of showy blooms. So long as you like yellow, you may have purchased a dream come true. 

Unfortunately their omnipresence tends to lose their shine, but if it is possible to look at a well maintained Forsythia as though you have never seen one before then you will truly see what is a magnificent gift it is to Horticulture. 

Named after William Forsyth (1737 – 25 July 1804), a Scottish botanist, royal head gardener, founding member of the Royal Horticultural Society and Bruce Forsyth's great, great, great, great grandfather, the genus Forsythia is mostly a native to eastern Asia, although there is one species found native to southeastern Europe.

How do you grow Forsythia?
With something as exotic as a blooming Forsythia, one may be forgiven for thinking that they are difficult to grow. So how do you grow Forsythia? Well luckily for British gardeners, Forsythia environmental requirements are very similar to those experienced in the UK. This means that you can plant it just about anywhere, and in most soils, and still get a decent display.

However to get the best performance when growing Forsythia plant them in a position that will receive as much sun as possible although it will easily tolerate a partially sunny spot. With regards to soil conditions Forsythia will grow best in a fertile, well-drained soil. Poor soils can be improved by adding sterilized, blended farm manures and those which are known for water-logging can be improved by adding plenty of organic matter and, or, grit. In extreme conditions of water-logging consider planting within a mount or raised bed. If you experience periods of drought in its first year or two then apply water as required.

To promote flowering in following season, prune back your Forsythia after flowering to approximately 6-12 inches from the ground in young specimens and 1-2 feet for mature specimens.

Forsythias are rarely affected by pests and disease, however it is always good practice to sterilize your tool blades before cutting to avoid any pathogen transference. 

Consider an autumn much around the base of the stem, although avoid having the mulch touching the stem.

Main image credit - 松岡明芳 - 松岡明芳, CC BY-SA 3.0, https://commons.wikimedia.org/w/index.php?curid=11642218

For related articles click onto the following links:

CAN YOU CUT FORSYTHIA TO THE GROUND?
HOW TO PRUNE CAMELLIAS
HOW TO PRUNE IVY

HOW TO GROW LEYMUS ARENARIUS 'blue dune'

how do you grow Leymus arenarius 'blue dune'?

Looking around at images in the internet it's easy to believe that they are plenty of amazing blue coloured grasses around. However the reality is different. In fact there is probably a choice of probably no more than three. You have the festuca glauca cultivars (which tent to suffer from fungal infections), then there is Panicum virgatum, and also Helictotrichon sempervirens. Unfortunately blue grasses are usually significantly bluer in the images than they are in real life. Which kind of leaves (excuse the unintentional pun) Leymus arenarius 'blue dune'. As blue as it is, it does require specific growing conditions. So how do you grow Leymus arenarius 'blue dune'?

Commonly known as known as sand ryegrass, sea lyme grass, or simply lyme grass the clue to its prefered environment is clearly there to be seen.  Leymus arenarius is what you would call psammophilous, a fantastic word meaning sand-loving. The native habitat Leymus arenarius are the coasts of Atlantic and Northern Europe including the British isles and Iceland. 

However before you walk down to the beach, spade in hand, in search of some free plants take care. During the 17th century reign of William III, the Scottish Parliament passed a law protecting Leymus arenarius growing on the Scottish coasts. A century later and under the reign of George I, the British Parliament expanded this law to protect it on English coasts. In fact, this law went as far as declaring the cutting or possession of the grass to be a penal offense. Why? Because the stems are used for roof thatching and for weaving into a coarse fabric. Nowadays, Leymus arenarius extensive root network is used in stabilizing sands on at-risk coastal beaches.

Assuming you have found a specimen you need to be aware that under favourable conditions this plant can produce an absolutely massive root system, hence its sand stabilising abilities. Therefore this is not a specimen you want to be growing in your herbaceous borders. If you already have it and you want to dig it out then it is still likely to return as it can grow back from even small pieces of root. It is best cultivated in a large container, in a well drained sandy soil in full sun. To make the most of the attractive foliage, cut back down to soil level in the autumn to allow a shock of fresh growth in the spring.

For related articles click onto the following links:
FESTUCA GLAUCA - The Blue Fescue
HOW TO GROW BAMBOO
HOW TO GROW BAMBOO IN POTS


SHOULD I DEADHEAD FRITILLARIA?


 Should I deadhead Fritillaria

As far as ornamental flowering corms and bulbs go, Fritillaria species have to be rated amongst the best. At least they are in my opinion. However as gorgeous and structural as they are they can also be expensive and so most gardeners like to cultivate them to the highest quality standards. With this in mind the question of whether you should deadhead Fritillaria often comes up. But first, why should you even ask?

If you are hoping to encourage further blooms then you're out of luck. Unlike most annuals and some perennials, Fritillaria will not produce further flowering stems once the initial inflorescences have bloomed. This is a one time only production and once its over its over, so there is no need to deadhead for this reason.

If you want to collect the seed from your Fritillaries then of course there is no point deadheading until the seeds within the seedpods have matured and dried ready for harvesting, At that point they can be deadheaded. If you are not planning to collect the seed then the seed pods be removed as soon as the blooms are spent. There is good reason for this as seed production takes a lot of energy from the corm which, if the seedpod is removed in a timely fashion, will remain in the corm to power next years blooms. However in this scenario leave the stem in place to die back naturally as this will help replenish the corm with valuable nutrients and carbohydrates.

If all you want to do is maintain a tidy looking specimen then by all means remove anything that you consider unsightly. Be aware that this may cause a reduction in blooms the following year, but this can be mitigated by providing a high potash, liquid soluble fertilizer in the spring prior to the flowers appearing.

For related articles click onto the following links:
HOW TO GROW THE WINTER ACONITE - Eranthis hyemalis
WINTER ACONITE - Eranthis hyemalis
HOW TO GROW THE GIANT HIMALAYAN LILY - Cardiocrinum giganteum
HOW TO GROW THE GIANT HIMALAYAN LILY FROM SEED
HOW TO GROW THE FOXTAIL LILY

IS FORSYTHIA POISONOUS?

Is Forsythia poisonous?

Named after Scottish botanist William Forsyth (1737 – 25 July 1804), the genus Forsythia has been a popular garden plant in northern European gardens for almost two centuries now. And why wouldn't it be? It is one of the earliest and most spectacular ornamental flowering shrubs commonly available, particularly if you have a passion for yellow, and robust in nature. However, a situation may occur, presumably with a pet or farm animal, where you may need to know if Forsythia is indeed poisonous?

Forsythia is in the olive family Oleaceae which is strong clue to its toxicity - in that it isn't considered particularly toxic. In fact the species Forsythia suspensa is considered one of the 50 fundamental herbs in Chinese herbology, the fruit of which used for the treatment of bronchiolitis, tonsillitis, sore throat, fever, gonorrhea and general inflammation.Whether Forsythia is an effective treatment of such conditions remains to be proven.

For those interested in foraging, Forsythia flowers are in fact considered edible, though not necessarily tasty with some believing that the blooms are able to produce lactose (the milk sugar). Rarely produced in other natural sources except milk, the presence of lactose Forsythia flowers has yet to be confirmed by the scientific community so this may be nothing more than an old wives tale.

The new foliage of Forsythia are also eaten by foragers as a salad leaf. However these leaves contain Phillyrin, an endophytic fungal isolate with anti-obesity activity, and it’s not yet clear how much of this you can ingest safely.

For related articles click onto the following links:

CAN YOU CUT FORSYTHIA TO THE GROUND?

HOW DO YOU GROW FORSYTHIA?

HOW TO PRUNE CAMELLIAS
HOW TO PRUNE FUCHSIAS
HOW TO PRUNE IVY


HOW POISONOUS IS THE LILY OF THE VALLEY?

How poisonous is the lily of the valley 

While almost all of us choose our garden plants based on suitability and ornamental value, hardly any decisions are based on whether these plants are toxic or not - which of course many of them are! One plant in particular where this should be considered is Convallaria majalis, the lily of the valley. So just how poisonous is the lily of the valley and should gardeners take precautions?

All parts of the lily of the valley are indeed poisonous, containing approximately thirty eight different cardiac glycosides which are highly toxic if consumed, notably slowing down the heart and causing irregular heart rhythm. However as a rule, people don't have a habit of eating the leaves, roots and stems of ornamental garden plants. That being said, the red, sweet-tasting berries are attractive and unfortunately there are cases of young children who consider them worthy of ingesting. Conversely, there are relatively few cases of animal poisoning reported.

If ingested, these cardiac glycosides can also cause symptoms such as abdominal pain, nausea and vomiting. If lily of the valley poisoning is suspected then vomiting is advised even if it is not a system.  Be aware that lily of the valley toxicity can be severe and difficult to treat. If you believe that a pet or child has eaten this plant then you will need to get immediate medical advice.

That being said, handling the plant with bare hands should not cause any issues but if you are concerned then wear gloves. However if you are not happy with any risk you can remove the plant either by digging it out or by spraying it off with a suitable weedkiller.

Main image credit - By liz west from Boxborough, MA - lily of the valley, CC BY 2.0, https://commons.wikimedia.org/w/index.php?curid=28876599

For related articles click onto the following links:

ARE CHERRY LAUREL FRUIT POISONOUS?

IS FORSYTHIA POISONOUS?


DO TULIPS COME BACK EVERY YEAR?

Do Tulips come back every year?

Do Tulips come back every year should be a simple question to answer, and in some respects it is. As far as native species growing in their natural environments are concerned the answer is of course yes. The whole evolutionary point of the bulb is so that it can survive extended periods of harsh conditions, such as drought and high temperatures, by moving into a period of dormancy. Once conditions improve the bulb is triggered back into life and we have a growing, thriving tulip once more.

Do Tulips come back every year
When growing Tulips in northern Europe they question of whether Tulips come back every year can become a little greyer. As far as the commercial producers of Tulip are concerned they would like you to think that they are only annuals and indirectly promote them as such to generate year on year sales.

The thing is this, Tulips are native to a large region from Southern Europe to Central Asia which experiences hot dry summers and winters, with rain most likely experienced in the spring and autumn. So if your garden has similar conditions then congratulations your tulips should return year after year. In the green and pleasant lands of England we generally receive prolonged wet and freezing conditions which are not ideal for sustaining healthy Tulip bulbs. If you leave them in place then there is a risk that they will die after the first season, however you can do as the Victorian gardeners do and lift them for overwintering under protection they should mostly survive. 

Alternatively you can try and create more conducive growing condition such as planting into well-drained raised beds in full sun and away from leaf fall. If you have a penchant for growing rare and unusual Tulip species then consider growing them in a large terracotta pot and providing a dormant period by leaving it in an unheated greenhouse once flowering has finished.

So to answer the question of do Tulip come back every year the answer is yes, sometimes yes and if you don't research and put the work in then possibly no.

 For related articles click onto the following links:

DO BLACK TULIPS REALLY EXIST?
How to Grow Species Tulips from Seed
HOW TO OVERWINTER RARE AND SPECIES TULIPS
HOW TO PROPAGATE TULIPS
LOST TULIPS OF THE DUTCH GOLDEN AGE - SEMPER AUGUSTUS AND THE VICEROY
OLD DUTCH TULIPS - Tulip 'Absalom'
OLD DUTCH TULIPS - Tulip 'Lac van Rijn'
SPECIES TULIP - Tulipa Wilsoniana
THE WORLD'S MOST EXPENSIVE TULIP - EVER!
Top Tips for Tulip Care
TULIPA ACUMINATA
TULIP HISTORY AND POPULAR VARIETIES
Tulip History
TULIP ‘SEMPER AUGUSTUS’ - DOES IT STILL EXIST?
WHAT IS THE TULIP BREAKING VIRUS?