WHAT IS WASABI?

wasabi root and leaf on wooden table
What is wasabi?


Commonly known as the Japanese horseradish, the wasabi plant - Wasabia japonica is an edible herbaceous perennial whose natural habitat is found partially submerged along mountain stream beds in Japan. Despite certain similarities the wasabi plant isn't a close relation to the European horseradish - Armoracia rusticana, syn. Cochlearia armoracia, although they are both genera of the Brassicaceae family. Conversely, in Japan the horseradish is known as European wasabi!

Wasabi growing by a pond
Wasabi in ts native habitat
The mature wasabi plant produces large heart shaped leaves, which protrude from the top of a swollen rhizome-like stem, holding the leaves as high as 60 cm above ground at the base of the plant. The true roots are usually submerged and firmly anchor the plant to prevent it being washed away during floods. The plant takes two years to reach maturity requiring mild temperatures and filtered sunlight.

Wasabi has been apart of Japanese cuisine for thousands of years, in fact archaeological evidence has shown that the ancient Japanese were eating wasabi as early as 14,000 B.C. Although rare to find and notoriously difficult to bring under cultivation, the use of wasabi was widespread by the 16th century but the cost of production restricted its use to the Japanese ruling class. Be that as it may, the production both improved and increased with the rise in popularity of sushi, when wasabi became the preferred flavouring. In sushi preparation, the wasabi is usually placed between the fish and the rice because covering wasabi until served preserves its flavor. Wasabi was also prized for its ability to counteract food poisoning.

wasabi stem being grated
Preparing wasabi
When preparing fresh wasabi, remove the leaves and then rinse the stem under cold running water. It is not necessary to peel the stem, but any dark patches of skin can be removed for a uniformly coloured paste. The greenest, sweetest wasabi will be at the foliage end of the stem and this is where you should start to grate. Using a wasabi grater (known as an oroshigane), grate in a circular motion to produce a fine paste. Only grate what you need as it will lose its flavour after 15 minutes or so. You can always grate more if you need it later.

Using a wasabi brush that should have been purchased with the grate, remove the wasabi onto a wooden or ceramic surface as the steel surface of the grate will speed up the oxidation process and affect the flavour. Wasabi loses its flavour after 15-20 minutes when exposed to air so gather the paste into a ball as this minimizes contact with the air and prolongs the flavour. Let it rest at room temperature for up to 5 minutes to allow the flavours to develop, then it’s ready to serve. You can improve the flavour of an older wasabi ball by grating a little fresh wasabi onto the pile and gathering it up into a ball again.

Although eaten in very small amounts, you may be interested to know that wasabi is very low in cholesterol and sodium and is a source of dietary fibre and vitamin C. Wasabi is also a good source of Vitamin B6, calcium, magnesium, potassium and manganese.

For related articles click onto the following links:
HOW TO GROW BRASSICAS FROM SEED
HOW TO GROW CHAMOMILE
WHAT IS A BULB?
WHAT IS AN F1 HYBRID?
WHAT IS A PERSIMMON?
WHAT IS QUINOA?

HOW TO OVERWINTER TREE FERNS

tree fern forest
How to overwinter tree ferns


Tree ferns are among some of the world's great architectural garden plants, and while they are native across the tropical and subtropical areas regions of South Africa, Australia, Tasmania, New Guinea and New Zealand there are a number of the thousand or so species which are hardy enough to survive planted outside in northern European countries. In fact in the milder regions of southwest England there are areas where species such as Dicksonia antarctica have been left to their to their own devices quite successfully for almost a century.

Of course, shipping tree fern trunks halfway across the world can make them an expensive purchase so to ensure that your prized specimen survives year after year it is prudent to put in place suitable cold protection so that they can survive our freezing winters relatively unscathed.

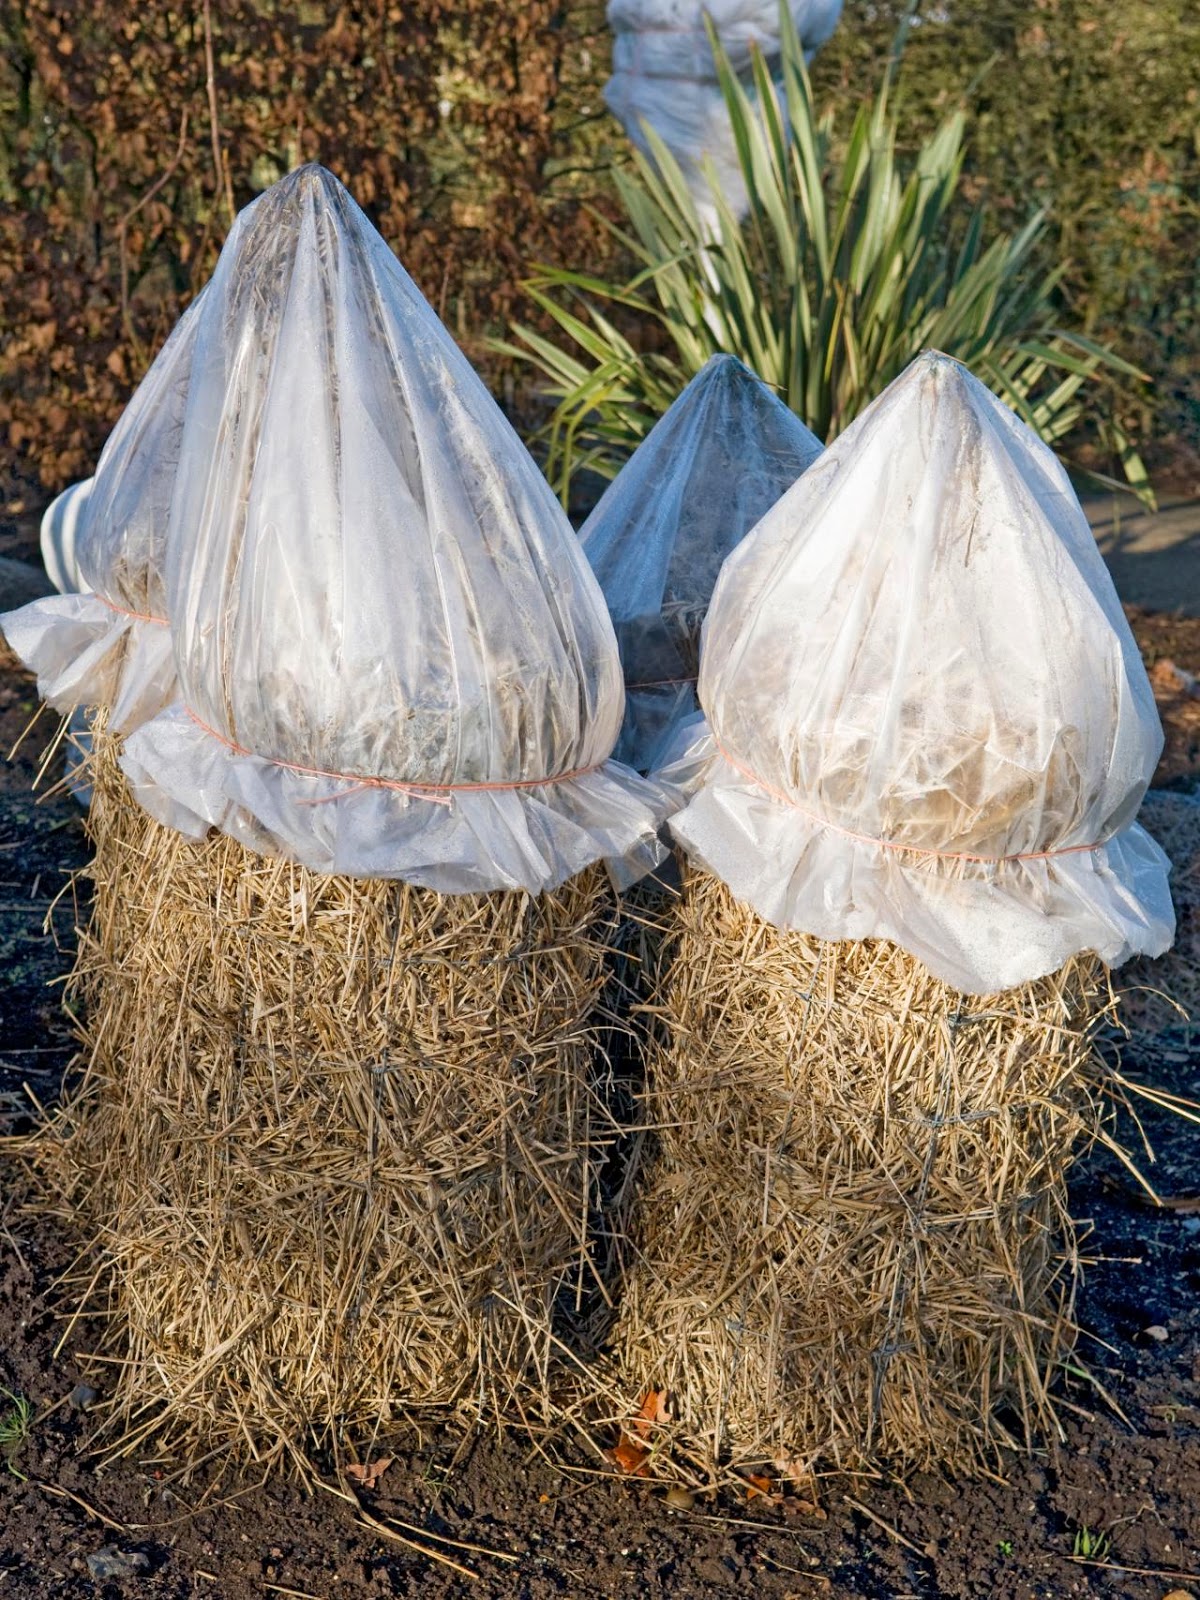
Tree ferns with winter protection of straw
How to overwinter tree ferns
The new growth of tree ferns is produced at its crown, although side crowns can occur on mature specimens. While thick taproots run from the crown down through the trunk and into the soil the thick fibrous qualities of the trunk is usually enough to provide adequate cold protection for this specialist above-ground root system.

The crown of the tree fern is another matter and will require cold protection, especially the further north they are planted. The old brown, dried fronds can be packed into the crown, alternatively use bracken or straw. Do not push your protective material to hard into the crown as this can cause damage to the tightly wound 'embryonic' fronds known as crosiers. This level of protection will be perfectly adequate for the south of England and should be put in place before the first hard frosts - usually october to November.

Further north and the longer freezing temperatures will require an upgrade in cold protection. Gather the fronds around the crown and tie them up. Wrap the entire plant in layers of frost protection fleece. The colder the temperature the more layers will be required.

For less hardy specimens such as Dicksonia squarrosa, Dicksonia fibrosa and Cyathea dealbata pack the fleece with a thick layer of straw or bracken.

Take off the protective fleece in the spring, and remove the crown protection before the new fronds come into growth. Container grown plants in milder areas should be placed under protection in a sheltered frost-free position with the container bubble-wrapped to prevent the roots from becoming cold damaged. Countries with a more arctic winter such as Canada, or Scotland tree ferns are best lifted and brought into a frost-free conservatory or greenhouse.

For related articles click onto the following links:
COLD HARDY CITRUS VARIETIES FOR OVERWINTERING OUTSIDE
HOW TO FEED TREE FERNS
HOW TO GROW JAPANESE PAINTED FERNS
HOW TO GROW TREE FERNS
HOW TO OVER-WINTER CITRUS PLANTS OUTSIDE
HOW TO OVERWINTER FUCHSIAS
HOW TO OVERWINTER GRAPEVINES
HOW TO WATER TREE FERNS
WHEN DO TREE FERNS PUT OUT NEW FRONDS?
WHY IS MY TREE FERN DEAD?

HOW TO OVERWINTER GUNNERA MANICATA


The giant ornamental rhubarb - Gunnera manicata is a near-hardy perennial native to South America from Colombia to Brazil. It will grow best in damp conditions such as the side of a natural ponds, but when grown in the colder regions of northern Europe the crown and near-surface roots can suffer damage under extended periods of freezing, wet conditions.

Gunnera manicata crown covered by old leaves
How to overwinter Gunnera manicata
Traditionally, the crown is protected by covering it with its own leaves either weighed down with soil or secured in place using small branches or its own leaf-stems. This procedure is usually undertaken after the first light frosts in October. As soon as the leaves begin to show the effects of cold damage they can be removed but if the weather's still warm then delay cutting as the heat will cause warm, humid conditions around the crown which can encourage fungal infections to take hold.

Be aware that the stems and undersides of Gunnera leaves are covered in thick spines so unless you have the gnarled hands of a northern bricklayer you should wear thick, protective gloves. While the spines are not sharp enough to puncture the skin, they are quite capable of inflicting deep and painful scratches.

First remove the leaves by cutting the stems near the crown using a sharp blade or silky saw. Then remove the stems by cutting them away from the base of the leaf. Any flower or seed stalks can also be removed and placed around the crown for extra protection. First, cover the top of the crown with 2 or three leaves, then place the remaining leaves in a cone shape around the crown. The leaf-stems can now be place on top of the leaves to help keep them in place.

Young plants may not have produced enough leaves during the growing season to provide itself with enough protection. In this instance provide a thick mulch of straw instead and cover that with whatever leaves are available.

In the spring the leaves and soil can be drawn aside to expose the crown, but left in place to act as a mulch.

For related articles click onto the following links:
BBC Gunnera
HOW TO GROW COLOCASIA
HOW TO GROW GUNNERA MANICATA
HOW TO OVER-WINTER CITRUS PLANTS OUTSIDE
HOW TO OVERWINTER GRAPEVINES
HOW TO PROPAGATE GUNNERA MANICATA
WHAT IS RHUBARB POISONING?

HOW TO OVERWINTER CANNA LILIES

canna flower yellow and red
How to overwinter Canna lilies


Canna lilies are a spectacular, late summer flowering perennial, and a popular choice in northern Europe for those who wants to bring a taste of the exotic into the garden. Furthermore, if you are lucky with the weather then you can experience these gorgeous blooms right up to the beginning of December!

overwintered canna stems
How to overwinter Canna lilies
Although Canna lilies originate in the tropics, some of the most ornamental cultivated varieties have been produced in cooler temperate regions, but in areas which receive freezing temperatures they are unlikely to survive and often treated as an annual. However in the warmer parts of northern Europe, such as the southwest coast of England, it is possible to leave your Cannas outside all year round so long as they are planted a little deeper than recommended and in a free draining soil. If your garden has heavier, poorer draining soils the consider planting canna lilies into raised beds.

To reduce the penetration of ground frosts the apply a thick layer of dry mulch such as straw, bracken or bark chips. Be aware that successfully overwintered canna lilies will emerge much later than specimens lifted and brought in under protection. In fact you may not see your first leaves emerge until late June, or even early July!

Traditional overwintering of Canna lilies

rooted canna stems
How to overwinter Canna lilies
Canna lilies can be lifted as soon as the top growth begins to wither which is usually after the first light frost. Carefully lift them out of the ground (trying to keep the root system as intact and 'undisturbed' as possible) and allow the plants to partially dry off in the late autumn sun. If rain is forecast then bring them under cover.

Before the plants become too dry, cut off the leaves and roots in readiness for storing through the winter. Plant up the rooted stems in moist, but not wet, peat or leaf mold in a frost-free position. If kept too dry the rhizomes will shrivel up and die, but keep them too wet and they will be at risk of rotting off during to fungal infections.

Overwintered canna lilies can be planted back outside in late spring once the threat of late frosts have passed.

NOTE. If you know that you will be lifting your canna lilies at the time of purchase then consider planting into large terracotta pots beforehand and sinking those into the ground. This makes lifting them later on on the season a much simpler operation.

For related articles click onto the following links:
HOW TO GROW CANNA LILIES FROM SEED
HOW TO OVER-WINTER CITRUS PLANTS OUTSIDE
HOW TO OVERWINTER GUNNERA MANICATA
RHS Overwinter
THE CANNA LILY
THE HISTORY OF THE CANNA LILY

WHAT IS A DRY MULCH?

A bag of bark chips sitting on a  bed of bark chips
What is a dry mulch?


All gardeners will be familiar with mulching their plants. A healthy dose of nutritious, rich compost is just the thing for many species as it can provide a whole growing seasons worth of natural, slow release fertilizer.

Landscaped garden with gravel and bark chip dry mulches
Of course a mulch will do more than just supply food for plants. They can help to retain moisture in in the soil, and suppress the growth of completing weeds. This type of organic mulch has different purpose to a dry mulch and as such is loosely listed as a 'biodegradable mulch' although a dry mulch can also be biodegradable and may require several applications.

When using organic mulches avoid direct contact with the stems of trees or specimen shrubs as this can cause the trunk or stem to soften, making them vulnerable to diseases.

A dry mulch is primarily used for protecting susceptible plant roots from extremes of temperature and to reduce the incidence of fungal roots that could be encouraged when a regular mulch bio-degrades. They are usually applied in late autumn as a cold protection for plants whose roots are at risk of damage from ground frosts.

Dry mulch around the bases of trees and shrubs
Traditionally, bracken fronds, pine needles, shredded leaves and straw are used as dry mulches, but as these degrade in the cold wet weather they would need subsequent applications to maintain a reasonable level of protection.

Gravels may also be applied in appropriate borders but perhaps the most commonly used dry mulch used today is bark chips. Dry mulches are usually removed in the spring to allow the soil to warm faster. Be aware though that when using wood chips there is a slight risk of introducing honey fungus

Dry mulches can also just be used for decorative effect with no intended benefit to the plants themselves except to serve as an ornamental background. In this instance, many materials can be used to achieve this including slates, pebbles, stone chippings, crushed CDs, sea shells, and tumbled glass.

For decorative mulches a woven landscape fabric should be laid down before their application.

For related articles click onto the following links:
HOW TO MAKE A LEAF MOULD COMPOST
HOW TO MAKE JOHN INNES COMPOST
HOW TO MAKE LIQUID FERTILIZER FROM COMFREY
HOW TO USE BLACK PLASTIC SHEETING FOR WEED CONTROL
RHS Mulch
WHAT ARE MYCORRHIZAL FUNGI?
WHAT IS AN F1 HYBRID?
WHAT IS WASABI?

HOW TO GROW CUP AND SAUCER' PLANT FROM SEED - Cobaea scandens

The 'Cup and Saucer' plant in flower
The 'Cup and Saucer' plant - Cobaea scandens


The 'Cup and Saucer' plant - Cobaea scandens, is a stunning half-hardy perennial climber native to tropical Mexico.

The 'Cup and Saucer' plant seeds - Cobaea scandens
In northern Europe it can be grown as a perennial in a cool greenhouse or conservatory, but is usually grown outside as an annual on a south facing wall. It is a vigorous climber that is noted for its large purple, bell-shaped corolla which is embraced by a green saucer-like calix - hence its common name.

To make the most of the growing season Cobaea scandens seeds are sown in February or March. Before sowing soak the seed for 2 hours in lukewarm water before sowing. To maintain the temperature place the seeds and water inside a thermos flask.

Using a modular seed tray, fill with a good quality peat-based compost and gently water in. Allow the excess water to drain off and then press one seed into the surface of the compost at a rate of one seed per module. Do not cover the seed as it requires the presence of light to help initiate germination.

Place the tray inside a heated propagator at a temperature of between 18-24C and place on a warm bright windowsill, but out of direct sunlight during the warmest part of the day. Alternatively seal inside a clear polythene bag after sowing is helpful. You can expect germination to occur within 21-30 days.

The 'Cup and Saucer' plant seeds - Cobaea scandens
Image credit - http://davesgarden.com/
Once the root systems have established inside the module, carefully pop them out trying to disturb the root system as little as possible. Pot them on into 5 inch pots using a multi-purpose compost and grow on in cooler conditions. Keeping them well watered and once the threat of late frosts have passed they can be gradually acclimatise to outdoor conditions for 10-15 days before planting out into their final positions.

after all risk of frost 60 cm (24 in) apart in a sheltered spot in sun on ordinary well drained soil. For summer flowering under glass, transplant into 20-23 cm (8-9 in) pots, and keep the atmosphere fairly humid.

The 'Cup and Saucer' plant will do best in a sunny, sheltered position in ordinary well-drained soil. Avoid the temptation of adding fertilizer to the soil beforehand as this can reduce the number of blooms.

For related articles click onto the following links
COBAEA SCANDENS
HOW TO GROW COBAEA SCANDENS FROM SEED
RHS Cobaea scandens

HOW TO GROW ALSTROEMERIA FROM SEED

Yellow Alstroemeria in flower
How to grow Alstroemeria from seed


Alstroemeria are undoubtedly one of the most ornamental of all late summer flowering plants however they are comparatively expensive to other herbaceous plants and almost always only available as pot grown stock. Be that as it may, Alstroemeria are relatively easy to grow from seed and if you can't find any to purchase in your local garden stores then you can always collect your own seed from established plants. Be aware though that you will need to break seed dormancy first, and even then viability of the seed will vary.

Alstroemeria seed pod
Under normal cultivation old flowering stems are cut back to near ground level in late autumn or early winter, but these stems will need to be left in place if you want to collect the seed later on.

You can sow Alstroemeria seed any time from mid winter to mid spring. Fill a modula seed (with approximately 1 inch sq modules) with a moist, soil-less and well drained potting compost. You may need to mix in some horticultural grit to improve the drainage further. John Innes compost will not be suitable for this. Make sure that the compost is only ever kept moist and never waterlogged during the germination period otherwise the seeds can rot.

Sow two seeds in each module at a depth of ¼ inch. Gently water in and once the excess water has drained off place the tray inside a heated propagator at a temperature 21 degrees Celsius.

Alstroemeria seedlings
After three weeks remove the tray from propagator. Water again if necessary and then seal the tray inside a clear polythene bag. Now place the tray inside the main compartment of a refrigerator for the next three weeks. Just check the temperature to make sure that it is set at 5 degrees Celsius.

Once this cool period is over return the tray to the heated propagator, again at 21 degrees Celsius. You can expect your Alstroemeria seedlings to emerge in 10 to 14 days. Remove the tray from the propagator as soon as the first seedlings appear as the high humidity can cause fungal rots to take hold.

Once the root system of seedlings have become established in their modules carefully pop them out so as to disturb the root system as little as possible. Pot them into 3-4 inch pots using a good quality multi-purpose compost and grow them on in bright, frost-free conditions. Once the threat of late frosts have passed they can be hardened off and planted outside in a sheltered position into well-drained soil.

Main image credit - - By JJ Harrison (https://www.jjharrison.com.au/) - Own work, CC BY-SA 3.0, https://commons.wikimedia.org/w/index.php?curid=5504703

For related article click onto the following links:
ACANTHUS MOLLIS
HOW TO GROW ACANTHUS SPINOSUS
HOW TO GROW ALSTROEMERIA
HOW TO GROW LUPINS FROM SEED

HOW TO GROW HYACINTH BULBS

Field grown hyacinth bulbs in mixed blooms
How to grow Hyacinth bulbs

As a true species, the common hyacinth - Hyacinthus orientalis is rarely (if ever) grown under commercial production. However the huge number of extremely popular Dutch cultivars and hybrids make it one of the most commercially successful of all bulbs.

Native to eastern Europe and west Asia, the common hyacinth will produce an extremely colourful flower spike between 4 and 12 inches tall depending upon the variety. Often sold as forced hyacinths, skilled production and special storage conditions enable most forms to flower before Christmas. When left to their own devices you would normally expect hyacinths to flower between February and May depending on environmental conditions and the initiation requirement of the individual cultivar.

Forced hyacinths would need to be potted up in August or September using either bulb fibre or a good quality compost such as John Innes 'No 2' to ensure their flowering before Christmas. Untreated bulbs will of course flower later and can be potted in succession from August to October.

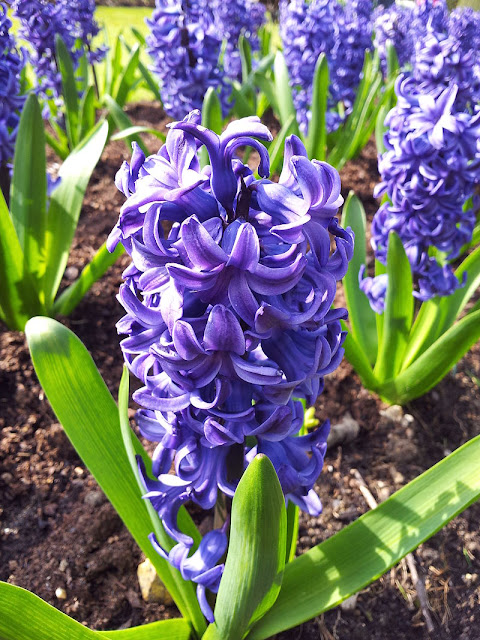
Blue hyacinth in flower
How to grow Hyacinth bulbs
Be aware that bulb fibre provides bulbs with little (if any) nutrients and so bulbs grown in it as a rooting medium can exhaust their energy supplies through flowering. Subsequently if they are planted in the garden it may be a couple of years before they flower again. This is not the case of bulbs planted in regular compost.

After flowering, forced hyacinths can be planted 6 inches deep outside into their final position in March and April. They will do best in well-drained, moderately fertile soil, in a sunny position.

Keep the surrounding area free of weeds and and remove any dead leaves or flower stalks as they arise. Avoid watering over the summer and once the bulb comes into leaf feed regularly with a good quality, liquid soluble fertiliser. If left undisturbed they will continue to flower year after year.

For spring bedding displays plant hyacinth bulbs 5-6 inches deep in the autumn after the summer bedding has been removed. Hyacinth bulbs will not do well when competing with other plants, so in order to guarantee a good display year after year he bulbs should be planted at least 6 inches away from other plants. If this is not practical then they can always be lifted after flowering and replanted in a more suitable position.

Main image credit - John O'Neill Hyacinths - floriade canberra CC BY-SA 3.0
In text image - By The wub - Own work, CC BY-SA 3.0, https://commons.wikimedia.org/w/index.php?curid=20184777

For related articles click onto the following links:

HOW TO GROW THE SHRIMP PLANT

shrimp plant flower
How to grow the shrimp plant


The Mexican Shrimp Plant - Justicia brandegeana is a gorgeous ornamental flowering plant from the subtropical forests of Mexico. Seen only as a houseplant in northern Europe it also makes for an excellent summer bedding plant, but in warmer temperate or subtropical regions it is a fantastic evergreen shrub for those hard to plant shady positions.

The shrimp plant as a houseplant

Justicia brandegeana - botanical drawing
As houseplants go the shrimp plant is fairly vigorous, growing up to approximately 1 meter in height and 50 centimetres wide. Usually purchased in the spring in 3 inch pots, the shrimp plant can be potted on in March into 5-6 inch pots using a good quality compost such as John Innes 'No 2 or 3'.

Over the summer the plants will need to be kept cool and well-ventilated, but if they are hardened off and kept outside for the summer they will be quite happy in a damp shaded position with high humidity. If kept inside, the high humidity of the kitchen or bathroom will provide suitable conditions but if placed elsewhere an occasional spray with tepid water will do the trick.

Water freely from March to November, but over the winter you will need to reduce watering to keep the compost just on the moist side. Do not allow the roots to become waterlogged over this period as cold, wet conditions can allow your shrimp plant to succumb to fungal root rots. During the growing period apply as liquid soluble fertilizer every week or so, usually from May to September. Do not allow the shrimp plant to experience temperatures below 7 degrees Celsius.

The shrimp plant as a garden plant

When growing the shrimp plant as an evergreen shrub in the garden you will need to site it in a damp. but well-drained position in the shade. It will prefer a sandy, loamy soil and once established is surprisingly drought tolerant. It will not require mulching or applications of liquid fertiliser.

Pruning

Remove the first bracts of young plants to encourage sturdy, free-flowering plants. In February, cut the main stems back lightly to encourage a more compact and ornamental shape.

For related article click onto the following links:
HOW TO GROW FICUS PUMILA
HOW TO GROW STROMANTHE SANGUINEA 'Triostar'
RHS Shrimp Plant

HOW TO GROW THE GOLDEN SHRIMP PLANT - Pachystachys lutea

Golden Shrimp plant - Pachystachys lutea in yellow flower
How to grow the Golden Shrimp plant - Pachystachys lutea


The Golden Shrimp plant - Pachystachys lutea is a gorgeous, soft-stemmed evergreen from the subtropical regions of Peru and grown in Europe either as a houseplant or as summer bedding.

It produces, lush, heavily-veined, dark green leaves, but its most ornamental feature is the brightly coloured, thick-stemmed flowering body. The true flowers are the short-lived white blooms which emerge throughout the summer from the overlapping bright golden-yellow bracts.

Golden Shrimp plant - Pachystachys lutea in full bloom
How to grow the Golden Shrimp plant - Pachystachys lutea
The Golden Shrimp plant will grow best in most damp but well-drained soils so long as they are slightly acidic. If your soil is particularly alkaline or chalky then it can be improved by digging in moss peat, or sulphur based products such as Aluminium sulphate (used in hydrangea colourants) and Ferrous sulphate (sulphate of iron). Always use a pH tester to judge your results and note that clay soils have a natural buffering capacity so much more sulphur is needed to change their pH when compared to a sandy soil. For pot grown plants the solution is easy as you would simply use an acidic compost, usually sold as ericaceous compost in garden centres.

As a result of their subtropical origins, the golden shrimp plant will need to be kept in a position that receives as much light as possible, so position garden plants in full sun and house plants near a south facing window. Water frequently over the summer months and regularly mist with tepid water if humidity is low. Pot grown plants will require feeding with a liquid soluble fertiliser every week or so.

The golden shrimp plant will need little maintenance outside, but as they have the capacity to grow anywhere between 1-2 metres in both height and width favourable condition indoors can mean that they will outgrow their allotted space. Luckily, this plant will respond well to pruning, a task that is best carried out in the spring. Always cut back to just above a leaf node and is need be you can remove up to a third of the branches.

For related article click onto the following links:
HOW TO GROW FICUS PUMILA
HOW TO GROW STROMANTHE SANGUINEA 'Triostar'
HOW TO GROW THE SWISS CHEESE PLANT - Monstera deliciosa
HOW TO GROW THE SHRIMP PLANT
RHS Golden Shrimp Plant


HOW TO GROW ECHINOCACTUS GRUSONII FROM SEED

large ECHINOCACTUS GRUSONII specimens
César Manrique jardin de cactus in Lanzarote


Echinocactus grusonii is a slow growing, globular or cylindrical cacti which given the right environmental conditions can reach up to a metre in height and width. They are cultivated for their beautiful spines, but when grown as houseplants in temperate regions they are the most unlikely to flower of all cacti species.

Native to east-central Mexico, be aware that Echinocactus grusonii will need full sunlight to produce the good spine formation. It is the ornamental effect of the spines that has helped this particular species become one of the more widely cultivated of all cacti.

ECHINOCACTUS GRUSONII SEEDlings in seed tray
Image credit - http://www.cactiguide.com/
When growing in northern Europe, the best germination results are achieved by sowing Echinocactus grusonii seed in April. Using a modular seed tray, fill with a good quality compost, such as John Innes 'Seed and Cutting', with a few handfuls of horticultural grit mixed in to help improve the drainage further. Gently water the compost in then sow one seed per module, gently pressing the seed into the surface of the compost. Be careful not to cover the seed with compost as Echinocactus seed needs the presence of light to help initiate germination. You can however provide a light sprinkling of vermiculite or horticultural grit.

Place the tray inside a heated propagator at a temperature of approximately 21 degrees Celsius, then keep the tray in a warm room that receives as much light as possible although try to avoid direct sunlight during the hottest part of the day. Alternatively seal the tray inside a clear polythene bag.

Field grown Echinocactus grusonii in China
Field grown E. grusonii in China - image credit http://www.ec21.com/
You can expect the seedlings to emerge within 2-3 months, at which point they can be removed from their propagator or polythene bag. Avoid the temptation to water until the first two cotyledons are present, and do not touch them as this can damage their growth.

Pot on as necessary using a good quality, open cactus compost but you can make your own by using 1 part by volume horticultural sand to 2 parts John Innes 'No2' compost. This is only really necessary every 2-3 years and then only on warm sunny days.

Never allow temperatures to drop below 8 degrees Celsius, and while they will tolerate dry conditions an occasional spray of warm, tepid water will do wonders. Water as necessary but avoid watering from above especially on hot sunny days as the plants can easily become scorched. Remember that cacti will carry the scars their existence throughout their life. Over the winter period you can reduce watering to once a month and even then do not allow the compost to become fully soaked.

For related article click onto the following links:
CHRISTMAS CACTUS CARE
HOW TO CARE FOR THE JADE PLANT
HOW TO GROW THE BRAIN CACTUS
HOW TO GROW MAMMILLARIA FROM SEED
HOW TO GROW PEYOTE FROM SEEDS
HOW TO GROW PRIZE WINNING CACTUS
THE BRAIN CACTUS - Mammillaria elongata 'Cristata'
RHS Echinocactus grusonii
WHAT IS PEYOTE

HOW TO GROW AQUILEGIA VULGARIS 'MAGPIE' FROM SEED

Aquilegia vulgaris 'Magpie' in full flower
How to grow Aquilegia vulgaris 'Magpie' from seed


Aquilegia vulgaris, perhaps better known by its common name of columbine, is a hardy herbaceous perennial native to Europe. The species and the various ornamental hybrids derived from it make for popular garden plants, in fact there are illuminated manuscripts dating back to the 13th century showing Aquilegia hybrids being grown in English gardens.

Aquilegia vulgaris 'Magpie' flower
Aquilegia vulgaris 'Magpie' is an upright perennial with divided foliage which is able to reach a height up to 75 cm and a spread of 30 inches.  The with deep maroon-purple flowers are approximately 5 cm across and have an attractive, contrasting white corolla. The blooms also have deep purple spurs which curl at the tips

Be aware that there is some confusion with the name as the Aquilegia vulgaris 'Magpie' is also goes by the cultivar name of 'William Guiness'.

Aquilegia 'Magpie' seeds are very easy to germinate and will do so though the spring, summer and autumn. They will best is a cooler part of the garden under partial or dappled shade. Sprinkle the seeds straight onto the ground and gently rake them in so that the seeds are just covered with a small amount of soil as they need the presence of light to help initiate germination.

For related articles click onto the following links:
AQUILEGIA 'CHOCOLATE SOLDIER'

HOW TO GROW AQUILEGIA FROM SEED

 Aquilegia flowers
How to grow Aquilegia from seed


Aquilegia, although perhaps better known by their common names of 'Granny's Bonnet' or 'Columbine' is a genus of hardy perennials, the smallest of which can be considered as alpine species. They are very easy to grow from seed and readily hybridize between cultivars so be aware that seed collected from mixed aquilegia plantings will not grow true to the parents unless protective measures are put in place.

Aquilegia seeds
Image credit - http://tmousecmouse.blogspot.co.uk/
It is best to sow the seeds as soon as they are ripe on the plant, usually in July or August,  and if you miss the summer sowing period you can always have another go in March. That being said aquilegia seeds will germinate naturally in the garden at most times of the year beginning as early as february if the weather is mild, and as late in the year as October.

To begin with, fill a deep seed tray with  a good quality compost such as John 'Innes 'Seed and Cutting'. Gently water the compost in then sow the aquilegia seeds on the surface. Do not cover with layer of compost as aquilegia seeds require light to help initiate germination. However, to keep the compost moist you can cover the seed with a fine sprinkling of vermiculite.

Place the tray inside a heated propagator at a temperature of between 15-20 degrees Celsius and place on a warm, bright windowsill but one that does not receive direct sunlight as this can dry out the compost and scorch the new seedlings as they emerge. If you do not have a propagator, the seal the tray inside a clear, polythene bag.

Aquilegia seedlings
Image credit - http://rambleonrose-rr.blogspot.co.uk/
Germination will usually takes anywhere between 1 and 3 months, and once the seedlings are large enough to handle, transplanted individually into 3 inch pots containing John Innes No.1 and grown them on in cooler conditions such as a cold frame.

Once the roots have established in the pot and the plants themselves are large enough to plant outdoors they can be hardened off to acclimatise them to outdoor conditions over 7 to 10 days. Do not plant outside into their final position until the threat of late frosts have passed.

Aquilegias will do best planted in a moist, well-drained soil in a sun or part shade.

For related articles click onto the following links:
AQUILEGIA 'CHOCOLATE SOLDIER'
RHS Aquilegia

THE BLACK LILY - Lilium 'Landini'

THE BLACK LILY - Lilium 'Landini'
Image credit - http://www.vanengelen.com/

If you consider yourself to be a connoisseur of the dramatic, then the black lily - Lilium 'Landini' could be right up your street. Named after the Italian ‘Landini’ tractor factory (don't ask me why), it is currently the darkest lily in cultivation. While the flowers do not express a true black pigment they are an extremely rich, black-purple.

Like most ornamental lilies, Lilium 'Landini' a hardy bulbous perennial with erect stems. It will growing between 3-4 ft tall with spirally-arranged, glossy, dark green leaves. It will produces large, upward-facing, non-fragrant purple-black flowers in  June.

THE BLACK LILY - Lilium 'Landini'
Image credit - http://davidsgardendiary.files.wordpress.com/
When grown in northern European climates it can be grown outside in full sun although in warmer mediterranean or subtropical climates the tips of the flowers can become scorched and so a position that is shaded during the hottest part of the day would be more suitable.

Black lily bulbs are purchased on the spring as soil-free, pre-packed and will need to be planted as soon as possible to prevent them from drying out. If this is not practical you can delay planting for 2-3 weeks by keeping the bulbs in a cool, frost-free position but any longer and you risk damage to the bulbs. Lilium 'Landini' will perform best in a well-drained, sandy loam in a position that has good air circulation. Avoid soils prone to waterlogging soils, and improve heavy soils with horticultural grit, perlite, leaf mold or moss peat. Lilium 'Landini should be planted approximately 4 inches deep in light soils but maybe only a couple of inches deep in improved, heavy soils.

Alternatively plant Lilium 'Landini' into well-drained, raised beds 8 to 10 inches above ground level. If your lily corms are at risk of damage from rodent then secure 1/4-inch galvanized hardware cloth on the bottom of the bed.

Remove the flowers as they fade including the seed heads, but do not cut back stems until autumn. Allow the stems to die back naturally as this will help to bulk up the corms for the following year. Provide a dry mulch such as gravel, or bark-chips over the winter.

For related articles click onto the following links:
HOW CAN YOU GET RID OF THE RED LILY BEETLE?
HOW TO GROW THE CALLA LILY
HOW TO GROW CHIONODOXA
HOW TO GROW THE GIANT HIMALAYAN LILY - Cardiocrinum giganteum
HOW TO GROW THE GINGER LILY FROM SEED
HOW TO KILL THE RED LILY BEETLE
HOW TO PLANT LILY BULBS
HOW TO GROW LILY CONCA D'OR
LILIUM NEPALENSE - The Lily of Nepal
DRACUNCULUS VULGARIS - The Dragonlily

ORGANIC CONTROL OF CATERPILLARS

green caterpillar on a green leaf
Image credit - http://caterpillar-eyespots.blogspot.co.uk/


Believe it or not, caterpillars can cause absolute devastation within the garden, but because they're not as obvious to the naked eye as slugs or have characteristic bite marks such as the dreaded vine weevil they often get away with the damage they inflict blame free.

parasitic wasp attacking brown caterpillar
Parasitic wasp - image credit http://simple.wikipedia.org/wiki/
Of course, a small amount of damage is neither here nor there, and if you are talking edible crops a few holes does not stop your plants from being edible. Furthermore, if you control your caterpillars in such away that they don't survive then you are denying the environment the adult butterflies which are in the majority of cases important pollinators. But there is another side this coin. Given the right environment and if left uncontrolled infestations of certain caterpillar species can quickly explode in the locale and in such cases economically important crops will be lost.

While caterpillars are extremely adept at hiding within the foliage, arguably the best technique to controlling caterpillars is to cover with a protective fleece or netting. This is fine for the allotment but impractical in an ornamental flower garden.

In the garden the most organic method is still to pick them from the plants by hand. Finding them is the difficulty but their presence is betrayed by irregular holes and large, dark green droppings. If doing it yourself seems like an awful lot of hard work then why not employ nature. Encourage insect eating birds into your garden by providing water, nest sites and appropriate foods.

This is one product which you can spray on you plants which is caterpillar specific and won't kill other beneficial insects. The product is called Dipel and contains the bacterial Bacillus thuringiensis. The bacteria works as a bacterial stomach poison for all caterpillars.

parasitic wasp eggs attached to green caterpillar
Parasitic wasp egg cases - Image credit http://www.harvesttotable.com/
Tip 1. If it is the caterpillar from the cabbage white butterfly that you are hoping to control then try this old gardener's tip. Place broken eggshells from white eggs only around your susceptible crop. It is believed the the butterfly mistakes the shells for other cabbage white butterflies and flies on to an area where the competition is less.

Tip 2. Sometimes it is easier to search for caterpillars at night using a torch to find their the caterpillars themselves or locate them using their shadows.

Tip 3. If it is a particular plant that is showing susceptibility to caterpillar damage then place white card or plastic below the plant and shake out the branches. Collect and dispose of fallen caterpillars.

Tip 4. Use companion plants that are known to deter specific butterfly species from your crops. Predatory wasps that will actively seek out and caterpillars can be attracted to your garden by planting lemon balm, parsley, chamomile, peppermint and catnip.

For related articles click onto the following links:
DEFRA
HOW CAN YOU GET RID OF THE RED LILY BEETLE?

HOW TO GROW ISOPLEXIS CANARIENSIS

Isoplexis canariensis in terracotta flower
How to grow Isoplexis canariensis


Commonly known as the Canary Island foxglove, Isoplexis canariensis is a gorgeous, evergreen shrub native to both the Canary islands and the island of Madeira. Upright in habit, it will usually grow to 4 -5 feet tall, although some individual specimens can reach up to 6 ft tall given the right conditions.

Isoplexis canariensis flower
Image credit - http://botany.cz/
In its native habitat Isoplexis canariensis is usually found in humid woodland areas although it is occasionally seen growing in far drier woodland areas. Despite its subtropical origins it performs at it best in cooler conditions making it a suitable plant for the temperate regions of southern Europe. It will even grow outside in the south and west of Great Britain so long as it can be provided with a sunny, sheltered position out of the way of cold winds. In warmer countries, a position that is shaded during the hottest part of the day with give better results.

Although capable of surviving temperature down to as low as -4 degrees Celsius, it will not thank you for it and so it is best to avoid freezing temperatures wherever possible. To keep your plant in optimum condition, keep winter temperatures above 6 degrees Celsius which for many of us in the cooler climates of northern Europe will mean growing your Isoplexis canariensis in a pot so that it can be brought in under protection in freezing weather.

Isoplexis canariensis growing in its native habitat
Image credit - http://biodiversidadeflorestal.webnode.pt/
Luckily Isoplexis canariensis does particularly well in a pot as it is easy to emulate the well-drained, low nutrient soils of the volcanic islands upon which it has evolved. Use a good quality compost such as John Innes 'No 2', but mix in a good quantity of horticultural grade grit-sand to improve the drainage further.

Keep the roots moist over the growing period but avoid having them waterlogged. A 10 liter pot will be fine, but if you are happier with moving heavier specimens then consider using up to 25 litre pots. Feed with a liquid soluble-fertilizer once a month and keep the compost just on the moist-side over the winter.

Isoplexis specimens that are going to be planted in the ground will prefer a light, moist, well-drained conditions. Dig in plenty of humus-rich compost such as leaf-mold or peat but avoid nutrient-rich matter such as well-rotted farm manures or garden composts.

For related articles click onto the following links:
HOW TO GROW LOTUS BERTHELOTII
Isoplexis


HOW TO GROW CHIVES

Mature chives in bloom
How to grow chives


Chive are a great and flavoursome addition to fish, potatoes, and soup dishes. Not only are that packed with flavour they are also popular with organic gardeners are they have insect-repelling properties. Chives are a bulb-forming, herbaceous hardy perennial plant and are also the smallest species from the edible onion genus - Allium.

harvested chives
Image credit - http://travelingchili.com/
Chives will do best in a medium, loamy soil, in a position of full-sun to semi-shade.  However they will grow quite happily in any fertile, well-drained soil. Once planted they need little maintenance other than frequent watering during dry periods.
If you are growing chives for culinary use then remove flowerheads as the form, otherwise the plant will direct its energy away from produce edible foliage.

Chives will die back to ground level in the winter and reappear in the spring with a flush of new growth ready for use by early May. For an earlier crop of leaves consider protecting your chive plant with a cloche over the winter period. Under these conditions  you can expect your first harvestable leaves by March or April.

Give unprotected chives a top dressing of well-rotted farm manure in March or April, making sure that the leaves are washed thoroughly before eating fresh.

You can divide clumps of chive bulbs every four years for propagation in September or October. Divide them using a sharp, sterilized blade into smaller clumps containing approximately half a dozen shoots and replant them 12 inches apart in ground that has been newly dug over with well-rotted manure.

For related articles click onto the following links:
BBC Chives
Growing Chives from Seed
HOW TO GROW AUTUMN ONION SETS
HOW TO GROW BASIL FROM SEED INDOORS
HOW TO GROW COMFREY
HOW TO GROW JAPANESE ONION SETS
HOW TO GROW ONIONS FROM SEED
HOW TO GROW SAGE 
HOW TO GROW SAGE FROM SEED
HOW TO GROW WELSH ONIONS
HOW DO YOU PLANT OUT ONION SEEDLINGS?

HOW TO GROW KOHLRABI

Image credit - http://www.diseaseproof.com/


Although Kohlrabi is not a particularly popular crop in Great Britain although it is quite widely grown in other parts of Europe. Be that as it may the Kohlrabi is a much more suitable crop for our climate faring better in out hot, and usually dry, summers than the far more popular turnip!

Image credit - http://floweryprose.com/
Although considered to be a root vegetable, the edible part of the Kohlrabi is not really a root at all, instead it is a swollen stem base known as a 'globe'. It is a biennial vegetable that is grown as an annual for cropping purposes. There are two forms in cultivation, a small, tender quick-growing cultivar and a larger, coarser slower growing form that is only really used for feeding cattle.

Kohlrabi will grow well in any fertile, well-drained soil, but avoid ground contaminated with clubroot. The idea situation is to have a sunny position on light soils. Heavy soils can be improved by digging in plenty organic matter during the previous autumn. Lime the soil if needed during the winter. If cabbage root fly is known to be an issue in the area then use protective discs around the base of the seedlings. A week or so before sowing, prepare your crop bed by treading down the soil and raking the surface to a fine tilth.

Image credit - http://well.blogs.nytimes.com/
Sow the seeds very thinly, 1/2 inch deep in shallow drills 12-15 inches apart from each other.  As soon as the seedling show their third true leaf they can be thinned out to one plant for every  6 inches. For continual cropping make successional sowings every three weeks from March until August. The young seedlings may need protection against damage from birds.

Hoe along the rows regularly to prevent competition for nutrients from perennial weeds. If growth is slow then feed occasionally and soak the ground during periods of drought. Do not allow your crop to dry out as this can result in woody, bitter flesh

Once the globe has reached the size of a tennis ball it will be large enough to harvest. Seeds sown in March should be ready to harvest in June. Do not lift and store kohlrabi, as they will begin to deteriorate as soon as they leave the ground. Instead leave them in the ground and harvest as required until December. Be that as it may it is possible to keep kohlrabi in a plastic bag in the fridge for a couple of weeks. The bag helps to keep the globe from drying out.

For related articles click onto the following links:
BBC Kohlrabi
HOW TO GROW BRASSICAS FROM SEED
HOW TO GROW CABBAGE FROM SEED
HOW TO GROW CAULIFLOWERS FROM SEED
HOW TO GROW CHINESE SPINACH FROM SEED
HOW TO GROW SPINACH FROM SEED
HOW TO GROW TURNIPS FROM SEED
ORGANIC CONTROL OF CLUBROOT IN BRASSICAS