HOW TO GROW ALOE VERA

Aloe vera 


As popular as the Aloe vera plant is to grow, there are no examples of this species remaining in the wild today. There are some naturalized stands of Aloe vera found in the southern half of the Arabian Peninsula, through North Africa , as well as Sudan and neighbouring countries, which gives us a very strong indication of the environmental conditions that this plant needs to survive and indeed thrive.

Aloe vera
Aloe vera will not tolerate areas which experience frosts or freezing temperatures. However, in countries which have a temperate or tropical climate Aloe vera can be grown outside, all year round.

As it is a succulent, the Aloe vera is able to survive in areas of low natural rainfall which makes it ideal for rockeries and other low water-use gardens. It needs to be planted into a free draining soil in full sun. In countries which have high summer temperatures it would be better to plant Aloe vera in an area which is part shaded over the hottest period of the day as this plant can be prone to scorching.

If you are growing it as a houseplant, pot up your Aloe vera into terracotta pots using a good quality, free draining compost. A specially formulated cactus and succulent compost will be fine, however you can use any good quality compost so long as you mix in 50:50 compost to horticultural grit, perlite or vermiculite.

Once potted you can place your Aloe vera plant in a bright, sunny position. Only water once the majority of the compost has dried out and never allow the roots to become waterlogged. Be aware that Aloe vera 'leaves' can burn under too much sun.

When potted, Aloe vera plants can become crowded with side shoots. These can be divided and potted on to allow room for further growth. Over the winter, Aloe vera plants should be allowed a period of dormancy, during which watering should be kept to a minimum.

For related articles click onto the following links:
ALOE VERA
DEVIL'S BACKBONE - Kalanchoe daigremontiana
GASTERIA maculata
HOW TO GROW ALOE VERA
HOW TO GROW AECHMEA FASCIATA
HOW TO GROW PEYOTE FROM SEEDS
How to Grow the Brain Cactus
HOW TO GROW THE HARDY ALOE - Aloe striatula

ALOE VERA

Aloe vera


Aloe vera is a popular succulent species and is widely grown as both a houseplant and commercially as a medicinal plant. For years now Aloe vera has been lauded as a miracle plant, although scientific evidence for the cosmetic and therapeutic effectiveness of aloe vera is limited and frequently contradictory.

Aloe vera illustration
Be that as it may, Aloe vera based products are commercially available for their healing properties on a number of skin conditions such as sunburns, cold sores and frostbite.

t is also prescribed as an oral medication for patients suffering with osteoarthritis, the regulation of bowls, epilepsy, depression, diabetes, multiple sclerosis, glaucoma, and a host of other ailments.

Aloe vera is an ancient medicinal plant. If fact, early records of Aloe vera use appear in the Ebers Papyrus from the 16th century BC, in both Dioscorides' De Materia Medica and Pliny the Elder's Natural History written in the mid-first century AD.

Bizarrely, Aloe vera species do not exist in nature, but this is probably due to centuries of over-collection and selective breeding.

There are naturalised stands of Aloe vera in the southern half of the Arabian Peninsula, through North Africa (Morocco, Mauritania, Egypt), as well as Sudan and neighbouring countries, along with the Canary, Cape Verde, and Madeira Islands. Its success in these countries certainly proves the suitability of the climate and may well be an indication to its lost origins!

Aloe vera
Further afield, Aloe vera has widely naturalised in temperate and tropical regions of Australia, Barbados, Belize, Nigeria, Paraguay and the United States. However this distribution pattern is the result of human cultivation.

As a succulent, it is able to survive in areas of low natural rainfall, making it ideal for rockeries and other low water-use gardens, although it is intolerant of very heavy frost or snow. As a species it is relatively resistant to most insect pests, although spider mites, mealy bugs, scale insects, and aphid species may take a hold under protected environments.

Aloe vera gained the Royal Horticultural Society's Award of Garden Merit in 1993.

For related articles click onto the following links:
ALOE VERA
CEROPEGIA AMPLIATA - The Bushman's Pipe
HOW TO GROW THE HARDY ALOE - Aloe striatula
HOW TO GROW ALOE VERA

HELICONIA ROSTRATA - The Lobster Claw Plant

HELICONIA ROSTRATA - The Lobster Claw Plant


As far as tropical plants go, the Heliconia rostrata has to be without doubt one of the most exotic of all the fancy, flowering species. Native to the tropical Americas and the Pacific Ocean islands west to Indonesia, Heliconia species are found in the tropical wet forests of these regions.

They are in fact herbaceous plants and able to grow to a height of up to 15 feet. Heliconia leaves look more or less like banana leaves. They are generally green but can tinged slightly with colour, particularly when young.

HELICONIA ROSTRATA - The Lobster Claw Plant
However it is the flower that attracts the most attention and these are produced on long, drooping panicles which consist of a run of bright red waxy bracts. The small, true flowers are those parts peeping out from the bracts.

Unlike most other Heliconias, which produce their flowers in the upright position, Heliconia rostrata has downward-facing flowers.  Each flower will last for many weeks, even when cut, making them extremely popular within the floristry trade.

The plants typically flowers during the wet season and are exclusively pollinated by hummingbirds, but this isn't the only relationship the Heliconia has with the local wildlife. The Honduran White Bat uses the leaves of the Heliconia to make diurnal tent shaped roosts. The bat cuts the side veins of the leaf extending from the midrib causing the leaf to fold like a tent. This structure then provides the bat with shelter from rain, sun, and predators.

For related articles click onto the following links:
HELICONIA ROSTRATA
HOW TO GROW HELICONIA ROSTRATA

SHEDS - NECESSARY EVIL OR GARDEN ENHANCER?

Fantastic sheds


Love them or hate them, sheds are an integral part of the garden. Cheekily, most garden designers conveniently forget to include them in their masterpieces in order to save spoiling their lines. But the fact of the matter is that gardens need maintenance; maintenance requires tools, and tools need to be housed!

Dr. Who inspired shed
Most people’s idea of a shed is of a rather shabby building hidden out the way in a dark corner of the garden. Of course that may fit your requirements exactly, but with a little imagination a shed can be an extremely practical and adaptable outdoor building. Get it right and it can also be a dramatic visual feature that not only enhances the garden but adds value to your property too!

If you already have a shed and feel a little embarrassed about it when friends come round, then a lick of paint and a few DIY planted containers could be all you need to clear your conscience. You could also consider to adding a fancier false roof if you are feeling particularly artistic! However, if you are starting from scratch then a little preparation and research can not only save you money it can pay out dividends; metaphorically speaking that is.

Concrete bases are better than wooden bases and as long as your shed isn't huge they are fairly simple to construct and worth having a go at yourself. 

Think about running a permanent electric point to your shed (there is nothing worse than trying to find tools at night with just the light of a cheap torch to guide you).  Once you have gone to the effort of digging out the trench for the armoured cable, it is worth asking yourself whether you want a water supply down there too?

Amazing garden buildings
You can always do what I have done and spend so much on a shed that after I put in the water, electric and drainage I decided to go the whole hog and have it carpeted and furnished too. Of course, once completed I ended up having to buy a second shed for the tools so that I didn't get the first shed untidy or dirty!

The cheapest sheds will be made to a price and probably clad in feather edge timber. They are great ways to store your garden items for minimal cost but for better weather proofing you can consider a shed constructed from tongue and groove. Log effect edging is going to be the most attractive of the three, but will also the most expensive for a standard shed. Of course you can spend as much as you like on a shed, but if you are looking for a little bit more from your garden building then you can always trade up to a log cabin!

My advice is this. Research first and never buy a shed without physically checking the build quality. That being said, you are generally going to find the largest selection and best prices on-line so once you are happy that you know what you are looking for then this is the place to go.

For related articles click onto the following links:
FENCE PANELS FOR YOUR GARDEN
SHEDS - A great security feature for your home
SHEDS - NECESSARY EVIL OR GARDEN ENHANCER?
THE BRIGHT FUTURE OF GARDEN BUILDINGS

HOW TO GROW POMEGRANATE FROM SEED

Pomegranate - Kris peterson www.flickr.com/groups/colorphotoaward


The pomegranate - Punica granatum is one of the iconic trees of the Mediterranean. It is also surprising hardy, being both drought tolerant and capable of thriving in the colder regions of northern Europe. Unfortunately, outside of the Mediterranean pomegranate trees are difficult to source, but if you keep your eyes open you will be able to find its fruit in your local supermarket.

Pomegranate fruit
You can sow pomegranate seeds from February to May.

Using a seed tray, Pomegranate seed should be sown on the surface of a good quality free draining, damp seed compost such as John Innes 'Seed and Cutting'. After which, cover with a very fine sprinkling of compost or vermiculite.

You will need to provide a germinating temperature of approximately 20-30 degrees Celsius, so they will either need to be grown in a warm room indoors or a heated propagator.

However, if you are fortunate to live in a more Mediterranean climate then additional heat should not be necessary. The seeds will need to be placed in darkness until after germination which can take 1-4 months. Just be aware that while pomegranate can be raised from seed, they may not grow true to the parent.

Pomegranate flowers
Once the seedlings are large enough to handle they can be gently lifted, causing as little damage to the root system as possible, and potted on into 3 inch pots containing a good quality potting compost such as John Innes 'No 2'.

Pot on as required as required into 4-5 inch containers and over-winter in a protective environment if you live in a climate where temperatures are likely to drop below 6 degrees Celsius.

Grow on in the pot for a further year before planting the young pomegranate plants in their permanent position outside.

For related articles click onto the following links:
HOW TO GROW A MULBERRY TREE
HOW TO GROW THE POMEGRANATE
HOW TO GROW POMEGRANATE FROM CUTTINGS
HOW TO GROW POMEGRANATE FROM SEED
THE POMEGRANATE  -  Punica granatum

HOW TO GROW HELICONIA ROSTRATA - The Lobster Claw Plant

Lobster claw plant - Heliconia rostrata 


Commonly known as the Lobster claw plants, Heliconia species are amongst the most exotic of all tropical flowering plants, and so long as you can replicate its native habitat they are surprisingly easy to grow.

Native to tropical South America they are very sensitive to cold weather, so much so that they will suffer damage if temperatures fall below 13 degrees Celsius! Put simply, Heliconia rostrata need it to be warm and humid which is why they are often seen in the tropical greenhouses of most botanical gardens. Position them in full sun to partial shade, although you will find they will tend to grow taller if they grown in shaded areas.

Lobster claw plant - Heliconia rostrata 
Heliconia rostrata prefer humus rich, free-draining soils with high organic matter. It will also require plenty of fertilizer and lots of water, particularly over the growing season. To prevent root damage through water-logging they are best grown on slopes or raised beds for good drainage.

If you are growing the Heliconia rostrata outside then heavy mulching is recommended to protect the soil from drying out around the roots. Heliconias are very drought intolerant, so you may need to provide additional irrigation in areas which suffer from low rainfall. They can even endure some soil flooding, but too much will again result in root damage.

The only significant pests of the Heliconia are grasshoppers, scale and mealybugs. Fungal diseases are rare although if the roots become too wet over the winter they can become susceptible to rots.

You should not prune Heliconias, as the stems are made up of rolled leaf bases from which the flowers emerge at the top. Each stem will only flower once, so after flowering you can remove it. This is recommended anyway to encourage more flowering, it will also increase airflow in between the stems reducing the incidence of fungal infection.

As with most of the Heliconias, it will be necessary to dig up the root-ball, divide it and replant. This is because flowering can be inhibited on established or root-bound specimens. Do not fertilize until you have good new growth, and do not water too much until you see the new growth emerge.

For related articles click onto the following articles:
HELICONIA ROSTRATA - The Lobster Claw Plant
HOW TO GROW HELICONIA ROSTRATA

THE ART OF GARDEN FURNITURE

Garden furniture


It's no secret that I love gardens, but I do have quite a number of bugbears. OK, that's not strictly true; it's more that I can be quite opinionated. I know exactly what I like (when I see it), and believe that when it comes to any subject remotely related to horticulture I am always right! Of course, if my wife is with me then she is right (but I am always right to bring her along).

Amazing garden furniture
Gardening is expensive, plants are expensive and getting someone in to landscape your garden is even more expensive. We all know that right minded people can spend an enormous amount of hard cash on their garden. They have done so for centuries, and hopefully will continue to do so.

My issue is this. Once the garden is finished and the money all gone, only then do most people consider purchasing garden furniture. As this is far too late there is usually not enough garden space set aside to take a decent set of furniture and there is no viewpoint from which to admire it. But that isn't the worst of it.

Cheap furniture in an expensive garden is a crime against horticulture, perhaps even humanity! Do not pretend that you are only buying cheap now so that you have something usable whilst you save up for the good stuff, because you won't. On average most families will buy no more than two furniture sets in their lives.

If your garden is themed then purchase furniture that matches, as it will both lift and enhance the garden. Its sounds obvious but make sure that your ‘furniture-to-be’ is comfortable. Just looking good is not enough.

Amazing garden furniture
Be aware that there is a large choice of materials and a massive range of designs, not all of which are practical or fit for purpose!

A good example of this is the wagon wheel bench on the left: 

IT IS THE MOST UNCOMFORTABLE CHAIR I HAVE EVER HAD THE DISPLEASURE TO SIT ON!

Yes, it is attractive, and yes it is environmentally friendly because it is all made from reclaimed timber (if you ignore the environmental cost of shipping it over from the Far East) but a seat it is not. It is art.

There are a few rules to abide by when purchasing garden furniture.

1. Cheap furniture cheapens the garden.
2. Assess the quality of the furniture and its maintenance requirements.
3. Ensure the style of furniture compliments your garden. 
4. You can generally get a better deal if you purchase furniture August onwards.
5. Always do your research. 

The most obvious garden furniture outlet for you to begin your search in will be a well-stocked garden centre as they should have on display a decent range of furniture. It will allow you to select the style of furniture you would like, as well as giving you an indication of the scale of the furniture and its quality. However they do not offer the most competitive prices. Do not buy garden furniture online until you have researched the brands and are happy with the quality. If you are not sure, go back and check the rules!

For related articles click onto the following links:
FENCE PANELS FOR YOUR GARDEN
THE ART OF GARDEN FURNITURE
SHEDS - NECESSARY EVIL OR GARDEN ENHANCER?

THE MADAGASCAR JASMINE - Stephanotis floribunda

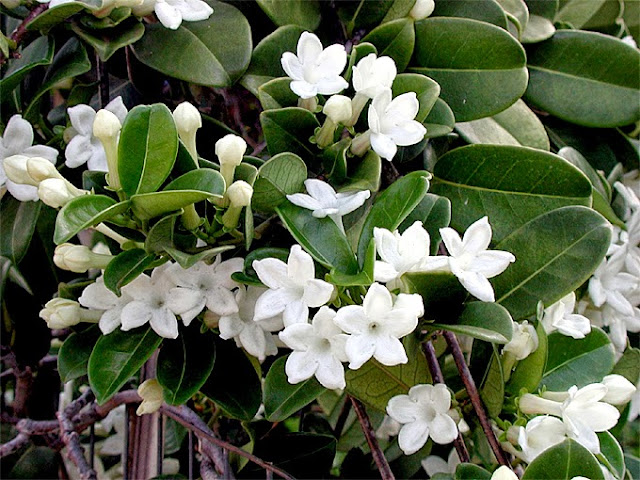
Madagascar Jasmine - Stephanotis floribunda


Where tropical climbing plants are concerned, the Madagascar Jasmine - Stephanotis floribunda, is up there with the best of them. While they may not be as showy as a Jade vine or as bizarre as a Dutchman's pipe, the white, waxy, star-shaped flowers of the Madagascar jasmine have a purity so outstanding that it is rarely matched in nature. More impressive though is the intensely fragrant perfume that they produce, although the blooms will fade to yellow after a few days and the deep, rich fragrance will slightly sour.

Madagascar Jasmine - Stephanotis floribunda
The flowers are produced in summer and only on new growth, therefore it is important that pruning is kept to a minimum, especially during the growing season.

Unlike many common names which are usually unintentionally misleading, the Madagascar Jasmine is a genuine native to the fascinating island of Madagascar. Its moderate temperatures, high humidity and seasonal cycles of hot, wet summers followed by cool, dry winters provide the ideal optimal growing environment for this woody, evergreen climber. So, if you can replicate similar conditions when growing the Madagascar jasmine outside then you can expect it to reach an overall height of 20 ft or more.

Clearly it will grow best in sunny, tropical conditions, but if you live in a colder climate you can grow it inside where it will make for an excellent houseplant.

Madagascar Jasmine - Stephanotis floribunda
They can flourish for years grown on a sunny windowsill, but the Madagascar jasmine will requires high levels of light to perform at its best and flower. If the light levels are too low then the leaves will begin to turn pale and become chlorotic. Under these circumstances the Madagascar jasmine will slow down in their growth and from this point should be watered very infrequently.

The Madagascar jasmine will be at its happiest (especially when it comes to flowering) when allowed to become root-bound, so it is best to not plant the vines in an over-sized container.

The compost mixture used should be soil based, such as John Innes composts, but will need a generous mix of drainage material such as perlite or horticultural grit.

To make the most of the higher light levels the Madagascar jasmine can be moved outside or into a greenhouse during the summer, but they will need to be acclimatized for a couple of weeks first so that you avoid leaf damage through scorching.

For related articles click onto:
Aristolochia chilensis
HOW TO GROW BEAUMONTIA GRANDIFLORA
HOW TO GROW THE MADAGASCAR JASMINE
HOW TO GROW SOLANUM JASMINOIDES 'ALBUM'
HOW TO GROW TRACHELOSPERMUM JASMINOIDES
HOW TO GROW WINTER JASMINE
THE DUTCHMAN'S PIPE - Aristolochia cathcartii
THE GOLDEN CHALICE VINE - Solandra maxima
THE JADE VINE
THE MADAGASCAR JASMINE
The Pelican Flower - Aristolochia grandiflora
THE WORLD'S UGLIEST FLOWER - Aristolochia cymbifera 'Domingos Martins'
What is the World's Hardiest Passionflower?

THE GHOST PLANT - Monotropa uniflora

Ghost plant - Monotropa uniflora

With the Halloween holiday just days away, this week's 'Freak of the Week' is the appropriately named Ghost plant - Monotropa uniflora. Although it looks as though it grows on the bones of the un-dead (hence it's other common name of 'Corpse plant'), it is in fact a herbaceous perennial plant from within the well known Ericaceae family.

Native to temperate regions of Asia, North America and northern South America, it is genuinely a rare find. Surprising when you consider the conspicuousness of its colour.

However, there is a good reason behind this colouration and that is because, unlike almost all other plants, it cells do not contain the chlorophyll pigment. So how on earth does does it manage to get the energy required for growth?

Like many forms of fungi (which it is not related to), the ghost plant is parasitic, which means it has evolved a way to gets its energy from photosynthetic trees. But it doesn't feed from then directly. It has managed to find away to feed from the symbiotic subterranean fungi which have a mutual beneficial relationship with the tree roots, usually beech trees.

It grows in shady woods with rich soil and decaying plant matter, often found near dead stumps.

Since it is not dependent on sunlight to grow, it can grow in very dark environments such as the under-story of dense woodland.

The insipid stems will grow to a height of around 12 inches, and are clothed with small scale-leaves.

As its scientific name suggests, the stems bear only a single flower, which are produced from early summer to early autumn.

For related articles click onto the following links:
CEROPEGIA AMPLIATA - The Bushman's Pipe
DEVIL'S FINGERS - Clathrus archeri
HOW TO GROW THE BUSHMAN'S PIPE - ceropegia ampliata
HYDNORA AFRICANA
THE EYEBALL PLANT - Actaea pachypoda

HOW TO TAKE CUTTINGS FROM COLEUS


Coleus are without doubt one of my favourite, 'Plan B' plants. I say 'Plan B' because once I have exhausted my knowledge of colourful plants for shade (and let's be honest, there aren't that many), I can always, always rely on a Coleus cultivar to come up with the goods.

Coleus cuttings
They are inexpensive, compact, and produce foliage so ornamental and exotic that even strong flowering plants find it difficult to compete! But the very best thing about them is this. Not only do they cope with the shade, they positively thrive! They retain a better shape, the colours are far stronger, in fact they bleach in a sunny position, and their leaves become larger and more luxurious.

The trouble is that with so many good cultivars around, once you have bought your favourites there is no guarantee that you will be able to find the same ones next year. However, there is a solution, and that is to take cuttings from your existing stock. Luckily enough it is extremely easy!

How to take Coleus cuttings
You could plonk a piece of stem into a jar of water and it will root, however it will produce what are unscientifically called 'water roots'.

The problem with these is that when it comes to potting them on, most of the roots will probably break off in the process.

The remain roots will then stop growing for a week or so while the root enzymes reconfigure for the new environment - this is known as root shock.

The best and most productive thing to do is to do the job properly and strike your cuttings into a suitable compost.

The best times of year to take cuttings are August and March. Using a sharp, sterilized blade tale 3 inch long tip cuttings from non-flowering shoots, making your cut just below a leaf node. Pinch out the growing tip, and remove the bottom half of the leaves.

Rooted Coleus cuttings
Root the cuttings singularly in 2½ pots containing a good quality compost such as John Innes 'No 1'. You will not require rooting hormone, but you will require a basal heat of 16-18 degrees Celsius.

This should be fine in a warm house, but you may need to use a heated propagator in cooler climates or at colder times of the year. They should take root within a week or so.

Once they have become established in the pot then they can be re-potted into 4 inch pots. After which they can be planted outside into their final position once the threat of frost is over.

For related article click onto the following links:
COLEUS 'Palisandra'
HOW TO GROW COLEUS FROM SEED
HOW TO PROPAGATE ABUTILON FROM CUTTINGS
HOW TO TAKE CUTTINGS FROM COLEUS
HOW TO TO TAKE CUTTINGS FROM THE STRAWBERRY TREE - Arbutus unedo

NERINE SARNIENSIS

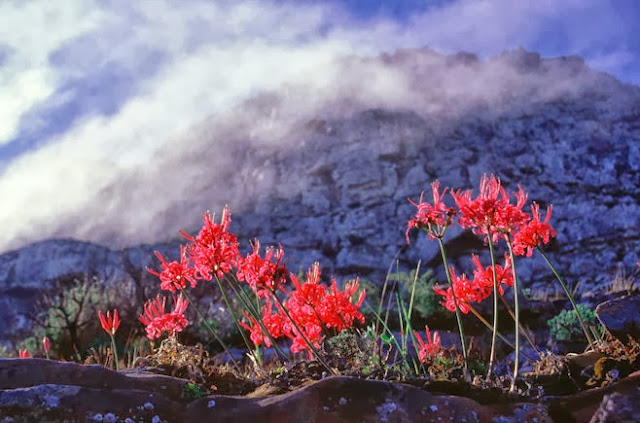
Nerine sarniensis in red flower growing wild on a mountain side
The red nerine - Nerine sarniensis


It is a personal opinion of course, but I believe that the red nerine - Nerine sarniensis, is without doubt the very best autumn flowering bulb that money can buy! And you don't have to take my word for it because in 2002 Nerine sarniensis gained the Royal Horticultural Society's Award of Garden Merit.

Bold red Nerine sarniensis in full bloom
The red nerine - Nerine sarniensis
With autumn truly in our midst, and the harsh reality of winter just a few short weeks away, these colder nights are causing havoc in my garden. The late planted Canna lilies are close to the end, and my cherished Dahlias, while still flowering, are chewed to bits.

Yes, I could apply some pesticide, but I believe that feeding caterpillars is definitely for the greater good. And who wouldn't want a garden full of butterflies in the spring?

Back to the nerine. So, if like me you keep yourself busy in a northern European garden, then nerines are an integral part of the successional calendar. So with little else to look forward to in the garden, Nerine sarniensis could be just the ticket.

I myself have a row of gorgeous, very deep pink Nerine bowdenii in the front garden, but there is a problem. While there are a number of truly hardy nerine species and cultivars for you to choose from, Nerine sarniensis isn't one of them. Of course you can grow it in a container and bring it under protection when needed, but at the end of the day most gardens have very little, if any, protected space for overwintering tender plants.

The red nerine - Nerine sarniensis
Native to the Northern and Western Capes of South Africa, Nerine sarniensis is a summer-dormant, perennial bulb which flowers on erect leafless stems. The leaves appear after the flowers which makes for an even more impressive impact.

They will need as much sun as you can provide, but will definitely need to be in a frost free environment. A winter temperature of  between 8 -10 degrees Celsius is ideal, but the bulbs can survive short periods of freezing if they are in deep pots.

You can expect them to flower from September to November, therefore, if you live in a more Mediterranean climate Nerine sarniensis is a perfect choice.

However, those secretive plant breeders may have worked their magic once more as they have managed to cross-breed the hardy, pink Nerine bowdenii with Nerine sarniensis to produce a hardy (hardier) red nerine cultivar.

Marketed as Nerine 'Codora' it seem to be only available through Taylors bulbs, but besides the packaging image there is very little information available. Be that as it may, if I can source some in the spring I will hopefully have more information to give next year.

For related articles click onto the following links:
HOW TO GROW NERINE SARNIENSIS
How to Over-Winter Tree Peonies
HOW TO PLANT NERINE SARNIENSIS BULBS
NERINE SARNIENSIS
THE GUERNSEY LILY - Nerine bowdenii
The Snapdragon - Antirrhinum majus


HOW TO GROW THE POMEGRANATE


Pomegranate tree credit Kris Peterson - www.flickr.com/groups/colorphotoaward


The Pomegranate tree is one of the most iconic fruiting plants of the Mediterranean, and rather surprisingly, it can be grown outside in the milder regions of northern Europe. This would even include the south and western regions of England!

Of course you need to make sure that wherever you are planting your pomegranate tree that you try a replicate a Mediterranean climate as best as possible and so it will need to be planted in the sunniest, warmest part of your garden.

Pomegranate flowers
In warmer regions however, they will in fact grow and flower in partial shade. Furthermore, they are even tolerant of moderately saline water and soil conditions, which may explain why so many examples thrive on the Greek islands.

The pomegranate will do best in any well-drained soil, but will also thrive on chalk or acidic loam, as well as rock strewn gravel. If you have soil that is prone to waterlogging then you may need to plant it into a raised bed or mound, or in extreme conditions you may have no alternative other than to grow it in a large container.

Once they have established, pomegranates are naturally drought tolerant, but if you want to get a decent crop of fruit then they will need to be watered. Now that isn't going to be much of a problem in northern Europe, but in warmer regions you may need to put irrigation in place. As a matter of course, new plants they should be watered every 2 to 4 weeks during the dry season.

Pomegranate fruit
Pomegranate trees require very little fertilizer, although they do respond well to a spring mulch of well-rotted farm manure. Be that as it may, they can be given a 2 to 4 ounce applications of ammonium sulfate or other nitrogen fertilizer over the first two springs to help them along.

The flowers are produced from June to September, shortly after which the embryonic fruit will appear. These deep yellow or orange-yellow, red flushed fruit have a leathery rind which encloses pulpy red flesh and numerous seeds. In northern Europe these will generally only ripen under greenhouse conditions, but further south you should experience no such problems.

You can tell when the fruits are ripe once they have developed their distinctive color, they will also make a metallic sound when tapped. Be aware they will need to be picked before they become over-ripe as they have a habit of cracking open, particularly when rained on. Pomegranates are particularly good for storage, but do best at a temperature of 32° to 41° F. Surprisingly they can last as long as 7 months, and will even improve by becoming juicier and more flavoursome.

For related articles click onto the following links:
BOMAREA CALDASII
HOW TO GROW A MULBERRY TREE
HOW TO GROW THE POMEGRANATE
HOW TO GROW POMEGRANATE FROM CUTTINGS
HOW TO GROW POMEGRANATE FROM SEED
THE POMEGRANATE  -  Punica granatum

HOW TO GROW THE MADAGASCAR JASMINE

Madagascar jasmine n bloom
How to grow the Madagascar jasmine 


If you are planning to grow the Madagascar jasmine outside then you will need to try and replicate its native conditions as best as you can. Indigenous to the tropical island of Madagascar it has evolved in a climate of high humidity and seasonal cycles of hot, wet summers and cool, dry winters. Be that as it may, the Madagascar jasmine is surprisingly hardy and able to cope with short periods of cold weather as low as 4 °Celsius, but will not tolerate frost or freezing of any sort.

Madagascar jasmine
It needs to be grown in a very free draining soil in order to prevent any root damage through water-logging. Add plenty of horticultural grit to the soil before planting, but you may need to consider growing in a raised bed or within a mound just to be on the safe side.

Always allow the soil to dry out before re-watering, and as the days begin to cool and shorten, allow even longer periods between watering. If you are keeping your Madagascar jasmine too wet then you will find that the leaves will turn yellow and start to drop. If this over-watering isn't corrected then it will eventually kill the plant. Conversely, if the plant is kept too dry, the leaves will lose their gloss and will start to wilt, which again, if not corrected will result in the death of the plant. However, if picked up in time, a quick watering will often revive the plant.

When they are in full growth they can tolerate temperatures over 40 degrees Celsius, so long as they have sufficient water, but it will do far better in a 20 - 30 degrees Celsius temperature range.

During the summer growth season, it will require as much sun as you can possibly provide, plenty of water, high humidity and a balanced fertilizer. To give it a helping hand, the Madagascar jasmine will do well with a top dressing of well-rotted farm manure in the spring, then through the rest of the growing season give a monthly application of a weak mixture of fish emulsion, bone and blood meal.

For related articles click nt the following links:
HOW TO GROW THE MADAGASCAR JASMINE
HOW TO GROW SOLANUM JASMINOIDES 'ALBUM'
HOW TO GROW TRACHELOSPERMUM JASMINOIDES
HOW TO GROW WINTER JASMINE
THE MADAGASCAR JASMINE

HIBISCUS ROSA-SINENSIS

Hibiscus rosa-sinensis


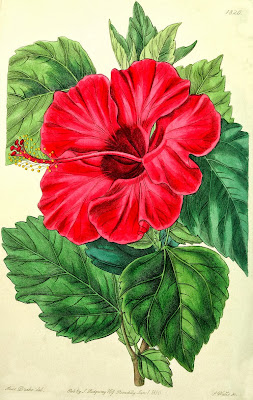
One of the most widely grown, flowering shrubs on the island of Crete is the superb Hibiscus rosa-sinensis. Ubiquitous it may be, but as flowering shrubs go it is truly a vision of perfection. Its leaves are the darkest green, and while the single, deep crimson flowers are relatively short-lived, they can be up to an impressive 5 inches wide and produced in huge numbers from June to September.

Hibiscus rosa-sinensis illustration
Meaning literally 'Rose of China', this 6 ft tall evergreen can be purchased in double and semi-double forms. There are also cultivars with yellow, pink or salmon-pink flowers. The variety 'cooperi' has smaller flowers, with narrower leaves that are variegated with cream or crimson. Of all the cultivars available 'cooperi' and has gained the Royal Horticultural Society's Award of Garden Merit, but for my money, none of them can compete with the purity of the native species.

Of course, it is not just Crete where they are a popular choice, you will find Hibiscus rosa-sinensis throughout the warmer regions of the Mediterranean. However, as the name suggests, Hibiscus rosa-sinensis is a native to East Asia.

It is widely grown as an ornamental plant throughout the tropics and subtropics, but unfortunately for those of us living in northern Europe it will not tolerate temperatures below 10 °C (50 °F). of course, container grow specimens can be kept outside during the summer months and then moved to a protected environment over the winter. Alternative, if you want a hardy red hibiscus that will cope with our cold wet winters you can consider growing the far tougher Hibiscus syriacus.

Hibiscus rosa-sinensis flower
Hibiscus rosa-sinensis will grow in any ordinary well-drained garden. Plant them in a sheltered position, in a warm that will receive as much sun as possible. If you choose to grow it as a container specimen then grow your hibiscus into a good quality compost such as John Innes 'No 2' or 'No 3'.

When overwintering, try to maintain a minimum temperature of 7-10 degrees Celsius, and the soil moist, but don't be surprised if you begin to experience leaf-drop.

However the foliage will remain and maintain a far better colour and quality when temperatures can be kept above 16 degrees Celsius. Keep the compost on the moist side in these warmer temperature and you can expect your plant to continue to flower. If temperatures exceed 21 degrees Celsius make sure that there is plenty of ventilation.

For related articles click onto the following links:
HIBISCUS ROSA-SINENSIS
HOW TO GROW EUCRYPHIA X NYMANSENSIS 'Nymansay'
HOW TO GROW HIBISCUS
Rafflesia arnoldii

HOW TO GROW NERINE SARNIENSIS

Nerine sarniensis


Nerine sarniensis is without doubt one of the most stunning autumn flowering plants. Commonly known as the Guernsey Lily, it has no relation to this gorgeous island and is in fact a native to the Northern and Western Capes of South Africa. Unfortunately their warm origins mean that it is not cold hardy and will require a minimum winter temperature of between 8-10 degrees Celsius. The bulbs can survive short periods of freezing if they are planted deep enough but are likely to be damage in the process. Above all else they need as much light and heat as you can provide.

Nerine sarniensis flower
If you are growing them in a Mediterranean climate then they can be planted in any, well-drained garden soil. Set the bulbs 4 inches deep, preferably in a sharply drained, sunny border against a wall.

Leave them undisturbed until the plants become crowded and produce fewer flower stems. Lift, divide and replant the clumps, generally every four or five years.

If you are growing them in a northern European climate then plant into 6 inch pots at a rate of three bulbs per pot. Use a good quality compost such as John Innes 'No 2' with the neck of the bulbs just showing. begin watering when the flower buds appear and keep the compost just moist through the winter.

When the foliage is well developed, provide a weekly feed for about two months. Then withhold water from the time the leaves turn yellow until the next season's flowers appear. While they will need to be kept in a protected area such as a heated greenhouse over the winter, they will be quite happy outside from June onwards. Just make sure that they are positioned in a warm, sunny position.

For related articles click onto the following links:
HOW TO GROW CHIONODOXA
How to Grow the Guernsey Lily
HOW TO GROW NERINE SARNIENSIS
HOW TO PLANT NERINE SARNIENSIS BULBS
NERINE SARNIENSIS
Rafflesia arnoldii
THE GUERNSEY LILY - Nerine bowdenii

THE SEA DAFFODIL - Pancratium maritimum

THE SEA DAFFODIL - Pancratium maritimum


Still wandering around northern Crete, I find that there is yet another gaping hole in my plant knowledge. After walking down to the beach earlier today I came across an absolute beauty of a plant which, after a quick bit of research, I found out to be the Sea Daffodil - Pancratium maritimum.

Sea daffodil flowers
I had spent a lot of time on the south-west coast of Spain after my father moved there in the early 1990's, and there was nothing even close to it there. So while the sea daffodil is a native to the Mediterranean region it turns out that it is mostly found around south-western Europe. I consider it a lucky find, because on the south Bulgarian and north Turkish coasts of the Black Sea, it is already threatened with extinction.

Although it is classed as a true bulb, it is not remotely related to the Narcissus daffodil species that all of us in Northern Europe would be familiar with. However the resemblance is genuinely striking!

The sea daffodil grows on coastal sands or just above the high tide mark, in fact the latter part of its botanical name 'maritimum' means' of the seashore. The stunning, and highly ornamental white flowers are produced from August to October and release a gorgeous, exotic scent similar to lilies. However, because it is pollinated by a hawk-moth the perfume isn't released until the evening and even then it only becomes apparent during warm, windless nights.

Pancratium maritimum
The hawk-moth will only pollinate the flowers when winds are less than 2 metres per second, and amazingly the sea daffodil seems able to detect the wind velocity. Research has shown us if the flowers are artificially pollinated during windy weather then they will not produce seed.

It turns out that the sea daffodil is not receptive to its own pollen and furthermore the plant is able to recognize it as such. So by not releasing pollen during windy weather is a practical method to prevent the plant from wasting pollen (an expensive and valuable plant resource) and is perhaps a throwback to when this plant could have been self-pollinated which could have resulted in weakening the species gene pool.

Unlike most other bulbous plant the sea daffodil is evergreen although the leaves will often die back during hot summers.

For related articles click onto the following links:

HOW TAKE CUTTINGS FROM BOUGAINVILLEA

Variegated Bougainvillea in bloom
How to take cuttings from Bougainvillea


Bougainvillea species are undoubtedly some of the most beautiful flowering vines that money can buy. Keep them well fertilized, and not too much water, and these luscious green climbers will flower their socks off. However, Bougainvillea cultivars can be expensive to purchase, and while you may see exactly the colour form you need when driving around the neighbourhood, you cannot find it for love nor money in any of your local plant retailers.

Bougainvillea cutting material
Bougainvillea cutting materia
Now there is a solution, and one that is fairly simple in execution. Take your own Bougainvillea cuttings and grow them on into viable plants. Just make sure you ask for permission first before taking cuttings from your neighbours plants as this can cause offence.

The best time to take Bougainvillea cuttings is in the spring, and while you can take cuttings at any time of the year, spring is when Bougainvilleas naturally start to produce the majority of their growth.

Using a sharp, sterilized blade, take 6 inch cuttings from below a healthy, non-flowering growing tip. Be aware that Bougainvillea can be difficult to propagate and not every cutting will form roots, therefore take more cutting material than you require. If it will be some time before the cuttings are going to be put into their compost mixture then wrap them in damp paper towel to prevent them from drying out, and also place into a closed, plastic bag.

Pot grown Bougainvillea with different colour blooms
Bougainvillea colour varieties
When you are ready to commence, prepare the cuttings by remove all the leaves, except for four or five at top of the stem.

Prepare either 2 or 3 inch pot with a good quality compost such as John Innes 'Seed and Cutting' although you may wish to mix in an extra 30% horticultural grit, perlite or vermiculite for improved drainage. Just use one pot for each cutting you want to propagate, although if you are short on pots you can get away with two cuttings per pot at most. Firm the soil down with your fingers to remove any large air pockets, and aim for a soil level about 1/4 inch below the rim of the pot.

Remove a prepared stem from the wet paper towel and dip the cut end of the stem into rooting hormone powder. It is important to tap the stem with your finger to remove any excess.

Form a hole in the soil with the blunt end of a pencil and insert the cut end of your Bougainvillea so that it is 1.5 inches below the soil level. Firm the soil around the cutting to help hold it upright. Gently water in the cuttings and once the excess has drained away put them in an old seed tray or a pan with sides. Now place the whole lot into a closed, heated propagator or inside a large plastic bag. Close off the the top of the bag to help retain humidity.

Bonsai Bougainvillea in flower
Bougainvillea bonsai
Move the cuttings to a warm, bright position, but out of direct sunlight, and try to maintain a soil temperature between 65° and 75° Fahrenheit. You may require a heat mat to achieve this or just set the thermostat if you are using the heated propagator.

Keep the compost on the moist side, but not waterlogged as this will prevent rooting. Try watering using a mister as this will also help to keep up the humidity

It can take up to three months before Bougainvilleas take root, but you can start checking the cuttings once you see new growth on the stems. Pull gently to test for root formation. If you feel a slight resistance, then the cuttings have rooted.

Once rooted, the cuttings can be removed from their bag or propagator. Remember to water, but again, make sure the compost does not become waterlogged. The Bougainvillea cuttings can be potted on to a larger pot once roots begin to emerge at the bottom of their existing pot and can planted up into their final position once they are a couple of feet in height.

For related articles click onto the following links:
How to Take Cuttings from Bougainvillea
HOW TO GROW BEAUMONTIA GRANDIFLORA
HOW TO GROW BOUGAINVILLEA
HOW TO GROW BOUGAINVILLEA FROM SEED
HOW TO GROW THE GIANT HIMALAYAN LILY - Cardiocrinum giganteum
How to Grow Sedum from Cuttings
HOW TO GROW THE VIRGINIA CREEPER FROM CUTTINGS
Passiflora 'Silly Cow'
THE GOLDEN CHALICE VINE - Solandra maxima
HOW TO PROPAGATE BOX HEDGING PLANTS
HOW TAKE CUTTINGS FROM BOUGAINVILLEA
HOW TO TAKE CUTTINGS FROM FUCHSIA
HOW TO TAKE CUTTINGS FROM ROSEMARY
HOW TO TO TAKE CUTTINGS FROM THE STRAWBERRY TREE - Arbutus unedo
How to Take Hardwood Cuttings
HOW TO TAKE HONEYSUCKLE CUTTINGS
HOW TO TAKE CUTTINGS OF WISTERIA
What is the World's Hardiest Passionflower?