HOW TO GROW AMARANTH FROM SEED

How to grow Amaranth from seed
The edible Amaranth, or Chinese spinach as it is more commonly called, is an ancient food plant native to South America. So revered was it in ancient Inca and Aztec cultures that it was considered to be a sacred plant.

How to grow Amaranth from seed
Amaranth leaves are high in protein and although nutritionally similar to beets, Swiss chard and spinach, they are actually far superior. For example, amaranth leaves contain three times the amount of both calcium and niacin (vitamin B3) compared to spinach leaves.

Because of their sub-tropical origins, edible Amaranth will do particularly well in warm climates, so much so, that it if you are growing it using the ‘cut-and-grow-again method’ it can be harvested a mere 30 days after sowing.

When planting directly into the ground, amaranth seeds will germinate more successfully if they are sown into a finely prepared seed bed that receives adequate moisture.

This can be done anytime from April onward so long as the threat of late frosts are over. However, it is more important to make sure that soil temperatures are averaging above 16 degrees Celsius - you will be able to sow them earlier if they can be given the protection of a small poly-tunnel. Of course, once the weather stays consistently warm the cover can be removed.

How to grow Amaranth from seed
Thinly sow the seed into rows 12 inches apart with each row spaced up to two feet apart. Cover with a 1/4 inch of soil, firm gently, and keep moist and weed free. When they are large enough, thin the seedlings out to approximately 1 plant for every 3 inches when using amaranthus for baby leaf, or 8 inches apart for producing mature plants. If you wish, any thinnings collected can be eaten as you would do with baby leaf salad or they can be added as part of a stir fry.

Some edible amaranth varieties can get quite tall and may need the support of canes. Check the height of you crop before you sow so that you can place your canes before the plants are of a size that the roots can become damaged by their insertion.

In northern European climates, you should be able to harvest your first amaranths crop from June up until October.

If you are using the crop for baby leaves, only pick a few leaves per plant. For mature plants, harvest leaves and stem from the top to encourage further side shoots. Remove any flowers as soon as their buds appear otherwise leaf production will come to an end.

For related articles click onto the following links:
HOW TO GROW AMARANTH
HOW TO GROW CHINESE SPINACH FROM SEED

HOW DO ELEPHANTS COMMUNICATE AND TALK TO EACH OTHER?


Most of us are familiar with the calls of an elephant. They range from the familiar trumpet call (a favorite of the old Tarzan films) to a low-frequency rumble that sounds – at least to our human ears - something akin to a deep growl.

HOW DO ELEPHANTS COMMUNICATE AND TALK TO EACH OTHER?These forms of communication are an essential part of their social behavior and this enables a herd to keep track of relatives, defend territories and alert other elephants to danger.

It has now been discovered that elephants can produce an infrasonic sound from 1- 20 Hz – a range that is inaudible to humans - and these sounds can travel over huge distances.

They can also produce what is known as a ‘seismic’ signal which is like mini earthquake allowing elephants to position each other in relation to their own location.

Using specially-developed acoustic software, researchers at San Diego Zoo in the US have tried to uncover the secret language of the elephant by deciphering these sounds and have come up with a fascinating new insight into the workings of the herd.

HOW DO ELEPHANTS COMMUNICATE AND TALK TO EACH OTHER?
How do elephants communicate and talk to each other?

Early results have shown that pregnant females - in the last few days of their gestation period – begin to manipulate the low frequency range of their calls.


This auditory communication alerts the rest of the herd of the imminent birth, and at the appropriate time they react by forming a barrier around the mother to protect her and the newly born calf from potential predators at this critical time.

For related articles click onto the following links:
ELEPHANT COMMUNICATION
ELEPHANT FACTS
WHAT IS THE DIFFERENCE BETWEEN AFRICAN AND INDIAN ELEPHANTS?
WHAT IS THE SIZE OF AN ELEPHANT?
WHERE DO ELEPHANTS LIVE?
WHY DO ELEPHANTS HAVE BIG EARS?

HOW TO COLLECT, PREPARE AND SAVE OKRA SEED FOR GERMINATION


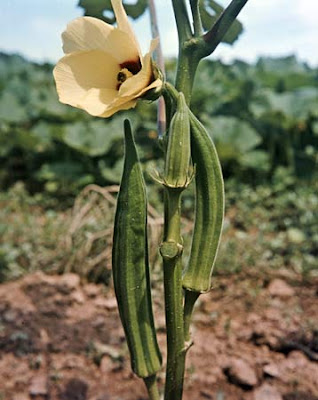
Often referred to as lady's fingers, okra is popular vegetable in the south of India (where it is mostly used in dry curries) and the southern states of America (where it is used in a variety of recipes including gumbos). Relatively unknown in Northern Europe the okra is a long green pod with a ribbed and slightly fuzzy skin. The inside of an okra pod has a somewhat gooey texture and is full of edible, creamy seeds. When cooking, okra exudes a glutinous juice which thickens stews and braised dishes.

Okra plants easily cross-pollinate so if you are planning on saving seed from your plants it is best to plant just the one variety - otherwise the resulting seedlings will not grow true to the parent plant.

HOW TO COLLECT, PREPARE AND SAVE OKRA SEED FOR GERMINATION
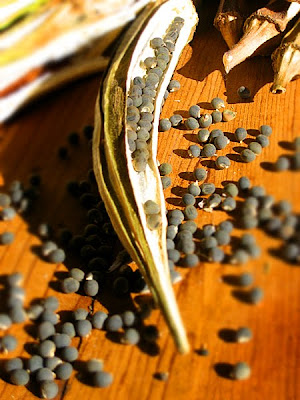
Okra seeds
When harvesting Okra pods for culinary use they are best picked before they get any bigger than 3 inches long. If they are left to grow any larger they will begin to give off an unpleasant woody flavour together with a rather unpalatable texture. However, if you want to collect seed from them it is best to allow the pods to get as big as they can. Either pick them off the stalk so that they can be dried off indoors or allow the pods to dry off naturally on the stalk before harvesting.

Have a bowl on hand to collect the seeds then either twist the dried pods in your hands to break open the seed or slice the pods lengthwise from top to bottom, prying the pods apart at the slit with your fingers -the seed will fall out quite readily.

Dry the seed thoroughly for several days, then store in a cool, dry place in tightly closed containers until next season.

Okra seeds have a history of not storing well so you will need to collect new seed each autumn for use the following season. Okra seeds are unlikely to remain viable into their second year. When it is time for replanting, soaks the seed a couple of hours before planting.

For related articles click onto the following links:
GROW OKRA SEED
HOW TO GROW OKRA FROM SEED OUTDOORS
Saving seeds: How to save okra seeds

HOW TO GROW OKRA FROM SEED OUTDOORS

How to grow okra from seed outdoors
Often referred to as lady's fingers, okra is popular vegetable in the south of India (where it is mostly used in dry curries) and the southern states of America (where it is used in a variety of recipes including gumbos). Relatively unknown in Northern Europe the okra is a long green pod with a ribbed and slightly fuzzy skin. The inside of an okra pod has a somewhat gooey texture and is full of edible, creamy seeds. When cooking, okra exudes a glutinous juice which thickens stews and braised dishes.

How to grow okra from seed outdoors
Although the typical northern European climate is far cooler that the okra plant’s native habitat, you will find that they can will produce a viable crop outside. If you have the space, then it is worth giving them an early start by sowing them indoors.

This way you can make the most of the growing season otherwise okra seeds can be outside directly into prepared seed beds - but only when the threat of frosts have past.

However you may still need to wait as Okra seed need warm weather to grow and should not be planted until outside temperatures are reliably around 18 degrees Celsius or the seeds may not germinate at all.

To make the most of an Okra crop you will need to try and mimic their natural habitat as much as possible and this means a well drained and sheltered position with plenty of sun.

They will also require plenty of water over the growing period so mulch and fertilize the soil throughout the summer in order to maintain a good level of nutrients within the soil.


How to grow okra from seed outdoors
Sow Okra seeds 4 inches apart into rows that are at least two feet apart. Place each seed in to the ground at about ½ inch deep then gently water gently in.

Once the seeds have begun to germinate they can be thinned out to about a foot between plants, but remember to try and leave the strongest plants in place.

Harvest okra as the plant begins to produce the seed pods, these should be about three to four inches in length when ripe.

Check your okra plants every other day for new fruit and harvest them quickly as this will encourage the plant to grow more pods.

It takes about 50 days for an okra plant to reach maturity.

For related articles click onto the following links:
GROW OKRA SEED
HOW TO COLLECT, PREPARE AND SAVE OKRA SEED FOR GERMINATION
HOW TO GROW VEGETABLES?
RHS: HOW TO GROW OKRA

HOW TO WATER THE VENUS FLYTRAP

How to water the venus flytrap
Out of all the carnivorous plants that you can buy, the Venus Flytrap is perhaps one of the easiest to grow. The one thing to remember is that it does come from a specialist environment which is why it obtains its ‘nutrients’ in such a unique way. This does mean however, that Venus flytraps require water that has a very low mineral content otherwise these plants will almost certainly die.

WARNING, do not give you Venus flytraps water straight from the tap without being sure of its mineral content!

In their native habitat (which is only a small area of marshy coastal country straddling the border between North and South Carolina) Venus flytraps have evolved to survive in low nutrient environments, such as bogs or the wet savannas.

Their specialised physiology allows them to thrive in wet environments, and this needs to be mimicked when keeping Venus flytraps at home. The easiest way (presuming they are growing in a pot) is to keep the pot in a high sided saucer filled with water. They will need to be kept standing in water for most of the year, and this is where the science comes in because you can't just use any old water
.
How to water the venus flytrap
The Venus flytrap requires mineral-free water which is fine if your tap water is relatively pure (less than 50 parts per million in dissolved minerals), because then you can safely water your flytrap with it - the easiest way. If your tap water is unsuitable, use filtered rain water, bottled distilled water or water that has passed through a reverse-osmosis unit. Do not use bottled mineral water.

As mentioned before, Venus flytraps come from a nutrient poor environment and this can leave the roots at risk from damage through ex-osmosis.

The definition of osmosis is:

'...osmosis is the diffusion of water through a semipermeable membrane. More specifically, it is the movement of water across a semipermeable membrane from an area of high water potential (low solute concentration) to an area of low water potential (high solute concentration)...'

Ex-osmosis occurs when the concentration of water soluble minerals in the root environment is greater than the concentration of soluble minerals within the actual root. When this happens water moves from the root cells to the soil causing a state of dehydration within the root. If ex-osmosis continues then the root cells eventually die causing a condition known commonly as 'root burn'.

While it is important to have your Venus flytraps standing in water during their active growing season, it is acceptable for the soil to be just moist or damp for short periods - although the soil should never be allowed to dry out completely. During their winter dormancy period it is better to keep the soil just damp and not let the plant sit in water as it would have done during the growing season.

It is also worth transplanting your Venus flytraps into fresh compost every few years as this will help to avoid an inevitable build up of nutrients and toxins within the root environment.

For related articles click onto the following links:
GROW VENUS FLYTRAP SEED
HOW DOES A PITCHER PLANT ATTRACT, CATCH AND TRAP INSECTS
HOW TO GROW PITCHER PLANTS
HOW TO GROW THE PITCHER PLANT FROM SEED
HOW TO GROW THE VENUS FLYTRAP FROM SEED
HOW TO WATER GARDEN CONTAINER GROWN PLANTS
VENUS FLYTRAP
WATER FOR VENUS FLYTRAPS
WHICH COMPOST DO YOU NEED FOR VENUS FLYTRAPS?
WHY DO CARNIVOROUS PLANTS EAT ANIMALS AND INSECTS

WHICH COMPOST DO YOU NEED FOR VENUS FLYTRAPS?

Which compost do you need for venus flytraps?
Out of all the carnivorous plants that you can buy, the Venus Flytrap is perhaps one of the easiest to grow. The one thing to remember is that it does come from a specialist environment which is why it obtains its ‘nutrients’ in such a unique way. This does mean however, that Venus flytraps require a rather specialist compost mix to grow in otherwise these plants will almost certainly die.

WARNING, you cannot plant Venus flytraps into a multi-purpose compost!

Which compost do you need for venus flytraps?
Compost for venus flytraps
In their native habitat – which is only a small area of marshy coastal country straddling the border between North and South Carolina – Venus flytraps have evolved to survive in low nutrient environments, such as bogs or the wet savannas. Usually when you buy a Venus flytrap it will already be potted up in a suitable compost but if you are growing from seed or potting on, you will need suitable compost – something you are unlikely to be able to buy in most plant retail shops. However, you can easily make up your own Venus flytrap compost by making a 1:1 mix of moss peat and perlite or silica sand.

Peat moss makes an ideal starting point for making carnivorous plant compost because it is both nutrient poor and slightly acidic. At no point should you need to add any fertiliser or lime to the compost mix as this will cause root damage through ex-osmosis.

The definition of osmosis is:

'...osmosis is the diffusion of water through a semipermeable membrane. More specifically, it is the movement of water across a semipermeable membrane from an area of high water potential (low solute concentration) to an area of low water potential (high solute concentration)...'

Ex-osmosis occurs when the concentration of soluble nutrients in the roots environment is greater than the concentration of soluble nutrients within the actual root. When this happens water moves from the root cells to the soil causing a state of dehydration within the root. If ex-osmosis continues then the root cells eventually die causing a condition known commonly as 'root burn'.

It is also worth transplanting your Venus flytraps into fresh compost every few years as this will help to avoid an inevitable build up of nutrients and toxins within the root environment.

For related articles click onto the following links:
GROW VENUS FLYTRAP SEED
HOW DOES A PITCHER PLANT ATTRACT, CATCH AND TRAP INSECTS
HOW TO GROW PITCHER PLANTS
HOW TO GROW THE PITCHER PLANT FROM SEED
HOW TO WATER THE VENUS FLYTRAP
VENUS FLYTRAP
Venus Fly Trap Soil
WHY DO CARNIVOROUS PLANTS EAT ANIMALS AND INSECTS

HOW TO GROW EGGPLANTS FROM SEED

How to  grow eggplants from seeds
How to  grow eggplants from seeds
Although tomatoes and eggplants are closely related, eggplants, otherwise known as aubergines, are going to require significantly warmer conditions than tomatoes in order to produce a significant crop. If you intend growing them outdoors then you will need, even in the South of England, a sheltered position and some form of protection to help get them off to a good start.

How to  grow eggplants from seeds
How to  grow eggplants from seeds
As a native to the areas of India, Bangladesh, Pakistan, and Sri Lanka they will need as much help as they can get when it comes to ‘mimicking’ acceptable growing conditions, especially when grown in a northern European climate. Not only are eggplants going to need higher temperatures they are also going to need protection from wind.

And while tomatoes will happily ripen four to six trusses of fruit when grown outside, you need to limit the number of fruits on an eggplant so that the fruit that is left will get the best opportunity to ripen. There is no point allowing the plant to expend energy into producing fruit that has no chance of ripening by the end of the growing season.

Eggplant seeds can be sown anytime from February to April, but if they are to be grown unprotected outside i.e. not in a greenhouse or polytunnel, it would be best to start them off indoors to give them as much of a head start as possible. Sow the seed into pots or plug trays using a good quality seed compost such as John Innes seed and cutting. Sow thinly and then cover with a layer of fine compost. Firm the compost down gently, keep moist, then cover with a sheet of glass, polythene or propagator lid in order to maintain a high humidity.

How to  grow eggplants from seeds
How to  grow eggplants from seeds
The seeds should then be kept in a warm, bright position at a temperature of approximately 18 -21 degrees Celsius. Remove the cover as soon as the seedlings begin to show through the compost, and once they reach a height of about 6 inches they can be transplanted into individual pots using a good quality free draining compost.

Allow them to continue growing and be ready to transplant them into grow-bags, in the ground or in large pots under protection in May once the threat of frosts are over.

While growing, keep them moist and weed free and they may require the additional support of canes or an open wigwam. Feed them with a high potash liquid fertilizer at one quarter the recommended strength - but apply it at four times the recommended frequency. Also pinch out the top of the plant when it gets to about 18 inches high to encourage it to bush out. However, once you have three or four fruits set, it will be time to start removing any further side shoots as they develop. This helps to divert the energy of the plant to where it is most needed.

One last cultivation point, to ensure a good set of fruit when the plants first come into flower you can consider giving them a little extra help by pollinating them by hand. This will not be necessary for the subsequent sets of flowers.

In hot weather you may need to water twice a day, which is why it is important to pot them on into a free draining compost. Eggplants can be incredibly thirsty and dry compost will quickly lead to a check in growth. Having a free draining composts allows you to water as much as the plant requires without the risk of root damage through waterlogging. This applies particularly to plants grown in a greenhouse where it can get very hot - even in late summer.

For related articles click onto the following links:
HOW TO GROW AVOCADO FROM SEED
How to Grow Eggplant from Seed

HOW TO GROW BEETROOT FROM SEED

How to grow beetroot from seed
Beetroot is an extremely underrated crop yet very easy to grow. Packed full of health promoting antioxidants, they also have unusually high nitrate levels which clinical trials have shown helps reduce blood pressure.

It is unnecessary to start beetroot seed off early indoors as they germinate easily enough outside in prepared seed beds. However, sowing can be brought forward a few weeks if you want to protect them using a polytunnel or cloche.

How to grow beetroot from seed
Beetroot crop
To prepare a seedbed, remove any weeds, especially perennial weeds, and dig over the site with a spade, removing any particularly large stones. Do not add any fertilizers or manure to the soil at this point as this will cause the roots to develop incorrectly. Beetroot prefer an alkaline soil and so if the soil is acidic you will need to add an appropriate amount of lime to compensate.

Beetroot seeds can be sown from April to July directly into a prepared seedbed sited in the crops final position. Alternatively, you can sow the seeds into 3-4 inch pots, the resulting seedlings can be transplanted into the final growing position at a later date but you will generally get a higher success rate if you can sow directly into the soil.

As a tip, soak the seed for a few hours before you need them, then sow thinly into rows 12 inches apart. Cover the seed with a thin layer of fine topsoil – no more than about an inch deep, then firm gently and keep moist and weed free during the growing period. If you want to grow a continuous crop throughout the year then re-sow every 2-3 weeks. When they are large enough, they can be thinned out as necessary to approximately 1 plant for every 3 inches apart, however if you are growing varieties that produce a cylindrical root you may need to extend this to 1 plant for every 4 or even 5 inches. The beetroot can be harvested as soon as the roots reach about 4 inches in length.

For related articles click onto the following links:
BBC: BEETROOT
HOW TO GROW RADISH FROM SEED
What is a Beetroot
WHEN DO YOU PICK BEETROOT?

HOW DOES A PITCHER PLANT ATTRACT, CATCH AND TRAP INSECTS


Pitcher plants are carnivorous plants whose prey-trapping mechanism features a deep, bulbous cavity filled with a digestive fluid. The traps of what we consider to be ‘true’ pitcher plants are created from modified leaves, however they are not simply folded into a tube - the process is far more complicated!

The process begins when the tip of the leaf begins to extend into a tendril. This gains support for itself by twisting around the stem of another plant, usually making no more than a single turn. The tip then begins to swell, drooping under its own weight. Then, quite suddenly, the swollen tip begins to inflate with air.

How does a pitcher plant catch and trap insects?

As the tip balloons larger and larger, flecks of colour start to appear in the walls of the growing cavity making it recognisable as the trap it will become. At this point the cavity begins to fill with fluid, and once it has fully matured a lid-like segment at the top of the trap opens and the plant is ready to receive its ‘visitors’.

Pitcher plants entice insects to their traps using a fragrant nectar. Any insects that encroach the trap are at risk from a ribbed, widely protruding rim known as the peristome. This is coated with a waxy film which when dry is not much of a threat, but after a period of rainfall the rim becomes covered with a film of water which confounds the surest of insect feet. Inevitably any insect stepping onto the peristome will slip down past the inner walls of the pitcher but these too are coated by a flaky waxy surface that peels off and clogs the feet of insects so that they lose all chance of adhesion.

As the victims tumble into the water and struggle to save themselves, the disturbance stimulates glands in the walls of the pitcher and these start to discharge a digestive acid. This is so powerful that a fly can be reduced to a hollow shell within days and a midge will entirely disappear within hours. The whole device is so effective that these pitchers can trap not just small insects, but larger prey such as cockroaches, centipedes and scorpions. In fact, some of the larger varieties of pitcher plant such as Nepenthes rajah, Nepenthes rafflesiana and Nepenthes attenboroughii are even able to catch prey as large a rat.

For related articles click onto the following links:
HOW TO GROW PITCHER PLANTS
HOW TO GROW THE PITCHER PLANT FROM SEED
WHY DO CARNIVOROUS PLANTS EAT ANIMALS AND INSECTS
PITCHER PLANT

WHY DO CARNIVOROUS PLANTS EAT ANIMALS AND INSECTS


Carnivorous plants, whether you love them or hate them, have become a source of fascination for both young and old alike. With their alien-like appearance, combined with a point blank refusal to accept their place in the natural order of things, carnivorous plants are a slap in the face to anyone who thought that vegetarianism in animals was simply the 'safer' option.

As a group, these specialist plants have evolved a number of different ways to attract, catch and digest their prey, although quite surprisingly this ability has evolved independently across a number of plant species. However, they all have one factor in common and that is they all live in nutrient poor environments.

Why do carnivorous plants eat animals and insects?
Typically you will find carnivorous plants growing in wetlands, or at least an almost permanently damp or wet environment. Plant nutrients are by their very nature water soluble otherwise they not be able to travel through the plant's vascular system. Unfortunately in a waterlogged root environment these vital nutrients are simply washed away.

The differing mechanisms that these plants employ to catch and eat their prey are all designed to solve this single problem - how do you get nutrients from an environment that is severely lacking in available nutrients, and more specifically that most important macronutrients of them all, nitrogen and phosphorus.
Nitrogen is a major building block in the process of manufacture of plant cells and proteins, as well as being a vital component of the chlorophyll molecule. Phosphorus is also extremely important as it is used in the production of nucleic acids (DNA, RNA etc), sugar phosphates and coenzymes.

Without these elements plants cannot survive and so instead of obtaining their nutrients from the ground, carnivorous plants have managed to diversify and obtain their nutrients by digesting the bodies of animals and insects. As luck would have it, these bodies are rich in a range of nutrients but in particular nitrogen and phosphorus. This therefore gives these plants a considerable advantage in an area where few other species can survive.

For related articles click onto the following links:
HOW TO GROW PITCHER PLANTS
HOW TO GROW THE PITCHER PLANT FROM SEED
NAT GEO: CARNIVOROUS PLANTS

NON-NATIVE INVASIVE SPECIES – The American Signal Crayfish

The American Signal Crayfish
The United Kingdom - as well as almost every other country on the planet - has often suffered from the effects of environmental damage through the proliferation of non-native species. For millennia, mankind has traveled the world, followed quickly by the establishment of trade routes and the movement of valuable animal and plant commodities. Unfortunately these routes have also brought their fair share of problems such as the globalization of smallpox, influenza and the infamous ‘black death’.

Today similar problems exist and while modern medicine has made great strides in the prevention of such epidemics there is still an ongoing problem with the deliberate and accidental introduction of non-native plant and animal species into sensitive environments. Recent history has already shown us the terrible destruction that can be reaped through the experiences of Hawaii, Australia and New Zealand.

The American Signal Crayfish
Image credit - http://www.davekilbeyphotography.co.uk/
Invasive non-native plant and animal species are now the second greatest threat to biodiversity worldwide after habitat destruction. This is because they can have a negative impact on native species, as well as for the damage caused to the environment, and as a secondary issue - local economies. One of the most devastating introductions to the United Kingdom in recent years is the American Signal Crayfish.

Originally the Signal crayfish was commercially bred in this country for the restaurant trade but about 25 years ago a handful managed to find their way into the waterways across England and Wales. Today, populations of Signal crayfish can be found as far south as Cornwall and are now making their way up into areas of Scotland causing devastation among our native populations of the smaller and less aggressive white-clawed crayfish. Not just confined to the water, Signal crayfish also have a habit of walking overland in a search for new feeding and breeding ‘grounds’ which is why they have been able to colonize such large areas of the country so quickly.

It is a voracious predator and extremely damaging to sensitive environments as it will eat almost anything it finds including plants, other invertebrates, snails, small fish and fish eggs. It is also cannibalistic and quite happy to make a meal of its own young. The Signal crayfish also digs burrows up to three feet long into river banks where each year a single female can lay more than 250 eggs at a time. At a time of increased flooding risk, areas where there are significant numbers of Signal crayfish have seen their once stable river banks collapse.

As you would expect, populations of our native white-clawed crayfish are now severely under threat. The American species of crayfish is bigger, more aggressive and easily out-competes our native species. Perhaps worst still they also carry a virulent disease, known as ‘crayfish plague’ – a water borne fungal infection, which can spread rapidly among more vulnerable native species. Unfortunately while the Signal crayfish is resistant to the disease it can still act as a carrier, and now the crayfish plague believed to have been responsible for wiping out our native crayfish from most of the rivers in the south of England.

Environmentalists say that the current northern stronghold of native white-clawed crayfish in the Scottish rivers of Wansbeck and Aln could also be under threat. In response to this, the Scottish government financed a pilot scheme at Loch Ken in Dumfries and Galloway amid fears that the Signal crayfish could cause havoc if they reach the salmon stretches of the River Dee. In the process they managed to catch and destroyed more than a million Signal crayfish – a startling figure and hopefully the wake-up call needed to bring the highly destructive Signal crayfish to wider attention.

For related articles click onto the following links:
American Signal Crayfish wrecks UK waters
COCONUT CRAB - THE INCREDIBLE FACTS
HOW TO CATCH CRAYFISH
JELLY FISH SWARMS – THE LATEST MAN MADE DISASTER?
NON-NATIVE INVASIVE SPECIES – THE CHINESE MITTEN CRAB
NON-NATIVE INVASIVE SPECIES – THE JAPANESE KNOTWEED
.

HOW TO GROW BUTTERNUT SQUASH IN POTS OR CONTAINERS

How to grow butternut squash in pots or containers
Butternut squash
Butternut squash are vigorous plants and to get the most out of a container grown crop you will need to make sure that there is plenty of nutrition available to it. Unless you are going to apply liquid or granular feeds - or are going to periodically top dress your container with an appropriate mulch - the only nutrients that are going to be available to your growing squash are those found within the container. If these vital nutrients become used before the end of the growing season then your plant will weaken and your crop can become stunted and lose considerable quality. In addition, you are likely to see an increased incidence in pests and diseases.

How to grow butternut squash in pots or containers
Butternut squash seedlings
Of course it's all in the preparation – what you put in is what you get out. So if your are unsure as to what compost blend to start them off with, consider creating a 50:50 mix of topsoil and well rotted farm manures as this will easily help to get your crop off to a good, nutrient rich start. Additional fertilisers and/or mulches can be added as and when needed

Each squash seedling will need to be planted approximately 3ft from its nearest neighbour, so unless you are using something the size of half-barrels you are likely to be use only one plant per container. If you have plenty of seedlings then plant 2-3 seedlings per container with the view to removing the weakest two a week or so after germination.

Having been started off inside under protection, the young squash plants will need to be hardened off for a week or two before they are permanently left outside. If your container is too large or heavy to move then ensure that the seedlings are protected at night by a bell cloche or something similar.

How to grow butternut squash in pots or containers
Butternut squash fruits
Small green fruits will appear shortly after flowering, and as they grow bigger remove some of the leaves so that the fruits can be exposed to the sun.

Butternut squash are vigorous plants, and once they start growing, they can spread rapidly. While the plants are still young, you can choose to control the foliage by either growing them vertically up a wigwam or trellis or allowing them to trail naturally along the ground.

Your squash plants will require plenty of water during the growing season – especially in hot weather - so keep an eye on them so that they don’t dry out. If the plant does dry out when there is fruit on the vine then there will be a strong chance that it will shed its fruit as a way of protecting the plant. Be careful too about over-watering too as this can also increase the incidence of fungal rots.

Your butternut squash should be ready to pick in the autumn but remove the fruits before the weather turns cold and definitely before the first frost. Timing is important because if you pick them before they are properly ripe then they can end up lacking in flavour.

For related articles click onto the following links:
HOW TO COLLECT AND PREPARE BUTTERNUT SQUASH SEEDS FOR PROPAGATION
HOW TO GROW BUTTERNUT SQUASH FROM SEED
How to Grow Butternut Squash in Boxes
WHEN DO YOU HARVEST BUTTERNUT SQUASH