HOW TO GROW EUONYMUS ALATUS - THE BURNING BUSH

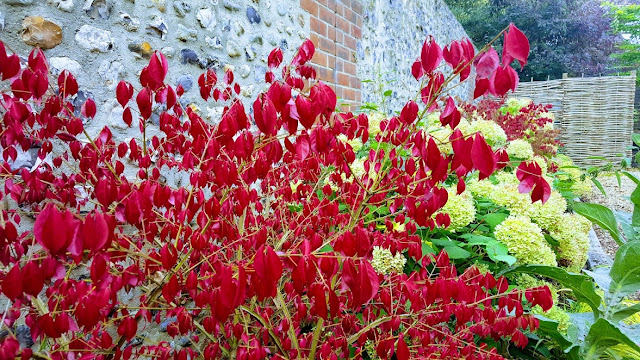
Euonymus alatus displaying red autumn colour against a sussex flint wall
How to grow Euonymus alatus
Commonly known as the 'burning bush' or 'winged spindle tree', Euonymus alatus is for the most part a rather unexceptional specimen. Native to central and northern China, Japan, and Korea it is a hardy deciduous shrub noted for the corky ridges or 'wings' which appear as the stems mature. However it is mostly considered for garden space due to its spectacular autumn colour as the leave turn a brilliant crimson-pink prior to leaf-drop. Hence the popular and far more relevant common name of 'burning bush'.

Close up of Euonymus alatus displaying red autumn leaf colour
How to grow Euonymus alatus
It was introduced to British science in 1860; however it wasn't until 1984 that it received the Award of Garden Merit from the Royal Horticultural Society. The common name of 'Spindle tree' is in reference to it close relation to Euonymus europaeus - the wood from which was traditionally used for the making of spindles for spinning wool.

Under favourable conditions you can expect Euonymus alatus to grow to a height of 2.5 metres tall, and up to 3 m wide. The species name 'alatus' is from the Latin for winged and refers to the broad cork structures which appear on the branchlets. The ovate-elliptic leaves are between 2–7 cm in length and 1–4 cm wide with an acute apex. The small flowers are greenish colour and appear over a long period in the spring although they are fairy insignificant to the eye. The fruits are reddish-purple which open to reveal bright orange-coated seeds.

Euonymus alatus will perform will in most soils but will prefer a moist, well-drained soil. It will be happy in either full sun or partial shade. Plant fro October to March.

Pruning of Euonymus alatus is not particularly necessary although the shoots can be thinned out and shortened in February in order to maintain a tidy form.

Main image credit - Simon Eade gardenofeaden@gmail.com
In text image -  Famartin https://creativecommons.org/licenses/by-sa/4.0/

For related articles click onto the following links:
HOW TO GROW EUONYMUS ALATUS - THE BURNING BUSH
EUONYMUS FORTUNEI 'Emerald Gaiety'
HOW TO GROW THE SNOWBERRY - Symphoricarpos albus

HOW TO GROW ENGLISH IVY - HEDERA HELIX

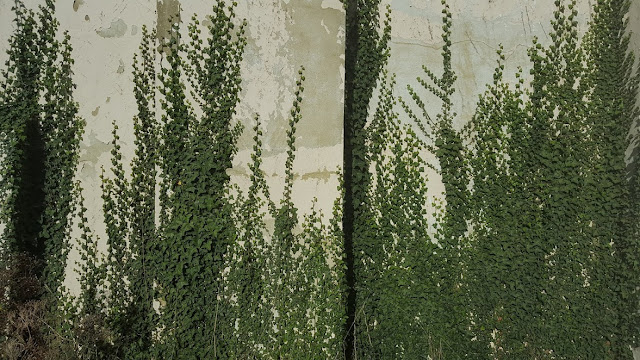
English Ivy - Hedera helix growing up an old painted house wall
How to grow English Ivy - Hedera helix

Although often known by the common name of English Ivy, Hedera helix is actually native to most of Europe and western Asia. It is a hardy, evergreen climber which under favourable conditions can be expected to reach a maximum height of between 20–30 m. Although considered little more than a noxious weed in the many countries where it has successfully naturalised, it was once held in higher regard when it was used for making wreaths which were worn by dancers and on the brows of the Greco-Roman deity in the tales of Bacchus - the god of wine.

The leaves are glossy dark-green, often with silver markings along the veins. The green-yellow blooms are formed in umbels from late summer until late autumn. Each flower is 3 to 5 cm in diameter and very rich in nectar. It is considered to be an important late autumn food source for bees, butterflies and other native insects.

Hedera helix flower buds on arborescent growth
How to grow English Ivy - Hedera helix
English ivy is an extremely robust and vigorous (some might say aggressive) species capable of growing in most soil types in almost any situation. It is one of the hardiest of all species within the genus and arguably the most useful for both ground and wall cover. It will perform best in full sun although it will benefit from some shade during the hottest part of the day over the summer.

Pot grown specimens can be grown in 10-15 cm pots containing good quality soil-based compost such as John Innes No.2. Keep in a position of full sun but move to a position away from direct sunlight over the summer. Keep the compost just moist throughout the year and feed monthly with a half dose liquid soluble fertiliser.

Unusually two forms are produced. The first is juvenile, sometimes known as runner growth with lobed leaves and adventitious roots able to attach themselves to any surface. The second form is adult or arborescent growth in which it bears flowers and fruits. In this state the leaves are entire with wavy margins, but unlike the juvenile growth it does not have adventitious roots. This arborescent growth is produced on the upper levels of the runner growth when it reaches the top of its support.

Along with its many cultivars, Hedera helix has proven itself to be an excellent houseplant particularly in unheated rooms.

English ivy - Hedera helix growing into the thatched roof of an old cottage
How to grow English Ivy - Hedera helix
When grown on walls or fences cut it back close to its support during February or March each year. English ivy can be pruned again during the summer to remove excessively long runners or any other unwanted growth. If growing on a house or small building wall keep an eye out for runners damaging gutters or entering the roof space. This can be a particular issue with thatched roof properties.

Note. Cuttings taken from the arborescent growth will retain its adult form and develop into rounded, bush shrubs which both flower and fruit freely.

Image credits - Simon Eade gardenofeaden@gmail.com

For related articles click onto the following links:

HOW TO GROW BANKSIA HOOKERIANA

Close up of Banksia hookeriana flower
How to grow Banksia hookeriana


Commonly known as Hooker's banksia, Banksia hookeriana is a bushy evergreen, half-hardy shrub native to southwest Western Australia. It was described by Swiss botanist Carl Meissner in 1855, and is named in honour of Sir Joseph D. Hooker (1817 – 1911) a founder of geographical botany and director of the Royal Botanical Gardens, Kew.

In its natural habitat Banksia hookeriana can be found growing on grows on deep white or yellow sand on flat or gently sloping land. Sadly it is not possible to grow Banksia hookeriana outside in the United Kingdom as it requires frost free conditions. However that doesn't mean that it can't be grown under protection of a large conservatory or glasshouse. When grown as a pot specimen provide full sun and plant in John Innes ericaceous compost or produce your own mix of equal parts loam, grit and moss peat. If grown in a greenhouse border it will perform well when plenty of leaf mould and sand are dug into the soil prior to planting in order to create well-drained conditions. This is important as Banksias require almost permanently moist conditions during their growth period, however they will quickly succumb to fungal infections in waterlogged conditions. The same can be said for high humidity and so make sure that excellent ventilation is also available. Provide a half-strength liquid soluble feed once a month from April to September and water sparingly over the winter.

If you can provide suitable soil conditions then it may be possible to grow Banksia hookeriana outside in the mildest regions of the Unite kingdom, notably the southwestern coasts of England and Ireland. However every cold protection measure will need to be applied.

In countries which experience frost-free winters then Banksia hookeriana can be grown outside. Once again they will require a free-draining, preferably neutral to acid soil in full sun.

Under favourable conditions you can expect Banksia hookeriana to reach and approximate height of 4 m and a width of 3 m. The leaves are long, narrow and serrated, and approximately 6–16 cm long by 0.5–1.2 cm wide.

The bright flower spikes, initially white before opening to a bright orange arise at the ends of branchlets, appearing from late April to October. As the spikes mature woody seed pods known as follicles develop. Like most Banksia species, Banksia hookeriana serotinous meaning that large numbers of seeds are can stored in the plant canopy for years until seed release occurs in response to an environmental trigger. In this case it is being burnt by bushfire!

Image credit - Gnangara  under the Creative Commons Attribution 2.5 Australia license.

For related articles click onto the following links:
HOW TO GROW BANKSIA HOOKERIANA
HOW TO GROW THE SNOWBERRY - Symphoricarpos albus

WHY SCARIFY A LAWN

Freshly cut verdant lawn with stripes
Why scarify a lawn?


Let's face it, scarifying lawns is hard work and I don't think that anyone would do this job willingly unless it was to reap some serious rewards in the future. So why scarify a lawn? Well the point of scarification is to keep the levels of thatch down to acceptable levels. Thatch being old grass stems, dead moss and any other such plant material taking up space at the base of your lawn.

The reason why we scarify is because a thick layer of thatch (anything larger than 1 cm deep) will impede the effectiveness of fertiliser applications and absorb rain water like a sponge preventing it from reaching the mat-like roots of your lawn - two things that can seriously affect the quality of your grass. Removing the thatch will help the grass by increases the levels of water, air and nutrients that are available to the lawn's root zone. This encourages the grass to thicken up, making it stronger and therefore less susceptible to disease. A thick layer of thatch will weaken the lawn making it more susceptible to diseases and less able to compete with common weeds and moss.

However with collection boxes on lawnmowers as standard and weed and moss killers readily available as well as cheap as chips, is there really still a need to brave the elements, wear out your arms and blister your hands?

Unfortunately the answer is yes, because lawnmower collection boxes will not collect every single grass clipping and any moss or weeds controlled by weed killers do not magically disappear. So thatch will still build up over time, although perhaps not as fast.

Ok, so if you you have made up your mind to scarify then you have two choices. The easy (more expansive) way or the hard (traditional and fitness enhancing) way. The hard way is how most gardeners scarify a lawn and that is to go over it vigorously with a spring-tine rake. A regular garden rake is not the tool for this job. The easy way is to purchase a rolling lawn scarifier, however for larger lawns and deeper pockets electric and even petrol powered scarifiers can be purchased.

Scarifying is quite and invasive procedure even for well-maintained, established lawns so don't over scarify as this can cause more harm than good. Avoid scarifying in the spring as your lawn will struggle to recover. Autumn is the best time of year to scarify lawns.

Main image credit - Simon Eade gardenofeaden@gmail.com

For related articles click onto the following links:
WHY SCARIFY A LAWN
HOW TO GET RID OF BIRD'S FOOT TREFOIL IN LAWNS

HOW TO KILL OFF IVY

How to kill off Ivy Common Ivy
How to kill off ivy

Our native English Ivy - Hedera helix, is a fantastic example of a species perfectly suited to its environment. The trouble is that it has a reputation for both strangling other plants (which it doesn't) and for damaging the mortar in brick or stone walls (which to be fair it does). While it can be argued that it doesn't strangle it will both out-compete a 'host' plant by smothering or cause it to fall down due to the sheer weight of the continuing Ivy's growth.

How to kill off ivy
How to kill off Ivy
What is undeniable is that Ivy can easily outcompete the majority of ornamental garden plants, and often reseeds itself to the point of becoming a pernicious weed. If left unmanaged it can completely cover single and two story building as well becoming a menace in both tiled and thatched roofs.

So how do you get rid of ivy? Well there are two ways, the first is the hard work organic way while the second is the easier herbicidal (using weed killers) way.

How to kill off Ivy organically

How to kill off Ivy
How to kill off Ivy
Quite simply you would cut off all growth from the base of the plant and allow the top growth to die off before removing from whatever is as attached itself to.

While you are waiting for this to happen you can spend your evening digging out the extensive though usually quite shallow root system.

If your Ivy is growing against a tree then it is unlikely that you can dig out the root system without damaging the trees root system. In this case cut the Ivy stems back to ground level year on year which over time should help to weaken it to the point of death. Alternatively you it may be able to cover the Ivy in sheets of thick black plastic - effectively smothering it over time.

You can't throw your discarded roots and still-green stems onto a compost heap as it is likely to form new growth. Arguably the best policy is to burn it once dug up or removed.

How to kill off Ivy using weed killers

How to kill off Ivy
How to kill off Ivy
Translocated weed killers can be used throughout the growing season so long as temperatures do not drop below 7 degrees Celsius.  They are best used on Ivy growing on walls, fences etc but cannot be used when growing on other leafy plants. Glyphosate products affect chlorophyll and so can be used when growing up barked trunk. Tree genera such as Juglans (Walnut), Tilia and Laburnum are not suitable as they have significant levels of chlorophyll in the stems and trunks - especially when young.

Gel treatments will perform best using a gel application while larger specimens will require a spray. Be aware that nearby plant specimens may also be at risk from the weed killer application, especially in windy conditions, and so may need to be covered to prevent accidental weed killer application.

Once your chosen treatment has been applied wait until the leaves turn brown before cutting the main branched to near-ground level. The stems can be allowed to dry off before removing, however the root system remain in the ground where over time it will naturally rot back into the soil.

For Ivy growing on trees which have had the branched removed, the remaining stump can be treated with a stump and root killer containing the active ingredient of glyphosate or triclopyr. Always read the packaging before application.

For related articles click onto the following links:
ARE CHERRY LAUREL FRUIT POISONOUS?

Over ripe cherry laurel fruits on natural stone floor
Are Cherry Laurel fruit poisonous?

They look like cherries and, when they are lying on the ground fermenting, they smell like rotten cherries. However if you have young kids or idiot dogs around, whether the fruits of the Cherry Laurel are poisonous or not is probably a question that is likely to cross your mind. Especially when you consider the huge amount of fruit drop you can get from a single mature specimen.

Native to southwestern Asia and south-eastern Europe, and sometimes commonly known as the English Laurel by the Americans (I don't understand why either), the cherry laurel -  Prunus laurocerasus is an large evergreen shrub or small tree grown for its large, glossy, leathery foliage. It is a widely cultivated ornamental plant most often used for hedging which accounts for why there are so many large, fruiting specimens around.

Surprisingly for many plant common names, the name 'Cherry laurel' is surprisingly accurate as not only are the fruits cherry-like in appearance, this species is indeed from the genus Prunus where all the ornamental and edible cherry species and cultivars reside.

So if the Cherry Laurel is so closely related to edible cherries that that mean that the fruits are not poisonous?

Well both the foliage and the fruit stones contain cyano-lipids which are capable of releasing cyanide and benzaldehyde when ingested, particularly when chewed. The fruits themselves are edible although rather flavourless and somewhat astringent. To a lesser extent the fleshy fruits also contain small amounts of hydrogen cyanide but usually not enough to cause any ill effects. That being said, if any of the fruits do have a bitter taste to them then they should be avoided as this is indicative of larger concentrations of hydrogen cyanide being present.

So to conclude, Cherry Laurel fruits are not usually poisonous but sometimes they can be, and the leaves and stones always are.

For related articles click onto the following links:
ARE CHERRY LAUREL FRUITS POISONOUS?

BANKSIA COCCINEA

Green leaves and scarlet flower of Banksia coccinea
Banksia coccinea


Probably only seen in England as a cut flower, or even more rarely as a specimen under the protection of a large glass house in a botanical garden, Banksia coccinea is a gorgeous evergreen shrub or small tree with a dramatic, erect habit and spectacular flowers. Commonly known as the Scarlet Banksia, the genus name is in honour of British botanist Sir Joseph Banks (1743 – 1820), President of the Royal Society.

Botanical illustration of Banksia coccinea
Banksia coccinea illustration
Native to the south west coast of Western Australia, its distribution ranges from from Denmark to the Stokes National Park, and then north to the Stirling Range.

Under favourable conditions you can expect Banksia coccinea to grow to approximately 8 metres in height, however outside of its native habitat 2–4 metres is more likely. It has an erect habit with little lateral spread. The trunk is generally single at the base before branching vertically further up, and is covered with a smooth grey bark. The leaves are roughly oblong in shape with toothed margins and are approximately 3–9 cm long and 2–7 cm wide.

However it is for its outstanding blooms which Banksia coccinea is best known and as such has become one of the most important Banksia species for the cut flower industry. The squat and roughly cylindrical, prominent red and white flower spikes appear mainly in the spring from the ends of one-year-old branchlets. The true flower is white and covered in grey or pale brown fur. The scarlet structures (can be dark red, orange or pink) are the styles (an elongated section of an ovary) which are 4–4.8 cm long and strongly recurved or looped until they are released at anthesis - the period during which a flower is fully open and functional.

In its native habitat Banksia coccinea will most likely be seen growing on white or grey sand in shrubland, heath or open woodland. So for successful cultivation it will require sandy, very well drained soils in Mediterranean climates where temperatures rarely fall below 0 degrees Celsius. Be aware that in regions with experience summer rainfall and humidity they can be prone to infection from fungal rots from which they can succumb to surprisingly quickly.

The most effective method of propagation of Banksia coccinea is by seed, which unlike many other species within the genus do not require any treatment before sowing. Germination will usually take 12 to 48 days but this can be longer depending on the age of the seed and growing conditions. You can expect these new plants to flower and fruit after approximately three years.

The coloured cultivars of Banksia coccinea can only be propagated by taking cuttings however they are notoriously slow to take and can often fail before rooting has taken place.

Main image credit - Cygnis insignis public domain
In text image credit - Ferdinand Bauer (1760–1826) public domain

For related articles click onto the following links:
BANKSIA COCCINEA
HOW TO GROW BANKSIA HOOKERIANA 

MULBERRY TREE IMAGES

Below are a selection of images from specimens from within the genus Morus. The illustrations are within the public domain, one image has permission granted by Mark Lane - Head Gardener to Queen Elizabeth II, while the others are files are licensed under the Creative Commons Attribution-Share Alike 4.0 or 3.0 International license. The attributes for the work in the manner specified by the authors are listed below the image are the best to my understanding but you may which to confirm these via their wikipedia listings.


Silkworm moth caterpillar eating leaves from white mulberry
Image credit - Gorkaazk This file is licensed under the Creative Commons Attribution 3.0 Unported license


Botanical illustration of Morus nigra
Image of Morus nigra illustration in public domain. Original book source: Prof. Dr. Otto Wilhelm Thomé Flora von Deutschland, Österreich und der Schweiz 1885, Gera, Germany. Permission granted to use under GFDL by Kurt Stueber


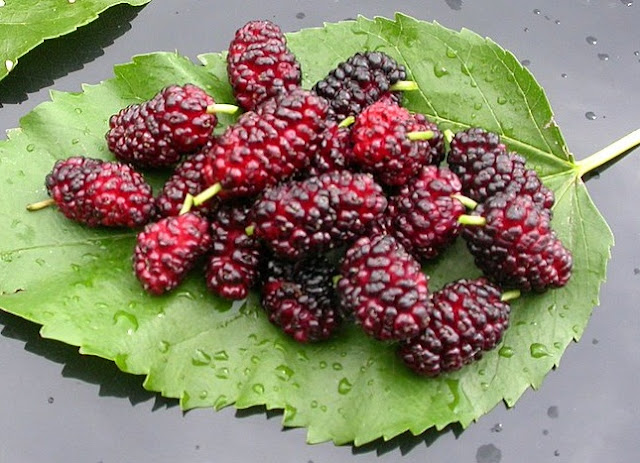
Fruit of Morus alba 'carman'
Image of Morus alba 'Carman' from the National colection of Mulberries housed at the Royal Estates. Pernission granted by Mark Lane - Head Gardener to Queen Elizabeth II


Flowers of Morus nigra
Female inflorescence of Morus nigra - Credit JJ Harrison (jjharrison89@facebook.com) licensed under the Creative Commons Attribution-Share Alike 3.0 Unported license.


Botanical illustration of Morus rubra
Illustration of Morus rubra - Public domain. Duhamel du Monceau, H.L., Traité des arbres et arbustes, Nouvelle édition [Nouveau Duhamel], vol. 4: t. 23 (1809)


White mulberry tree
Morus alba image credit - Alborzagros. licensed under the Creative Commons Attribution-Share Alike 4.0 International license.


Mature white mulberry tree at Canons Ashby House, England
Image credit - Kokai. Licensed under the Creative Commons Attribution-Share Alike 2.0 Generic license.


Morus alba fruit
Morus alba fruits image credit Andre Abrahami. Licensed under the Creative Commons Attribution-Share Alike 2.5 Generic license


Buckingham Palace London
Image credi - Diliff. Licensed under the Creative Commons Attribution-Share Alike 3.0 Unported license. In using this image or any subsequent derivatives of it, you are required to release the image under the same license. As such, any reproduction of this image, in any medium, must appear with a copy of, or full URL of the license.Attribution of this image to the author (DAVID ILIFF) is also required, preferably in a prominent location near the image.No other conditions may be added to, or removed from this license without the permission of the author and copyright holder.Suggested attribution: "Photo by DAVID ILIFF. License: CC-BY-SA 3.0"Please review the full license requirements carefully before using this image. If you would like to clarify the terms of the license or negotiate less restrictive commercial licensing outside of the bounds of GFDL/CC-BY-SA, please contact me by email, or if you don't have a Wikipedia account you can either leave a message on my talk page with your contact details and your request, or you can contact me on Facebook. Please also send a 'friend request' to ensure that I am aware of your message.

HOW TO PLANT NERINE SARNIENSIS BULBS


There are few plants that can give such an exotic display of colour in the autumn, but these bulbous perennials from South Africa are arguable some of the best. Of the 20 or so species within the genus (their classification is still ongoing) Nerine bowdenii has proven to be both the hardiest and most widely cultivated, however Nerine sarniensis, along with its cultivars and hybrids, is usually considered to be the more ornamental cousin. Nerines are usually available to purchase from quality plant retailers from September to approximately November, sometimes longer depending stock levels.

How to plant Nerine sarniensis bulbs
The trouble is that while forms of Nerine sarniensis are often available they can't be planted outside in the United Kingdom without rotting of due to the wet weather or simply dying of from the cold. The reality is that unless you are growing it in the mildest regions of the UK, as well as providing ideal conditions and a dry mulch over the winter, it will be always be best grown as a conservatory or greenhouse specimen.

That being said, outside of being brought under protection for the winter and keeping it out of heavy rain over the typical British summer they can be planted outside during their flowering period albeit in a suitable pot. So how do you plant Nerine sarniensis bulbs?

Using terracotta pots only due to their better drainage qualities and fill with a good quality, free-draining growing media made up of equal amounts of John Innes No.3, multipurpose compost and gritty sand. One bulb will be suitable for a 4 inch or 10cm pot. In larger containers space the bulbs close but not touching each other or the sides of the pot.

Three Nerine sarniensis bulbs in a pot
How to plant Nerine sarniensis bulbs
Unlike most other garden bulbs which are planted approximately 3-4 times the depth of the bulb, Nerine sarniensis bulbs will need to be planted with the neck of the bulb just exposed above the surface of the compost. Gently water in and then refrain from watering until the flower spike emerges. At this point you can sink the pot outside in a prominent border to gain the best effect fr0m it subsequent blooms.

Watering can then be increased as the stem and, later on, the leaves develop over winter. However as soon as overnight temperatures drop to below 7 degrees Celsius they will need to be moved to the protection of a heated greenhouse or conservatory.

Nerine sarniensis bulbs potted into terracotta pot and ready for sinking into the ground
How to plant Nerine sarniensis bulbs
From January to April the bulbs will require an application of a potassium-rich, liquid soluble fertiliser every two weeks. Tomato fertilisers are perfect for this. Once the foliage begins to turn Nerine sarniensis will enter its dormancy period. Place the pots out of the rain and stop the regular watering. Allow the compost to remain slightly dry over the summer period but do not allow them to become 'baked’ over the summer.

You can repot Nerine sarniensis on a regular basis at the end of each summer.

In text image credit for red Nerine sarniensis flower - By Sniffer Dogs - Own work, CC BY-SA 4.0, https://commons.wikimedia.org/w/index.php?curid=48502397

For related articles click onto the following links:
HOW TO PLANT NERINE SARNIENSIS BULBS