HOW TO GROW CORIANDER FROM SEED

How to grow coriander from seed?
Coriander is now one of the most common herbs in use today. It is superb at livening up salads and is an essential ingredient in many Asian dishes. Its recent popularity may be due in part to the plants culinary adaptability. This is because both the seeds and the leaves of the coriander plant can used in cooking. The seeds have a slight lemony flavour and are often ground up and used as a spice. The leaves however have a fresh and slightly bitter taste, and these are usually chopped up and added to dishes, soups, breads or used raw as a garnish.

How to grow coriander from seed?
Of course, coriander is easily available in supermarkets. If fact you will generally have a choice of buying it dried, pre-packed freshly cut stems or even living/growing potted plants. Be that as it may, none of these options will give you the quality of flavour that can be produced by growing your own coriander plants. Why? Well dried coriander will always lose flavour during the drying process – this is sadly inevitable. The freshly cut stems are from plants that are grown in highly controlled nursery conditions whose sole aim is to produce a product that fits a size and weight – not a quality of flavour. The same can be said for the pot grown coriander. These plants would have been fed on a computer controlled nutrient drip irrigation system and then placed under light controlled systems to help draw them up to a specific size. You may even find that that they have been subject to plant growth hormones such as gibberellic acid.

While these techniques can show excellent results when growing a plant to a required size, in the quickest possible time, they are not designed to grow a plant with the best possible flavours. However, this can be improved by repotting supermarket plants into a good quality soil based compost followed by hardening the plants off for a suitable position outside. Just be aware that it may take a few weeks before you end up with a decent tasting plant!

PROPAGATION

Coriander is easily grown from seed, but because the roots are very sensitive to disturbance they should be grown in pots, modular trays, or better still sown directly outside into their final position. Be aware that transplanting young coriander plants outside into their final position can stress them to a point where they will bolt and go to seed. Of course this is fine if you are growing coriander for its seeds, but not if you are growing coriander for its leaves! Refrain from giving coriander plants additional plant feed such as a weekly liquid fertiliser as this too will also encourage it to bolt.

How to grow coriander from seed?
Coriander seedling
If you have the protected space available then you can consider sowing coriander at any time of the year so long as average temperatures are not likely to drop below 16 degrees Celsius. This makes coriander ideal for growing indoors so long as you have a sunny windowsill or conservatory as you will need at least 4 hours of bright light per day to maintain healthy growth.

Using a suitable sized pot or container – it will need to be at least 6 inches deep so that the root system can develop – fill it with a good quality multi-purpose compost such as John Innes no 1 or 2. You may wish to mix in horticultural grit or perlite to help improve drainage. Sow seeds into holes around ½ inches deep, with each seed 2 inches apart and then lightly cover with some more compost. You can expect the coriander seed to germinate anytime from a few days up to no more than 3 weeks,. From this point on they will need to be regularly watered making sure that the soil never dries out. Just make sure that the young root systems do not become waterlogged through over watering!

If you're planning on starting your coriander seed outside then you can sow them from late April or early May onwards. This is to ensure warm soil temperatures as coriander seed will not germinate in cold weather. You may be able to start earlier that that if they are sown under the protection of a cloche or small polytunnel.

When direct sowing coriander seed outside choose a sunny, sheltered position, but one that can offer a certain amount of shade during the hottest part of the day in order to keep the foliage soft and flavoursome. If you are growing coriander predominately for its seed then you are better off sowing in full sun without any protection as the hot stressful conditions will trigger flower production far earlier.
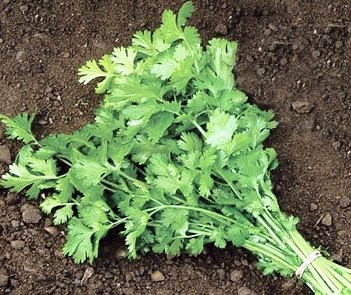
How to grow coriander from seed?
Prepare the soil by digging in plenty of organic matter such as well rotted manure or garden compost. When finished, rake over the bed until the top couple of inches turn to a fine tilth then sow each coriander seed ½ inch deep and two inches apart. Cover the seed back over with soil and water in. If you are planting in rows, space each row 1-1/2 ft apart. The seed should germinate anytime from a few days up to 3 weeks depending on the weather.

Once the germinated seedlings have reached a height of between 2-3 inches, the weaker plants can be thinned out to one plant for every 4 –5 inches. That way, each plant has enough room to grow to its full size. If you are growing the coriander for its foliage than make sure that you remove any flowering spikes otherwise the plants will direct all of their energy into producing flowers and seeds and little or no energy into producing leaves.

You can begin harvesting leave from your coriander plants once they have reached 4 inches in height. Picking the older leaves first will help to encourage further plant growth.

In order to maintain plant vigour, apply a liquid feed to the soil or compost every 2 – 3 weeks during the growing period.

TIP. Sow new batches of coriander seed every three weeks to ensure you have a continual supply during the summer.

For related articles click onto the following links:
Grow Cilantro Seed
Growing Chives from Seed
HOW TO GROW BASIL FROM SEED
HOW TO GROW BASIL FROM SEED INDOORS
HOW TO GROW CARAWAY FROM SEED
HOW TO GROW CHAMOMILE
How to Grow Chives
HOW TO GROW CORIANDER FROM SEED
HOW TO GROW COMFREY
HOW TO GROW DILL FROM SEED
HOW TO GROW HERBS FROM SEED
HOW TO GROW LEMONGRASS
HOW TO GROW LEMONGRASS FROM SEED
HOW TO GROW MINT PLANTS
HOW TO GROW OREGANO FROM SEED
HOW TO GROW PARSLEY FROM SEED INDOORS
HOW TO GROW PARSLEY FROM SEED IN OUTSIDE BEDS
HOW TO GROW SAGE 
HOW TO GROW SAGE FROM SEED
How to Overwinter herbs
TOP TEN HERBS FOR A HERB GARDEN
WHAT IS OREGANO?

GARDENING IN THE ARCTIC CIRCLE - Greenland


For those who do not already know, Greenland is the world’s largest island. It is also a mountainous country situated between the Atlantic and Arctic oceans, and while its name suggests a land covered in dense alpine woodland, it is in fact largely covered by Arctic Tundra.

The Arctic Tundra is considered to be the youngest biome in the world, having been formed a mere 10,000 years ago. To clarify, a biome is a large geographical area characterized by certain types of plants and animals. Located in the latitudes 55 degrees to 70 degrees north, this vast and treeless territory covers approximately 20 percent of the surface of the Earth, as well as encompassing the North Pole. Of all the biomes in the world the Arctic tundra is considered to be the coldest, and with less than 10 inches of rain in a year it is strangely, also the driest.


Southernmost Greenland averages about 10 degrees Celsius which is just warm enough to support some trees including the silver birch, European birch, balsam poplar and mountain-ash. With temperatures dropping the further north you go it’s not surprising that the majority of human and wildlife populations cling mainly to the ice-free shorelines of the sea and fjords. Of course, where there are human populations there are inevitably gardens of some description, and Greenland is no different. In fact Greenland is host to both ornamental and vegetable gardens even though the soil here is low in both minerals and nutrients.

Obviously, cool-season crops dominate with lettuce, cabbage and radish being the most popular choices. One brave soul has attempted to grow potatoes out of large portable cold frames. They would start the tubers under glass at the beginning of the Arctic summer (24 hours of light means they stayed warm at all times). Then once the plants reached the glass, the lids were removed and the potatoes were allowed to continue their upward growth unimpeded.

Fast growing annuals have also found their way into many of the gardens of Greenland, the most popular being pansies, violas, alyssum, stock, cornflower and calendula. Greenland gardeners are also known to take risks with more ‘exotic' plants. Perhaps the most popular is the common Iceland poppy, Papaver nudicaule. These do so well here, that they actually grow as garden escapes along suburban roadsides.

Also common in many of the gardens is the globeflower (Trollius europaeus), leopard's-bane (Doronicum orientale), orange avens (Geum X borisii), columbine (Aquilegia vulgaris) and polyanthus which are normally considered to flower in the spring – for the gardeners of Greenland however, they will be in full glorious bloom in August!

If you keep your eyes open you may even come across the odd specimen of fireweed (Epilobium angustifolium), monkshood (Aconitum napellus), angelica (Angelica archangelica) and lady's-mantle (Alchemilla sp.)

The importance of using native plants as garden flowers is not lost on Greenland gardeners either as floral display of river beauty (Epilobium latifolium), Arctic poppy (Papaver radicatum) or harebell (Campanula rotundifolia) can be every bit as attractive as many of our far warmer ‘exotic' ornamentals.

For related articles click onto the following links:
ELCHE GARDENS - The Huerto del Cura
GARDENING IN THE ARCTIC CIRCLE
GARDENING IN THE ARCTIC CIRCLE - Norway
HOW TO GROW HELXINE SOLEIROLII

HOW TO GROW LETTUCE INDOORS


If you are without a heated greenhouse and you want to get off to an early start, you can sow your lettuce seed indoors. They will grow quickly, so you may wish to skip sowing them into seed trays and instead sow them directly into small pots or compartmentalized packs. Just make sure that you use containers that are large enough for the young plants to reach garden size without the need for potting on.

Fill your tray or container with John Innes 'seed and potting' mix to within a half-inch of the rim, then tap the side of the container to help settle the mix - top up with additional compost as necessary. If using pots or cells, place a few seeds into each one, and then give a light covering of compost, firming it down gently over the seeds. If you are using a seed tray then give an even sprinkling of lettuce seeds across the whole tray at approximately 5 seeds per square inch. Once done, give a light covering of compost and water in. Label with the variety and date of sowing, and place in into a covered propagator making sure the vents are fully open. This can now be left in a bright, room, but out of direct sunlight.

Be aware that the more light the seed tray receives, the better germination of lettuce seeds you will get. Once the lettuce seedlings reach about 2 inches in height, thin out and discard any that look weak. Those in the seed tray can be pricked out and potted on into a standard potting mix. Those already in pots can be hardened off in preparation for moving outside.

To harden off successfully they can be placed into a cold-frame outside during the day but keep the lid closed for a couple of weeks. Don’t forget to bring them back in over night – especially if a frost is forecast. Afterwards they can be left out both day and night, and the lid can be left open on dry, frost free days. Just remember to shut it again at night. After a further week or so, or when frosts are no longer expected, leave the lid open day and night for a week before planting outside in to their final position.

If your seedlings have been grown in a heated room then they will need to be hardened off earlier by moving them into a bright unheated room for a week or so first.

For related articles click onto the following links:
GROWING ROCKET FROM SEED
HOW TO COLLECT AND PREPARE LETTUCE SEEDS FOR PROPAGATION
HOW TO CONTROL FLEA BEETLES ON LETTUCE
HOW TO GROW AMARANTH FROM SEED
HOW TO GROW LETTUCE FROM SEED
HOW TO GROW LETTUCE INDOORS
HOW TO GROW LETTUCE OUTSIDE
HOW TO GROW ROCKET FROM SEED
ORGANIC CONTROL OF APHIDS ON LETTUCE

HOW TO GROW ASPARAGUS FROM SEED INDOORS

How to grow asparagus from seeds indoors


When buying new asparagus plants, most plant retailers will only offer a small range of one or two year old plants. Although they will always look healthy in the pots, there is always a risk of failure when it comes to transplanting. This can be as much as 10%-15% for one year old stock and as high as 20% for 2 year old stock!

How to grow asparagus from seed
When paying full retail prices - particularly with regards to 2 year old stock - this can end up being an expensive lesson.

Growing asparagus from seed - either in pots or directly into the beds – will not only give you the best viability - with a survival rate of around 100% - it is also the cheapest way to obtain new stock. In addition, with direct sowing there is no transplanting or root shock to delay valuable root development.

The best time to sow asparagus seeds outside is around mid-April when the ground is warm enough to initiate germination.

However, you can begin germinating asparagus seed as early as late February if you sow them under the protection of a warm windowsill or greenhouse.

Remember they will need to be hardened off before they are planted outside in to their final position.

SOWING INDOORS

Some asparagus varieties like the popular 'Connover's Colossal are best sown indoors and as mentioned, this can be done any time between February and March.

A good tip is to soak the seeds in water for a couple of hours before planting as this will help to speed up the germination process considerably. When ready, plant the prepared asparagus seed into individual pots containing moist John Innes seed compost.

How to grow asparagus from seed
These can now be placed in a warm room at approximately 15-18 degrees Celsius. Once the new asparagus seedlings begin to germinate, they will need to be moved to a cool, light area such as a windowsill, but keep them out of direct sunlight.

Once the threat of frosts are over they will need to be gradually accustomed to conditions outside - this known as 'hardening off' and can take between 2-3 weeks.

Once they are ready to be moved out into the asparagus bed proper, they can to be planted fairly deeply leaving a couple of inches of soil above the level of the compost. Keep them nicely watered over the summer period and - as always - keep the bed free of weeds, especially perennial weeds which will compete with your seedlings roots for nutrients.

Growing your own plants can delay establishment of your bed by an additional year, but it does ensure that you are starting with new crowns that have not lost any of their vigour through being lifted, stored and shipped.

However, not only will you have a larger selection of varieties available to you, if you choose your varieties wisely you will still be able to harvest in their second year.

Main image credit - Ryan Freisling released this work into the public domain.
In text Image credit - Permission granted to use under GFDL by Kurt Stueber. This work is in the public domain in its country of origin and other countries and areas where the copyright term is the author's life plus 70 years or less.

In text credit - Attribution: Photograph by Longhair https://creativecommons.org/licenses/by/2.5/deed.en

For related articles click onto the following links:
ASPARAGUS SOUP
HOW TO GROW ASPARAGUS FROM SEED INDOORS
HOW TO GROW ASPARAGUS FROM SEED
HOW TO GROW ASPARAGUS PEAS FROM SEED
HOW TO PLANT ASPARAGUS CROWNS
HOW TO PREPARE AND MAKE AN ASPARAGUS BED
ORGANIC CONTROL OF ASPARAGUS RUST

GARDENING IN THE ARCTIC CIRCLE - Norway


High up on the north coast of Norway and 200 miles inside the Arctic Circle is the worlds most northerly botanic garden. It sits on the small, low lying island of Tromso, a rugged piece of land that is covered in snow for much of the year. It is also highly remote as its only connection to mainland Norway is a single bridge.

The botanic garden found here is not only relatively new – only opening in 1994, it is also relatively small. Excluding a large area or natural woodlands it covers no more than 5 acres of cultivated ground. Luckily, the cold, moist climate of Tromso is moderated by a branch of the Gulf Stream and this makes for relatively mild winters (the January average is -4.4 Degrees Celsius) and cool summers (the July average temperature 11.7 Degrees Celsius), otherwise nothing would grow!

Unlike most other botanic gardens, tromso is essentially a large rock garden containing nigh on 560 different plants within its collection – many of which have been sourced from the gardens of local islanders.

Plants need both light and warmth to survive so in a land where it can remain in daylight – or darkness - for months at a time, maintaining a botanic garden here creates huge challenges. Of course this is not a problem unique to Arctic gardeners. In days gone by the islanders had to develop ingenious way of keeping their culinary plants alive over the long and dark winter periods. This meant storing living plants in animal bladders and stomachs to help see them through the winter.

For the Tromso botanic garden to be both manageable and successful it is key to have plants that will tolerate the extremes of this harsh environment. With the additional pressure of winters lasting up to 7 months it is down to a wide selection of alpine plants to bring the majority of form and colour to this stunning environment. In truthfulness, despite the long cold winters these specialist mountain plants do well here as they get a chance to rest before next season’s growth.

Tromso is on the same latitude as Greenland which - without the benefit of the Gulf stream – is too cold to allow anything to grow. But during the relative warmth of an Arctic summer, plants more commonly found in the south of England - such as the Dog rose, lilacs and cow parsley - are able to flourish and bloom.

Part woodland, part alpine meadow, Tromso is clearly a living work of art that is constantly on the move, forced on by the relentless Arctic seasons. So long as you can visit when the sun is guaranteed to be up you can be sure of a unique and spectacular show.

For related articles click onto the following link:
ELCHE GARDENS - The Huerto del Cura
GARDENING IN THE ARCTIC CIRCLE
GARDENING IN THE ARCTIC CIRCLE - Greenland
HOW TO GROW HELXINE SOLEIROLII

HOW TO MAKE JOHN INNES COMPOST


John Innes Composts are a blend of carefully selected loam or topsoil, sphagnum moss peat, coarse sand or grit and fertilisers. The loam is screened and sterilised and then thoroughly mixed with the other ingredients in proportions designed to achieve the optimum air and water-holding capacity and nutrient content for different types and sizes of plants.

John Innes Base Fertiliser is the name coined at the John Innes Research Institute in the 1930's for a ready mixed blend of hoof and horn, superphosphate and potassium sulphate for mixing with loam, peat and grit to make John Innes Loam-based Potting Composts.

The following lists gives the formulae for the Composts - the proportions of the substrate are measured by volume, with loam and peat passed through a 9mm sieve. For the No. 1,2 and 3 composts the John Innes base fertilizer consists of 2 parts Hoof and Horn for the Nitrogen (N), 2 parts Superphosphate for roots (P)and 1 part Potassium Sulphate (K) for flowers and fruit. This is balanced with one part ground limestone (CaCO3) to provide an optimum pH.

For growing seeds, cuttings and ericaceous or calcifuge plants (plants which require acidic conditions) the proportions vary and for the latter the ground limestone is replaced with an equal quantity of Flowers of Sulphur which lowers the pH.

Compost Substrate Fertilizer rates for the John Innes base are per each cubic metre of mixed compost.

John Innes No. 1

7 parts loam
3 parts peat

2 parts sand 0.6kg ground limestone

1.2kg hoof and horn,1.2kg superphosphate

600g Potassium Sulphate


John Innes No. 2

7 parts loam
3 parts peat

2 parts sand 0.6kg ground limestone

2.4kg hoof and horn

2.4kg superphosphate

1.2kg Potassium Sulphate


John Innes No. 3

7 parts loam
3 parts peat

2 parts sand 0.6kg ground limestone

3.6kg hoof and horn

3.6kg superphosphate

1.8g Potassium Sulphate


John Innes Seed Compost

2 parts loam
1 parts peat

1 part sand 600g ground limestone

1.2kg Superphosphate


John Innes Cutting Compost

1 parts loam
2 part peat

1 part sand no added fertilizer


John Innes Ericaceous Compost

2 parts loam
1 part peat

1 part sand 600g Flowers of Sulphur

1 part superphosphate


Mixing is more easily performed if the ingredients are not too moist so that the particles do not stick together and so become more evenly distributed. Storage should be kept to a minimum as the nutrient balance will change due to the Nitrogen being mineralised by bacteria to unavailable Nitrate (NO3=) ions.

For related articles click onto the following links:
HOW CAN YOU IMPROVE CLAY SOILS
HOW TO COMPOST
HOW TO MAKE JOHN INNES COMPOST
HOW TO MAKE A LEAF MOULD COMPOST
HOW TO MAKE LIQUID FERTILIZER FROM COMFREY
WHAT ARE PLANT MACRONUTRIENTS AND MICRONUTRIENTS

HOW TO GROW LETTUCE OUTSIDE


You can’t have a decent salad without a good helping of fresh, crisp, and flavorsome lettuce – at least not in my book, and if you buy your lettuce from the supermarket you are likely to be disappointed. Cold stored and packed in a special atmospheric environment – any flavor and healthy goodness would have disappeared days before you open the packet!

So what’s the answer? Grow some in your garden from seed. It couldn't be easier as lettuce seed will actually germinate on a piece of damp paper towel! Be that as it may, growing lettuce outside involves a bit more work but you will be pleased to know that it is still very easy. Just follow the pointers set up below.

To begin with, lettuce seeds can be planted directly outside. They just need a free draining, humus rich soil that will hold plenty of moisture in the summer.

To prevent the common physiological disorder of 'Tip burn' that can be experienced with some soils, you may wish to add some lime before planting. Preparation to sowing lettuce seeds can begin as early as autumn or early winter by digging over the soil and adding plenty of organic compost (such as leaf mold or well rotted manure). Then a week or so before sowing your lettuce seed, rake the soil over to produce a fine tilth. You may also wish to apply a general fertilizer at this time.

Although Lettuce plants like plenty of light they do not like extremes of heat as this can also result in the physiological disorder 'Tip burn'. Although any lettuce seeds sown early should be fine it's advisable to plant your summer harvest in a lightly shaded site.

When sowing spring lettuce seeds outdoors, it is best to wait until the worst of the frosts are over. Choose a sheltered sunny site but by sowing lettuce seed this early you may need to give them the protection of a small poly-tunnel. If you are starting them off into seed beds, sow the seeds very thinly in ½ inch deep drills but leave about 6 inches between each row. If you are sowing them directly into the open ground then leave between 10 and 12 inches between rows.

To avoid having a glut of lettuce and to ensure that crops are regularly coming into harvest, make successive, smaller applications of lettuce seeds, at 1 or 2 week intervals depending on how much you intend on using. Depending on the variety it can take any time between 6 and 14 weeks from applications to become ready for harvest, so if you are growing from packet seeds - always read the label.

Once the lettuce seedlings get to about 2 inches high they can be thinned out to leave a gap of about 6 to 12 inches between each plant - depending on the overall size of the variety grown. If you are planning on transplanting seedlings grown indoors into open ground then this is an ideal size to do this.

For related articles click onto the following links:
GROWING ROCKET FROM SEED
HOW TO COLLECT AND PREPARE LETTUCE SEEDS FOR PROPAGATION
HOW TO GROW AMARANTH FROM SEED
HOW TO GROW LETTUCE INDOORS
HOW TO GROW LETTUCE FROM SEED
HOW TO GROW ROCKET FROM SEED
HOW TO CONTROL FLEA BEETLES ON LETTUCE
ORGANIC CONTROL OF APHIDS ON LETTUCE