WHAT IS THE TULIP BREAKING VIRUS?

What is the Tulip Breaking Virus?

The 'Tulip Breaking Virus' is an almost a mythical disease that had confounded tulip breeders for centuries. Responsible for the stunning colour breaks in single, block colored tulips these 'broken' color tulips were a major factor in the financial madness that occurred during the Tulip mania period of 1636-1637.

During this time ownership of these rare specimens was a reflection of your wealth and standing within society, and for a short period also made good business sense. The introduction of single colored bulbs infected by the Tulip Breaking Virus caused an immediate sensation Up until then, the majority of contemporary tulips - although bold in color - were only ever a single color, ie if they were red then they would be a block of red coloration, if they were yellow then they would be a block of yellow coloration. With the introduction of the new 'broken' tulip - this meant that the tulips lock on its single bold color was broken allowing unique color variations never seen before.

What is the Tulip Breaking Virus?
We already know that tulips had been popular right across Europe for several centuries with the first specimens traded through the Ottoman Empire. So when these rare and incredibly beautiful new strains arrived, there was a market for them ready and waiting. It's no wonder that these stunning bulbs were so sought after and commanded such extraordinary prices.

For centuries, generations of Europe's top Tulip breeders believed that it was environmental conditions that cause these single color tulips to break. It was generally believed that these unique coloration could be induced by either frequently changing the soil, allowing the bulb to weaken by allowing it to seed, or storage on exposed condition s so that the bulb would be 'acted' upon by the rain wind frost or sun. Eventually it was series of experiments by Dorothy Cayley that led to the discovery of the 'Tulip Breaking Virus' began in 1928. Working at the John Innes Horticultural Institution, She discovered that by transferring infected tissue from broken bulbs to healthy bulbs during their dormant state, the infective agent that caused the break in color would also be transferred. These experiments were further refined to include the tiny amounts that could be transferred by an insect which became her final deduction. The virus was eventually proven to be transferred by the following aphid species; Myzus persicae, Macrosiphum euphorbiae, Aphis fabae, Aphis gossypii, Dysaphis tulipae, and Aulacorthum circumflexum.

The transfer of the virus is simple, as the aphid bites into an infected plant, small amounts of the virus are left in it mouthparts. When the aphid moves to another host the virus enters the plant's vascular system when the aphid once again starts to feed

Typically, the symptoms of the Tulip breaking virus caused color breaking on the petals of pink, purple and red flowered cultivars although yellow and white colored varieties are not affected. This 'breaking' can take the form of conspicuous white or yellow streaking across the petals or streaking of a darker shade compared to the original color. Sometime you may see a combination of the two effects, and on rare occasions you may come across mottling or striping of the plants leaves.

Unfortunately there is a serious downside with the virus as it has a detrimental effect on the bulb itself. Infected bulbs will often grow stunted and weak, and as the virus progresses through each generation of plant the bulbs, it reduces their vigor, making them difficult to propagate. Eventually the bulb has no strength left to flower, eventually withering to nothing and ending the genetic line. It's for this reason alone that some of the most famous examples of color broken bulbs - the 'Semper Augustus' and the 'Viceroy' - are no longer in existence.

In many countries such as Great Britain, bulbs infected by the virus are illegal for sale to prevent it from spreading and weakening cultivated stocks. Control of the Tulip breaking virus is also notoriously difficult to control although perhaps the best means of treatment is to remove and burn infected plants as you see them. As a precaution, do not plant tulips next to lilies as they are also able to carry the virus, allowing cross contamination to occur.

There are a small number of tulips dating from the Tulipmania period that are still in existence today, some are even available to buy for only a few pounds at your local plant retailer. However, and rather surprising, there are a few varieties of 'broken' bulbs whose worst aspects of the viral infections have remained benign. One such example is the rare Tulip 'Absalom' that is still around today and is shown in the photograph above. However, like the Rembrandt tulips, there are many copies around that try to rekindle the look of the old Dutch greats - many of them are poor imitations but there is one - Tulip 'Rem's Sensation' that does at least get close.

In the 21st century there appears to be only one place where the breeding of broken Tulips is alive and well and that is 'The Wakefield and North of England Tulip Society' - the last of the great Tulip Societies in Great Britain.

Main image credit - Simon Eade - gardenofeaden@gmail.com
In text image of Semper Augustus in public domain

For related article click onto the following links:
DO BLACK TULIPS REALLY EXIST?

HOW TO GROW ONIONS FROM ONION SETS


How to grow onions from onion sets


Growing onions from onion sets is probably the easiest way to produce a fantastic crop of quality onions, and in most cases you will be able to achieve better success this way when compared to growing onions from seed. Why? Because most of the hard work has been done for you.
.
How to grow onions from onion sets
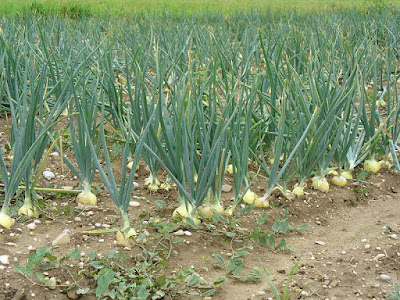
To begin with, start with a sunny site that has good drainage, but the key is to grow them in a permanent bed that is maintained year on year in order to build up the soil fertility.

There is a downside to this however as you can also encourage the buildup of soil pests and diseases. Therefore, some advise that you to rotate your onion bed with the rest of the vegetable garden. If you are starting fresh, avoid soils that have been planted with onions within the past three years, and because onions are shallow rooted and poor competitors with other plants, try and avoid sites with a history of perennial weeds.

It certainly is possible to grow onions on the same bed year after year, but in order to maintain successful and healthy cropping a strict health routine must be followed. If there are any onions that you suspect are harbouring any kind of disease then remove not only the plant, but also a small amount of soil from where the onion was growing.

Hopefully this will eliminate any unwanted bacteria in the soil. With this in mind, it is also worth watering the bed with a dilution of Jeyes fluid once the crop has been harvested - this again will help to kill any unwanted bacteria or fungi.

There are onion beds that were started over 140 years ago that are still in production today using this method!

How to prepare an onion bed
.
How to grow onions from onion sets
If you can, start preparing your onion bed in the autumn by digging in plenty of well-rotted farm manure.

This will give the ground a chance to settle over the winter period and allow frosts to break down the soil clods.

If your soil is too acidic, below pH 5.5, you will need to add lime to the bed according to manufacturer's recommendations.

In general, onions prefer a pH of between 6 and 7.5, and a fine tilth to be planted into. Weather permitting, the frosts should do a good job of this.
.
You can plant onion sets as soon as your soil will allow you to which can be anytime from late February, but you can steal a march here by picking a dry day a few weeks before planting and raking the soil to a fine tilth.

Onions like a firm bed so tread over the area you have just raked.

Try adding a general fertiliser like growmore for extra fertility, and for an even earlier crop you can plant onion sets under protective cloches at the end of January.

There is an advantage that can be gained by setting up cloches before planting.

If cloches are placed over the ground prior to planting, the ground has some time to warm up, reducing the chances of a check in growth. The soil may require some watering to achieve a uniform moisture before planting onion sets, but try and avoid planting them into a dry bed.
.
Plant onion sets 4 inches apart in rows about 1 foot apart and plant them to a depth where only the very tips of the sets are just showing through the soil. Dig a hole in the soil with a trowel and place them in the hole with their necks uppermost. Do not just push them into the soil as they may grow out of the soil as the season progresses.
.
Micro-nutrients are also important in onion production - in particular boron and zinc - so look at giving your onions a periodic liquid feed of seaweed based fertiliser. However if your onions are clearly growing well then this will probably be unnecessary.
..
You will need to keep a particular eye on newly emerging onion shoots as these will often attract the attention of inquisitive birds (particularly pigeons and blackbirds) who will lift your juvenile plants straight out of the seed beds for nothing more than a little mischievous fun.

If you don't have some kind of protection in place you can end up losing almost an entire crop!

Onions are not very good at suppressing weed growth, and if regular weeding is neglected they will easily be out-competed for nutrients. This will result in your crop becoming stunted.

If you can leave enough space between the rows to get your hoe in for weeding. However, always hand-weed any weeds close to your onions as they are easily damaged by garden tools.

To have a year-round supply, you can make a second planting during the late summer which should be ready to harvest from June, although a second planting isn't recommended in heavy, poorly drained soils.

Main image credit - © User:Colin / Wikimedia Commons / CC BY-SA 3.0 - cropped
Red onion image - Stephen Ausmus, USDA ARS, This image is in the public domain because it contains materials that originally came from the Agricultural Research Service, the research agency of the United States Department of Agriculture.
Onion field credit - Rainer Haessner https://creativecommons.org/licenses/by-sa/3.0/deed.en

For related articles click onto the following links:
Grow Giant Onion Seed
ALLIUM GIGANTEUM
Growing Chives from Seed
Gardeners world onions
How to Grow Giant Pot Leeks
HOW TO GROW JAPANESE ONION SETS
HOW TO GROW ONIONS FROM SEED
HOW TO GROW ONIONS IN AFRICA
HOW TO GROW WELSH ONIONS
HOW DO YOU PLANT OUT ONION SEEDLINGS?
WHY DO ONIONS MAKE YOU CRY?

PESTS AND DISEASES OF WATERCRESS

Pests and diseases of watercress


With regards to watercress, it’s worth noting that they don't suffer too much from pests or disease but should you be unlucky enough for your plants to become infected by a fungal infection, it is likely only to occur at the propagation stage rather than on mature plants in their aquatic environment - with the exception of crook root. Therefore, it is particularly important to apply good high standards of hygiene during the propagation stage in order to minimize the need for subsequent chemical use. Be aware that watercress diseases tend to be most prevalent during dull, cool weather when the crop is unable to grow away.
.
DAMPING OFF (Pythium species)

Cause: This is very common fungal infection which is implicated in the disease commonly known as 'damping off'. When propagating seed in damp soil, the soft underground plant tissues can be attacked particularly if conditions are extremely and if plant growth is slow. Any aerial parts of the plant should remain unaffected unless they have contact with the soil.

Symptoms: You will typically lose part – or in extreme cases – all of the root system and your plants (rather obviously) will begin to lack vigor. Some Pythium species only attack the root tips, which can turn from white to brown and ending with their eventual collapse.

Treatment: Washing and disinfecting seed trays will help to minimize disease risk. Compost should always be kept from sources that may have been exposed to the fungus, e.g. by contaminated dust, or water , and your watering supply must also be kept free from sources of infection.

CROOK ROT

Cause: This destructive fungal disease invades the plants by means of spores that penetrate the root cells. This fungus then goes on to systematically invade the leaves and stems of young shoots. The organism will also multiply within the root, producing large numbers of viable spores. At certain stages during its life cycle, only dormant spores are produced which are highly resistant to poor environmental conditions. When favorable conditions return, the dormant spores become active, and become released into the environment where it can infect more host plants. Crook root is especially most damaging in winter when watercress is growing more slowly.

Symptoms: Once the fungus reaches the new growth, the plant will begin to produce swollen and malformed, leaves and stems. As the disease moves into the secondary shoots, these will become stunted resulting in malformed plants.

Control: There are no chemicals that can be used to control this pathogen, however you can try purging your watercress with large volumes of water as this can reducing the rate of infection by washing away the viable spores.

FLEA BEETLES

Cause: This is perhaps the most recognized pest of watercress due to the immense, characteristic damage that these beetles can cause.

Symptoms: These beetles can cause significant damage by leaving copious amounts of small holes in the leaves. This normally serious infestation is usually experienced at two distinct times of the year, usually in April and July.

Control: Beetles can be removed by submerging your crop of watercress for about 2 hours. This causes the beetles to float off, at which point they can be skimmed off the surface of the water. You can also consider “trap crops” such as radish which may help lure the flea beetles away from your watercress. With the appropriate equipment – and if you don’t have too many plants - Flea beetles can be vacuumed off the foliage. However this must be repeated frequently to avoid another invasion of your plants.

MUSTARD BEETLE (Phaedon cochleariae)

Causes: Like flea beetles, adult mustard beetles can lead to an almost continuous infestation of watercress throughout the summer.

Symptoms: Eggs are not laid on Watercress so damage is limited to the leaf and by the feeding adult beetles.

Control: Again, these beetles can be removed by flooding the cropping beds for about 2 hours to allow them to naturally float off before being skimmed off the surface of the water.

APHIDS

Cause: Most aphid infestations are caused by the black bean aphid or the Peach blossom aphid (Myzus persicae).

Symptoms: Aphids generally feed on watercress over the summer, but severe infestations may cause serious losses. They damage and weaken the plant by sucking the sap out of pressurized parenchymal cells found just below the leaf's surface. Clusters of these small insects are readily identifiable, normally at the plants tips or on the underside of their leaves. In severe cases, the infected parts can begin to curl down due to the quantity of sap being removed from that area. Aphids will also excrete honeydew which causes leaves to first become sticky and shiny. They eventually turn black because of a sooty-mold fungus growth.

Control: There is no chemical control that is recommended against use on watercress, however using trap crops such as lettuce or bedding nasturtiums may help to entice aphids to these alternatives rather than to your edible crop.

Main image credit - HealthAliciouNess.com https://creativecommons.org/licenses/by/3.0/deed.en

For related articles click onto the following link:
GROW WATERCRESS SEED

WATERCRESS - Nasturtium officinale

European watercress - Nasturtium officinale

The European watercress - Nasturtium officinale, has been eaten as part of the human diet as far back as history can record. Fortified with more than 15 essential vitamins and minerals, even since ancient times its health giving properties have been highly valued. In fact Hippocrates - the Father of modern medicine - is said to have deliberately located his first hospital beside a stream so that he could grow a plentiful and convenient supply of watercress with which to help treat his patients.

Through the latter half of the twentieth century the popularity of watercress had been falling, mainly due to increased competition from imported and more exotic ‘fresh produce’. However since its identification as a ‘super food’, watercress has been experiencing something of a revival and has now become one of the most popular salad crops available today.

Low growing and trailing, the perennial European watercress is a member of the mustard family which is no surprise when you consider its delicious peppery taste. In its native habitat, watercress easily naturalizes in springs, streams and even boggy ground, a habit that makes it a particularly undemanding plant to grow in the garden. Although it is easily propagated from seed, it is usually produced from stem sections which readily take root in wet soil. If you are feeling particularly lazy, you can throw a rooted stem into any body of slow moving water and can expect it to grow with no further involvement.

Although there is a lot of good identified with the consumption of watercress there is a word of warning to those of you who intend collecting watercress from the wild. Dirty streams can make watercress unfit to eat and so as a rule of thumb - if you wouldn't drink the water, you shouldn't eat the watercress. More importantly though is collecting watercress from bodies of water found near to where sheep and cattle are farmed. Water that has come into contact with their dung can cause watercress to become contaminated by liver flukes. Acute infection from liver flukes will cause severe abdominal pain, intermittent fevers, eosinophilia, malaise, and weight loss due to liver damage.

Main image credit - HealthAliciouNess.com https://creativecommons.org/licenses/by/3.0/deed.en

For related articles click onto the following links:
BBC: WATERCRESS
GROW WATERCRESS SEED
.

WHAT ARE PLANT MACRONUTRIENTS AND MICRONUTRIENTS


What are plant macronutrients and micronutrients


The problem with plant nutrients is that there are so many of them. You have your macronutrients – nutrients that plants require large amounts of, and then you have your micronutrients – nutrients that plants require only in small quantities. The main macronutrients Nitrogen (N), phosphorus - phosphates (P), and Potassium (K) are commonly found listed on the sides of packaged fertilizers either as a percentage or ratio N:P:K, but there are others - see listed below. Each nutrient is in fact an element and found within the periodic table and the capital letters (shown in brackets) are those assigned to each element.

Macronutrients

(H) Hydrogen - Essential for photosynthesis

(C) Carbon - Essential for photosynthesis

(O) - Oxygen - Essential for photosynthesis

(N) Nitrogen - A vital constituent of amino acids, proteins, nucleic acids etc

(K) Potassium - A building block for 40 or more enzymes, and also has a important role in stomatal movement. Potassium also helps to maintain electroneutrality in plant cells.

(Ca) Calcium - A vital constituent of plant cell walls amongst others.

(Mg) Magnesium - This is required non-specifically by a large number of enzymes and is also a vital part of the chlorophyll molecule.

(P) Phosphorus - This is a vital component of sugar phosphates, nucleic acids, coenzymes etc.

(S) Sulphur - A vital component of proteins, lipoic acid, coenzyme A, thiamine etc.

The list of micronutrients that plants can use is huge - numbering 72, but the most important ones to be aware of are iron, copper manganese, zinc, molybdenum, and chlorine. If your soil is deficient in any of these you will experience characteristic physiological symptoms on the leaves of your plants. This is because without these vital nutrients the plant is unable to make those critical proteins and enzymes required to function. This is also called the 'Law of the Minimum' because plants can only grow as the minimum available nutrient will allow.

Important Micronutrients

(Cl) Chlorine - This is required for the photosynthetic reactions involved in the production of oxygen

(B) Boron - Used for carbohydrate transport within the plant and also forms complex molecules within certain carbohydrates

(Fe) Iron - Vital for nitrogen fixing and respiration, iron is also a constituent of cytochromes and iron proteins involved in photosynthesis.

(Mn) Manganese - This is required non-specifically for a large number of enzymes as well as for the production of oxygen during photosynthesis.

(Zn) Zinc - This is a vital constituent for a number of important enzymes such as glutamic and alcohol dehydrogenase.

(Cu) Copper - This is an essential component of - amongst others - ascorbic acid oxidase, tyrosinase and monoamine oxidase.

(Mo) Molybdenum - This is an important constituent of nitrate reductase and is essential for nitrogen fixation.

Main image credit - Holger K at English Wikipedia and released into the public domain by its author

For related articles click onto the following links:
HOW TO MAKE A LEAF MOULD COMPOST
Macronutrients and Micronutrients
WHAT CAUSES BLUE HYDRANGEAS TO TURN PINK?
WHAT IS A LEAF MOULD COMPOST?
WHY DO LEAVES CHANGE COLOUR IN THE AUTUMN FALL

GARDENING JOBS FOR APRIL


Gardening jobs for April


Bulbs, corms and tubers

With overnight temperatures on the rise it should be safe enough to plant most tender summer-flowering bulbs directly into the garden. So long as they are planted deep enough - approximately 4 inches or so - they should be more than insulated from the odd mild frost. However should you have a return of the cold weather, rather than try and lift all that you have just planted, give them an additional, good couple of inches of mulch instead. Even a hard frost will have difficulty in reaching that far into the ground.

In milder areas like the southern areas of Great Britain, dahlia tubers can also be planted outside, again about 4 inches deep. However, any further north and you should wait another month to be on the safe side.

To help encourage strong flowering from your daffodils next year, deadhead any old flowers as soon as they begin to fade. That way the bulbs won't waste valuable energy in producing seeds. Allow the leaves to die back naturally as this is an important way for the plant to absorb nutrients back into the bulb proper. You may also wish to give them a periodic liquid feed at this time.
.
Sweet Peas
.
Sweet peas can be sown outside this month, although in colder areas they will be best started off in a cold frame. Some types may have a natural dormancy period which can be easily broken by gently rubbing the seed coat with sandpaper or soaking them in water for 24 hours to help bring forward germination. Sweet peas do have a tendency to grow rather spindly so once the have reached about 6 inches or so it’s best to remove the growing tip - only the top couple of leaves are necessary- to allow the production of lateral growth further down. The extra shoots that are produced from will result in far more flowers later.

Lawn Maintenance

Months of wet weather would have caused moss to become a problem in many lawns. The worst affected will be those lawns that suffer from shade, poor drainage and from being grown on acidic soils. The biggest problem with moss - although unsightly - is that it can quickly smother, large areas of lawn and so action is needed as soon as it is recognised in order to remove it and to help improve the growth of the existing grass. Chemical moss killers can be used to destroy existing moss, but this will still need to be raked out, although on large lawns you would be better off using a powered scarifier. Don't be surprised if you find that far more of your lawn has disappeared than you first expected. Afterwards, fork over the whole area to improve surface drainage, although for best results use or hire a hollow tine aerator.
.
Increase the frequency of mowing to encourage basal growth, apply 'moss, feed and weed' fertiliser and regularly check for perennial weeds - digging out any that you find. For shaded patches where grass has died out through moss, this is an ideal time to start re-seeding. Look out for specific ‘shade’ mixtures of grass seed and apply using manufacturer's instructions.

Salads and Vegetables

Now is a great time to start sowing your new season salad crops, but don’t stop there as you can keep sowing salad varieties every couple of weeks to maintain a rolling crop. The first ones to consider for early sowings are radish, mixed lettuce, rocket salad, baby spinach and spring onions. Sow them outside from March but try and keep them under some sort of protection as this will help to keep the edible foliage sweet and tender. From early April include mangetout, broad beans, beetroot, parsnips, onions, peas, spinach, turnips and hardy herbs. You can sow brussels sprouts, summer cauliflower and cabbage in seedbeds so that they are ready to transplant to their final positions in May.

Onions, leeks and garlic

All things ‘oniony’ can be planted out now but you need to keep a particular eye on their newly sprouting shoots. These will often attract the attention of inquisitive birds – particularly pigeons - and they will lift your juvenile crops straight out of the seed beds for nothing more than a little mischievous fun. If you don't have some kind of protection in place you can end up losing almost an entire crop! Onion sets or seedlings that have already been grown on in pots or trays can go straight into outdoor beds now. Grow them in rows, leaving space between the rows to get your hoe in for weeding. However, always hand-weed any weeds close to your onions as they are easily damaged by garden tools.

Plant out individual cloves of garlic - placing them about 2 inches deep and 6 inches apart – into mounded rows as this will help with the all important drainage. Sow leeks into nursery beds outside, and these can be transplanted out during the summer into their final rows. 

Soft fruit

Although currant bushes, blackberries, raspberries and other hybrid berries would normally have been fed by a good mulch of well-rotted farm manure in January or February, they can still benefit from a further feed with a high nitrogen fertiliser such as sulphate of ammonia. Always look out for the manufacturer's recommendations for application rates.

For related articles click onto the following links:
GARDENING JOBS FOR JANUARY
GARDENING JOBS FOR FEBRUARY
GUARDIAN: Gardening jobs for April
Gardening Jobs for October
Gardening Jobs for November
HOW TO GROW PARSNIPS FROM SEED

WHAT IS BLOSSOM END ROT ON TOMATOES

What is blossom end rot on tomatoes

Blossom end rot is perhaps the most common physiological disorder you will experience with growing tomatoes. Typically it shows itself as a circular, dark brown patch of skin found at the flowering end of the fruit – hence the name. As the fruit grows this unsightly dark patch gradually toughens and shrinks back into the fruit.

What Causes Blossom End Rot?

This disorder is caused by a deficiency of calcium within the plant and its relatively poor mobility through the plant tissues. This is important as calcium is not only a valuable component within the plant cell walls and is also vital in the production of new cell walls and the normal function of plant membranes.

Because of this, the problem of calcium deficiency is most noticeable in areas where there is significant cell division, and when you consider the rapid growth generated in the production of a tomato fruit it is understandable why cell death (necrosis) can occur in this region when the availability of calcium is restricted.

Calcium deficiency should not be confused with lack of availability as its uptake can be inhibited by high levels of potassium, magnesium and /or ammonium-nitrogen within the root environment. Surprisingly other factors that can inhibit the uptake of calcium can include water stress and high humidity. To a lesser extent boron deficiency can also be a factor as it is needed for the transport of calcium within the plant's tissues.

How to Treat Blossom End Rot

There is no magic bullet to deal with blossom end rot and this is because of the complex inter-relationships that calcium has with other elements within the plants cells. However a holistic approach is normally best although signs of improvement are usually slow to appear.

It's probably worth doing a pH test first as acidic soils have naturally lower levels of calcium compared to alkaline soils. If this is the case then apply lime to the soil, but go by the manufacturer’s recommendations according to soil type - try to end up with a soil pH of about 6.5. You can also consider spraying the affected fruit with solutions of calcium nitrate or calcium chloride. This is applied at a concentration of 2 grams per litre on a fortnightly basis.

In the greenhouse environment it's important to keep humidity levels low, so make sure there is good ventilation throughout the growing space. Air circulation can be further improved by removing the older, lower leaves from the base of the plants.

Never apply fertilizer to dry soil and any irrigation that is in place must be sufficient to maintain a good, steady, growth rate for the plants – this is particularly important during the summer period. For outdoor tomatoes, giving the soil a good mulch can be very helpful in maintaining water levels in the soil especially in times of moisture stress. When feeding your plants use either a specific tomato fertilizer or use fertilizers that are low in nitrogen, but high in superphosphate.

Although all of these solutions will help in some way to reduce the incidence of Blossom End Rot in tomato plants it is always best to try and avoid the conditions that promote it in the first place. By using good plant husbandry as outlined above you will hopefully never have a incidence to worry about controlling.

Main image credit - A13ean https://creativecommons.org/licenses/by-sa/3.0/deed.en

For related articles click onto the following links:
BLIGHT RESISTANT TOMATO SEEDS - Tomato 'Ferline'
BLIGHT RESISTANT TOMATO VARIETIES
HOW TO CONTROL BLACKFLY ON TOMATO PLANTS
HOW TO CONTROL GREENHOUSE WHITEFLY ON TOMATO PLANTS
HOW TO CONTROL MOSAIC VIRUS ON TOMATOES
HOW TO CONTROL RED SPIDER MITE ON TOMATO PLANTS
How to Grow Giant Tomatoes
RHS: BLOSSOM END ROT
WHAT IS TOMATO BLIGHT?

HOW TO GROW ASPARAGUS FROM SEED

How to grow Asparagus from seed

When buying asparagus plants for a newly created asparagus bed, most plant retailers will only offer a small range of one or two year old plants. Although they will always look healthy in the pots, there is always a risk of failure when it comes to transplanting - around 10%-15% for one year old stock and as high as 20% for 2 year old stock. When paying full retail prices - particularly with regards to 2 year old stock - this can end up being an expensive lesson.

How to grow Asparagus from seed
Growing asparagus from seed - either in pots or directly into the beds - gives the best viability, with a survival rate of around 100%.

In addition, with direct sowing there is no transplanting or root shock to delay valuable root development.

The best time to sow asparagus seeds is around mid-April when the ground is warm enough to initiate germination. A good tip is to soak the seeds in water for a couple of hours before planting.

You will find that this will help to speed up the germination process considerably.

Direct sowing

Once the bed has been prepared raked over the top layer into a fine tilth, then sow the seed into thin rows down to a depth of about 2 inches. Depending on how many plants you intend cropping each subsequent row should be between 12 and 18 inches apart. Water them in well if conditions are dry.

The new seedlings should emerge in about 3 weeks, and as soon as they are large enough they can be thinned out to about 2in apart. Then, once the seedlings reach about 6 inches high, they can be thinned out again to around 18 inches apart. For the rest of the year you just need to keep the beds weeded and the plants well-watered.

If you have bought seed varieties that produce both male and female plants, you will need to remove any female forms as soon as they become identifiable - normally from their berries.

Main image credit - Ryan Freisling released this work into the public domain.
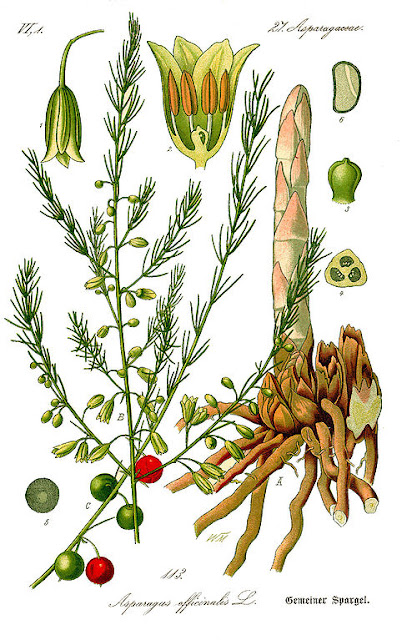
In text Image credit - Permission granted to use under GFDL by Kurt Stueber. This work is in the public domain in its country of origin and other countries and areas where the copyright term is the author's life plus 70 years or less.

For related articles click onto the following links:
ASPARAGUS SOUP
HOW TO GROW ASPARAGUS FROM SEED INDOORS
HOW TO GROW AVOCADO FROM SEED
HOW TO PREPARE AND MAKE AN ASPARAGUS BED
HOW TO GROW CELERY FROM SEED
HOW TO PLANT ASPARAGUS CROWNS
HOW TO PREPARE AND MAKE AN ASPARAGUS BED
ORGANIC CONTROL OF ASPARAGUS RUST
RHS Asparagus